
Greeting
– From the easital_tech With Love ❤
KidVerz – Baby Shop Kids Store Clothing & Accessories Shopify Theme – User Guide
KidVerz is an all-in-one Shopify Template with multiple layouts and styles that allow you to create different structures and satisfy any specific requirements for different kinds of kids shop or children’s stores.
With KidVerz Version 2.0, we focus on key factors to build your successful store and offer enhancements including amending KidVerz’s design to bring a smooth shopping experience.
Let’s discover tons of professional and creative design options as well as advanced features in our theme spotlight + full theme features below. Grab KidVerz now to quickly create a modern and professional e-commerce website store.
Full Theme Features in Kidverz
Below you can find our theme features from Kidverz 2.1.0 :
For Functionalities:
- Fully compatible with Shopify OS 2.0 (Sections on Every Page)
- SEO Friendly Optimized Code
- Wishlist Support
- Product Grid & List View
- Google Fonts Supported
- Powerful Built In Builder Module
- Beautiful Lookbook Module
- Customizable Animation Image With Text Slider
- Instagram Feed Module
- Category Wise Product Grid And Slider Module
- Parallax Effect Banner Section
- Easy Customizable Image, Product Carousel Slider
- Advance predictive search
- Collection Wise Tabs Module
- Column Or Masonry Gally Module
- Customer Review Grid And Slider Module
- Youtube, Mp4, Vimeo Supported Module
- 3 Style Featured Blog Module
- Product Quick View Featured
- Customizable Quick Cart
Install Theme
Refer to our video for full instruction
To install the theme:
- Please log in to your Shopify store, and click Online Store.
- At Theme Library, click Add a theme, and choose Upload zip file.
- The Upload Theme dialog displays. Click Add File or drop file to upload to select the .zip file you want to upload.
- Click Upload file.
- Wait until the uploading process finishes. Then click Publish button to activate the source to be live.

Install App
After successfully uploading and activating the theme, proceed to the installation and activation of several other free apps/plugins is required in the following steps .
- Step 01: Log in to the Shopify App Store.
- Step 02: Locate the desired app for installation and click on it.
- Step 03: On the app listing page, click Add app.
- Step 04: In your Shopify administrator account, authorize the usage of the app by clicking on the Install app.

info: Bellow these two apps are needed to install when you used this theme. We tested the below apps on the theme and they work well.
1. Product Reviews

Shopify Product reviews allow you to add a customer review feature to your products. This provides a way for your customers to engage with you, as well as each other to encourage sales.
To get the full specification of this App, Please hit the link bellow
https://apps.shopify.com/product-reviews
2. Shopify Search & Discovery
Shopify Search & Discovery app to get more control over how customers discover your products. Customize search, filtering, and product recommendations, so you can enhance your products’ relevance and sell more.
To get the full specification of this App, Please hit the link bellow
https://apps.shopify.com/search-and-discovery
How to insert Demo Data
Refer to our full video for instructions:
To set up the demo data for Kidverz Default Homepage Settings, please follow the below instructions:

To set up data for the Kidverz Default Homepage layout, please follow the below instructions:
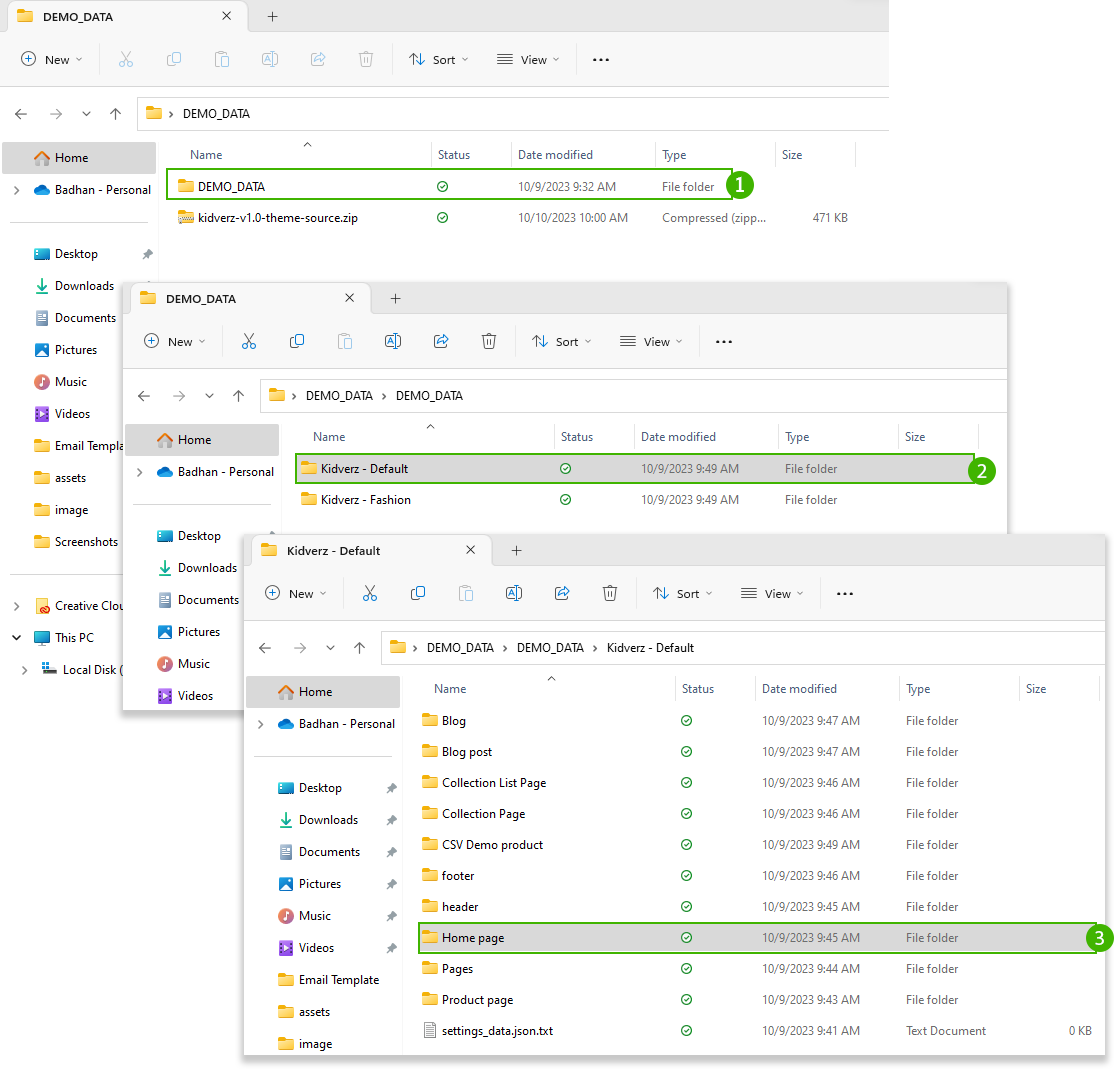
1: Insert Demo Data for Default Home Page Layout
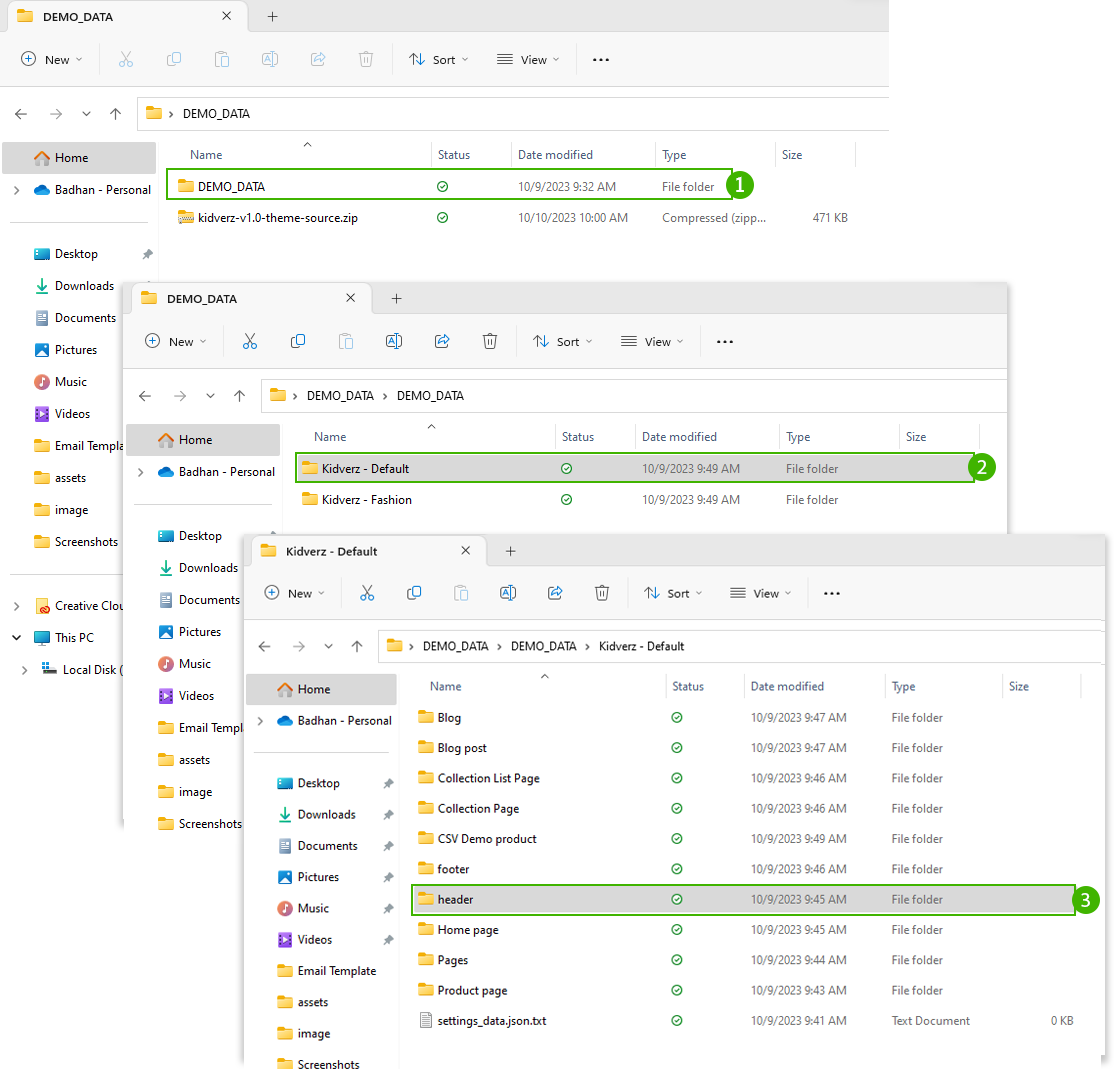
- Open the downloaded theme folder named kidverz-v2.0 main.
- In the DEMO_DATA folder you will find the folder named Kidverz – Default
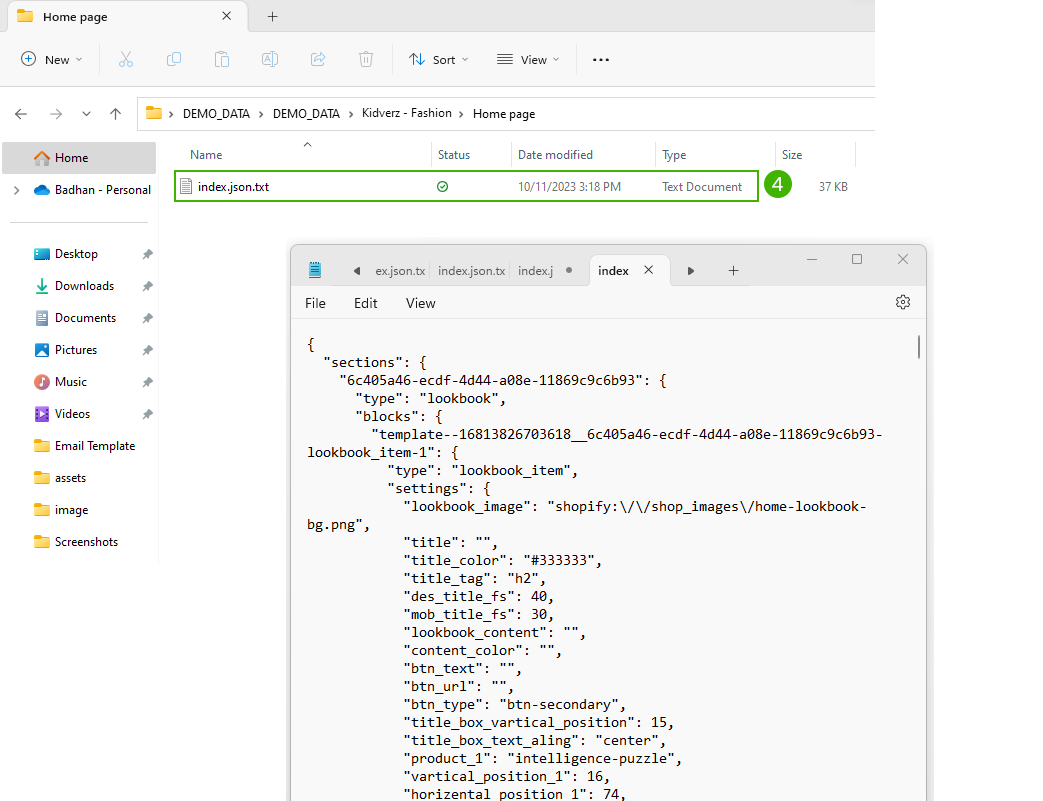
- In the Kidverz – Default folder, you will find the folder named Home page
- In the home page folder, you will find the file named index.json.txt
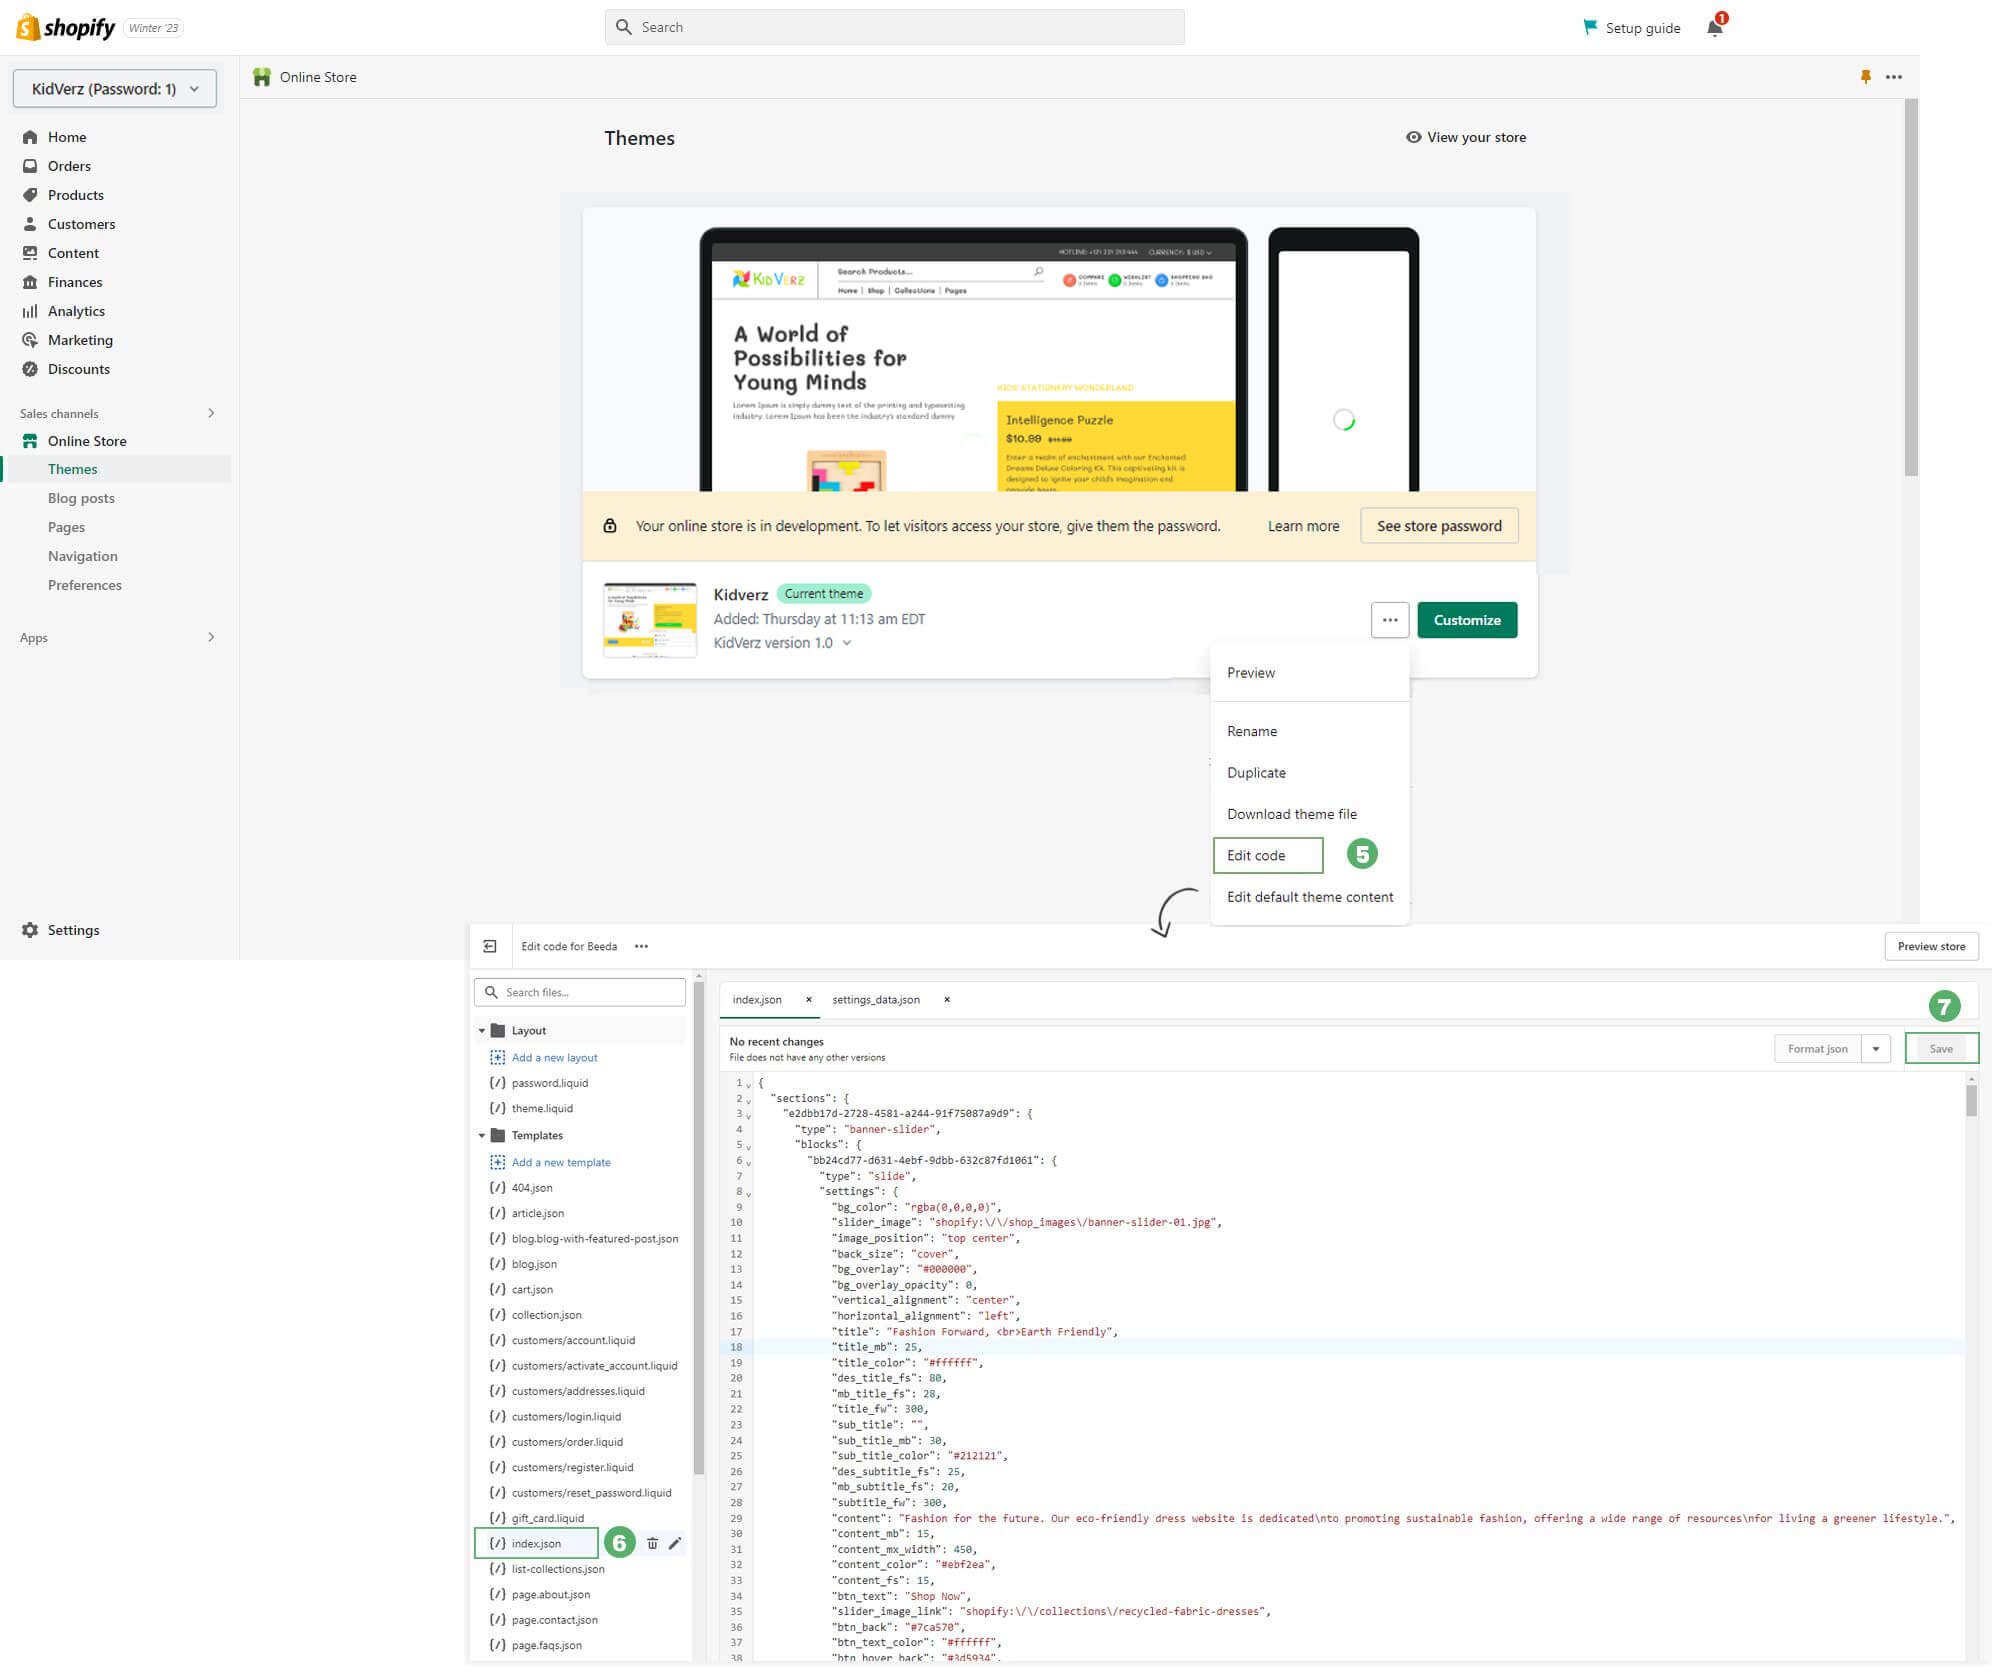
- Open the “index.json.txt” file in the text editor.
- SELECT ALL and COPY.
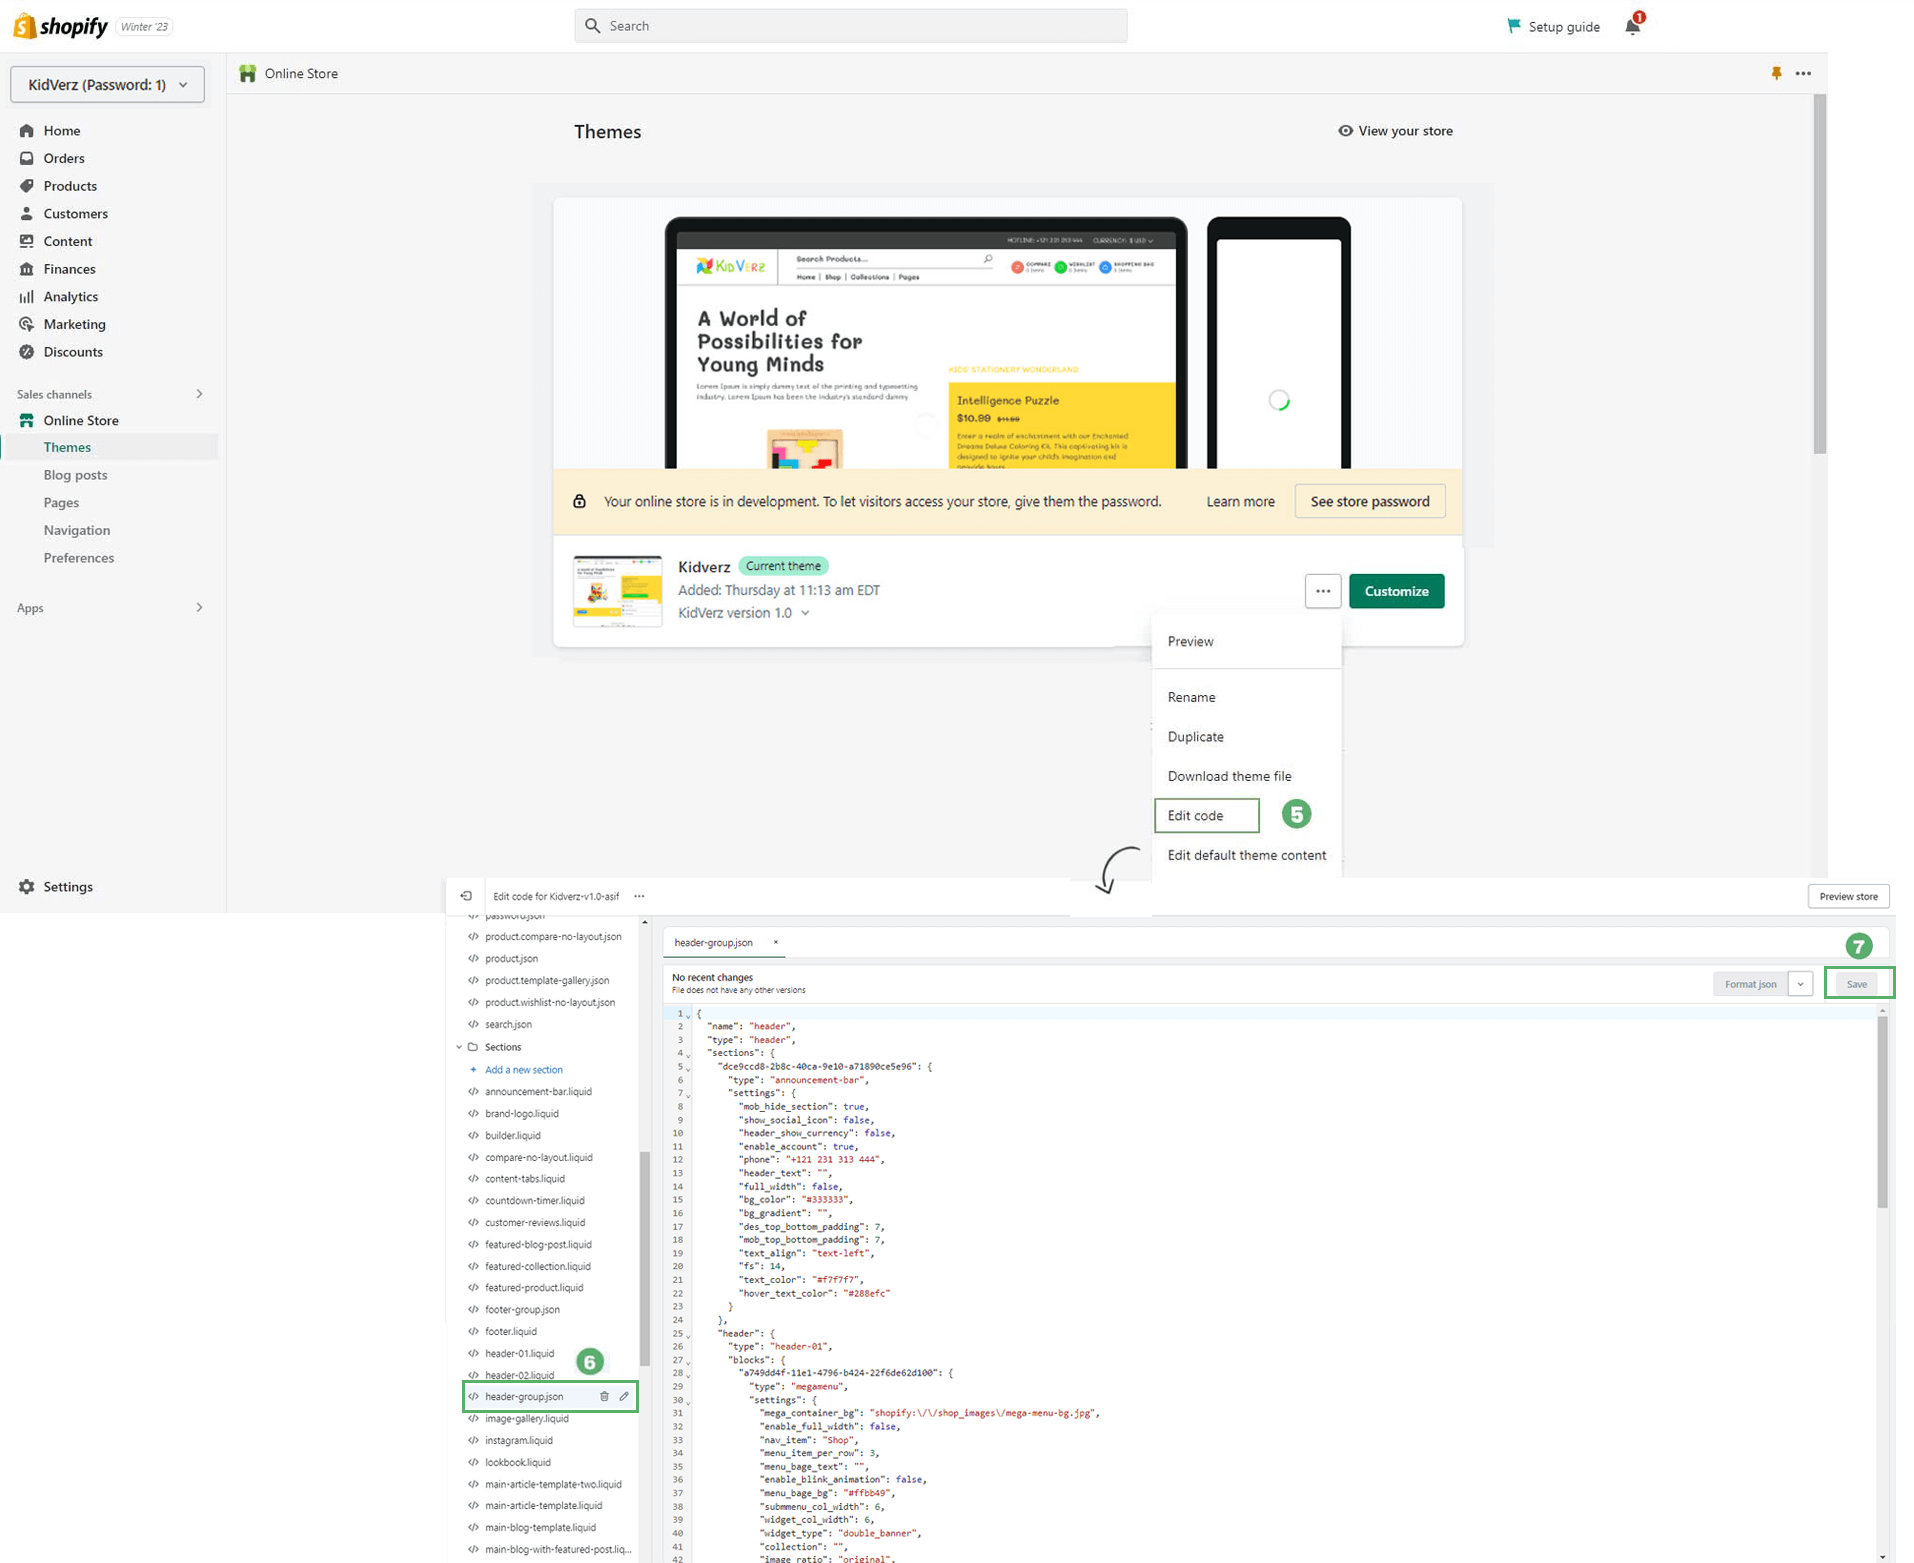
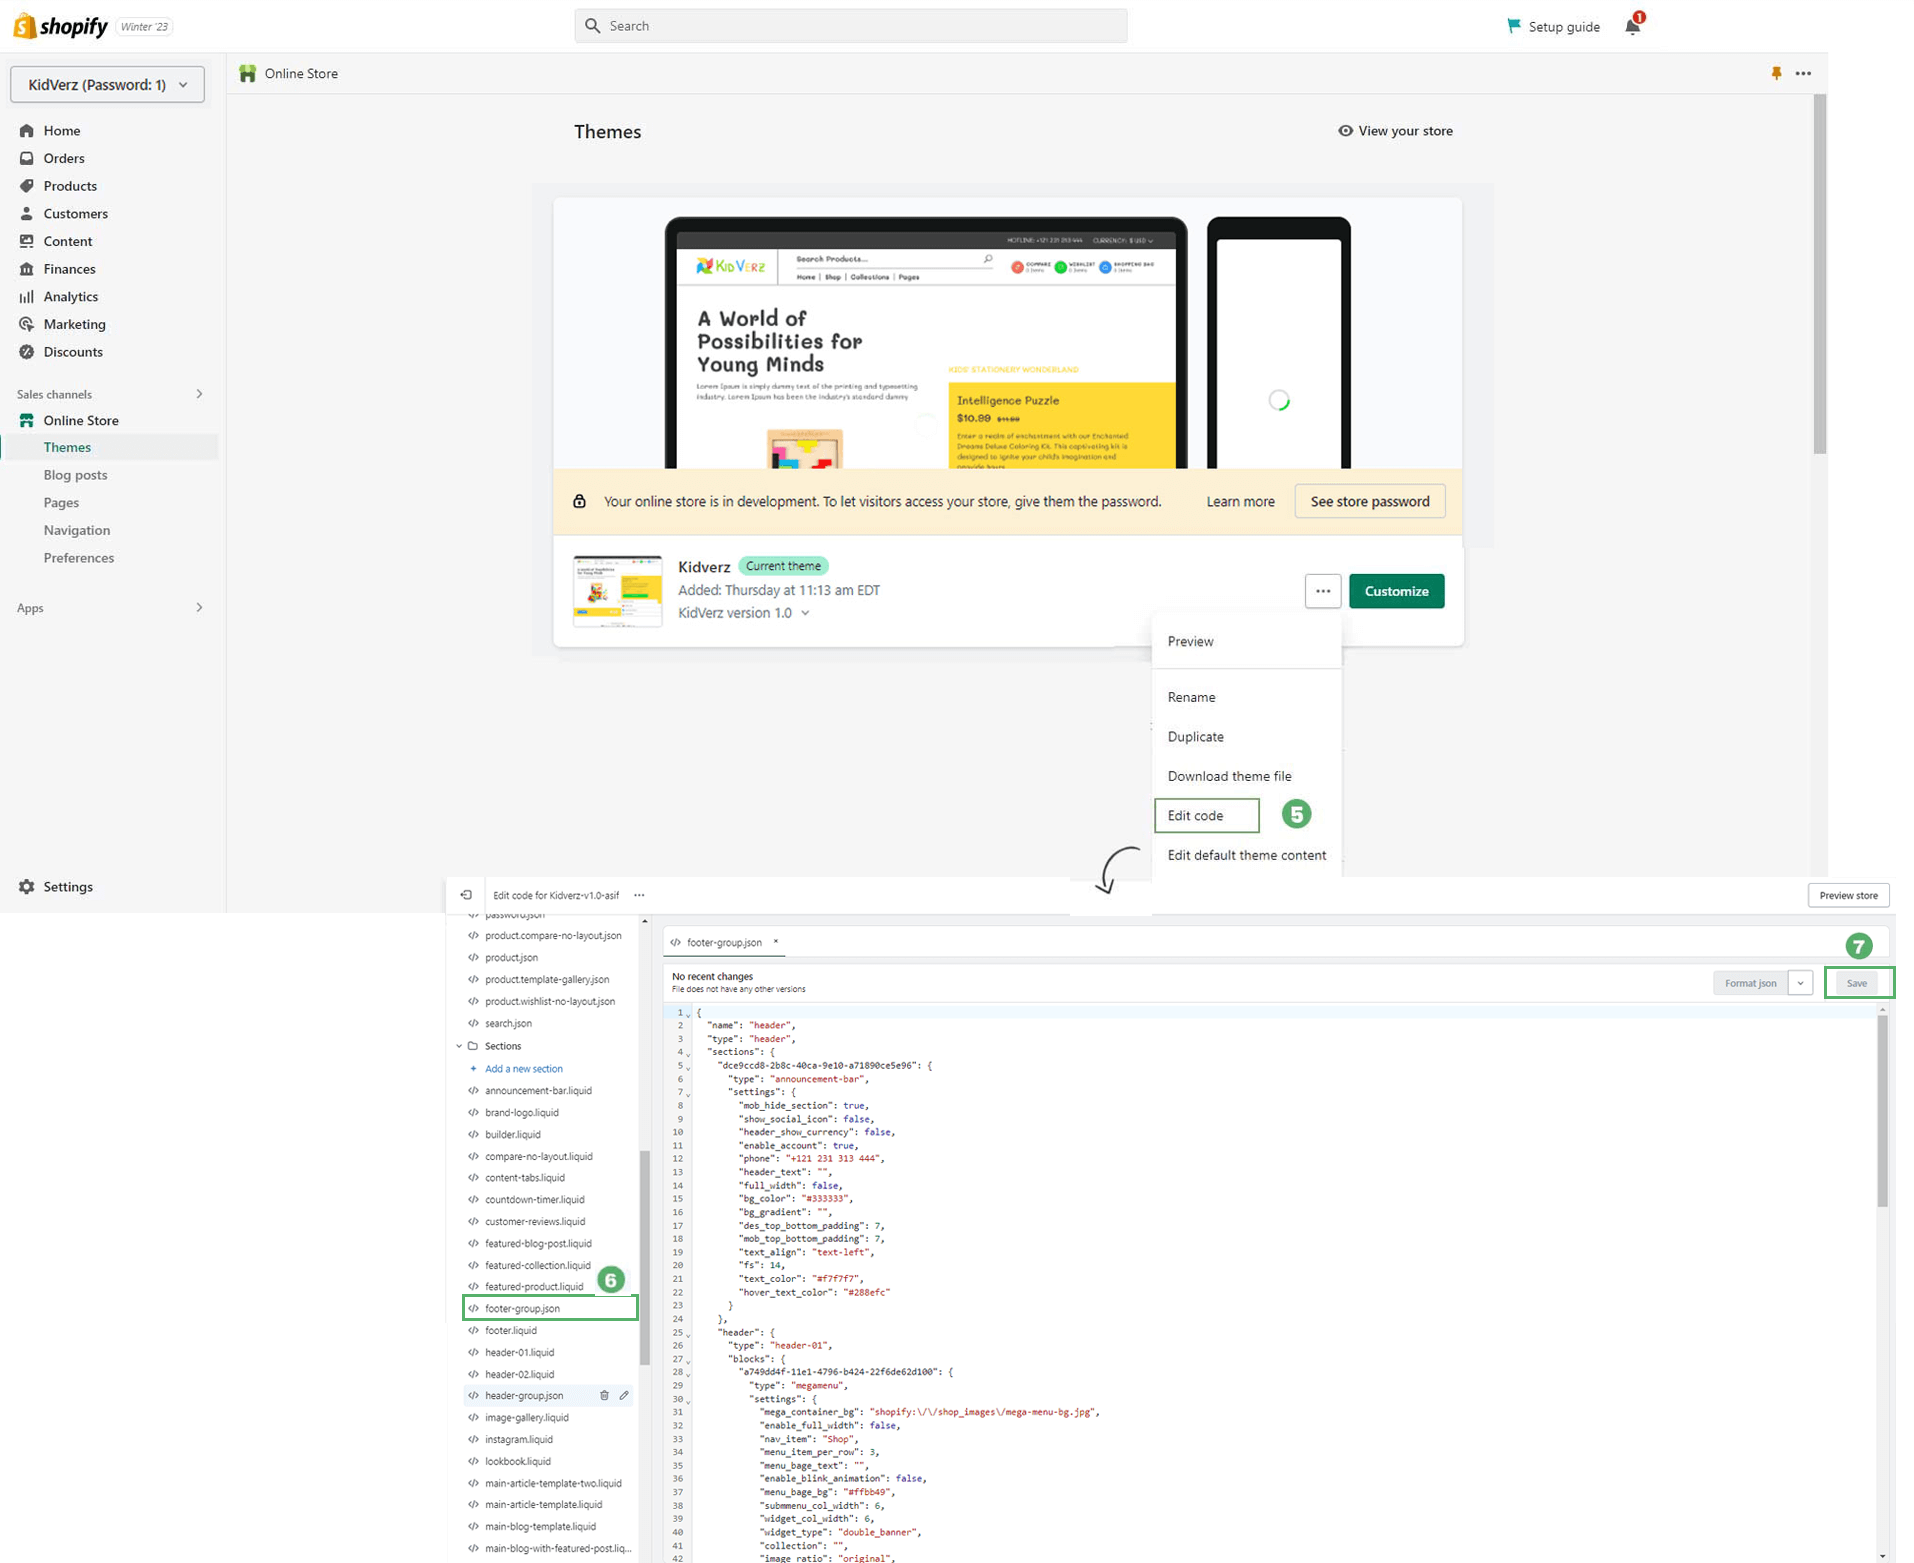
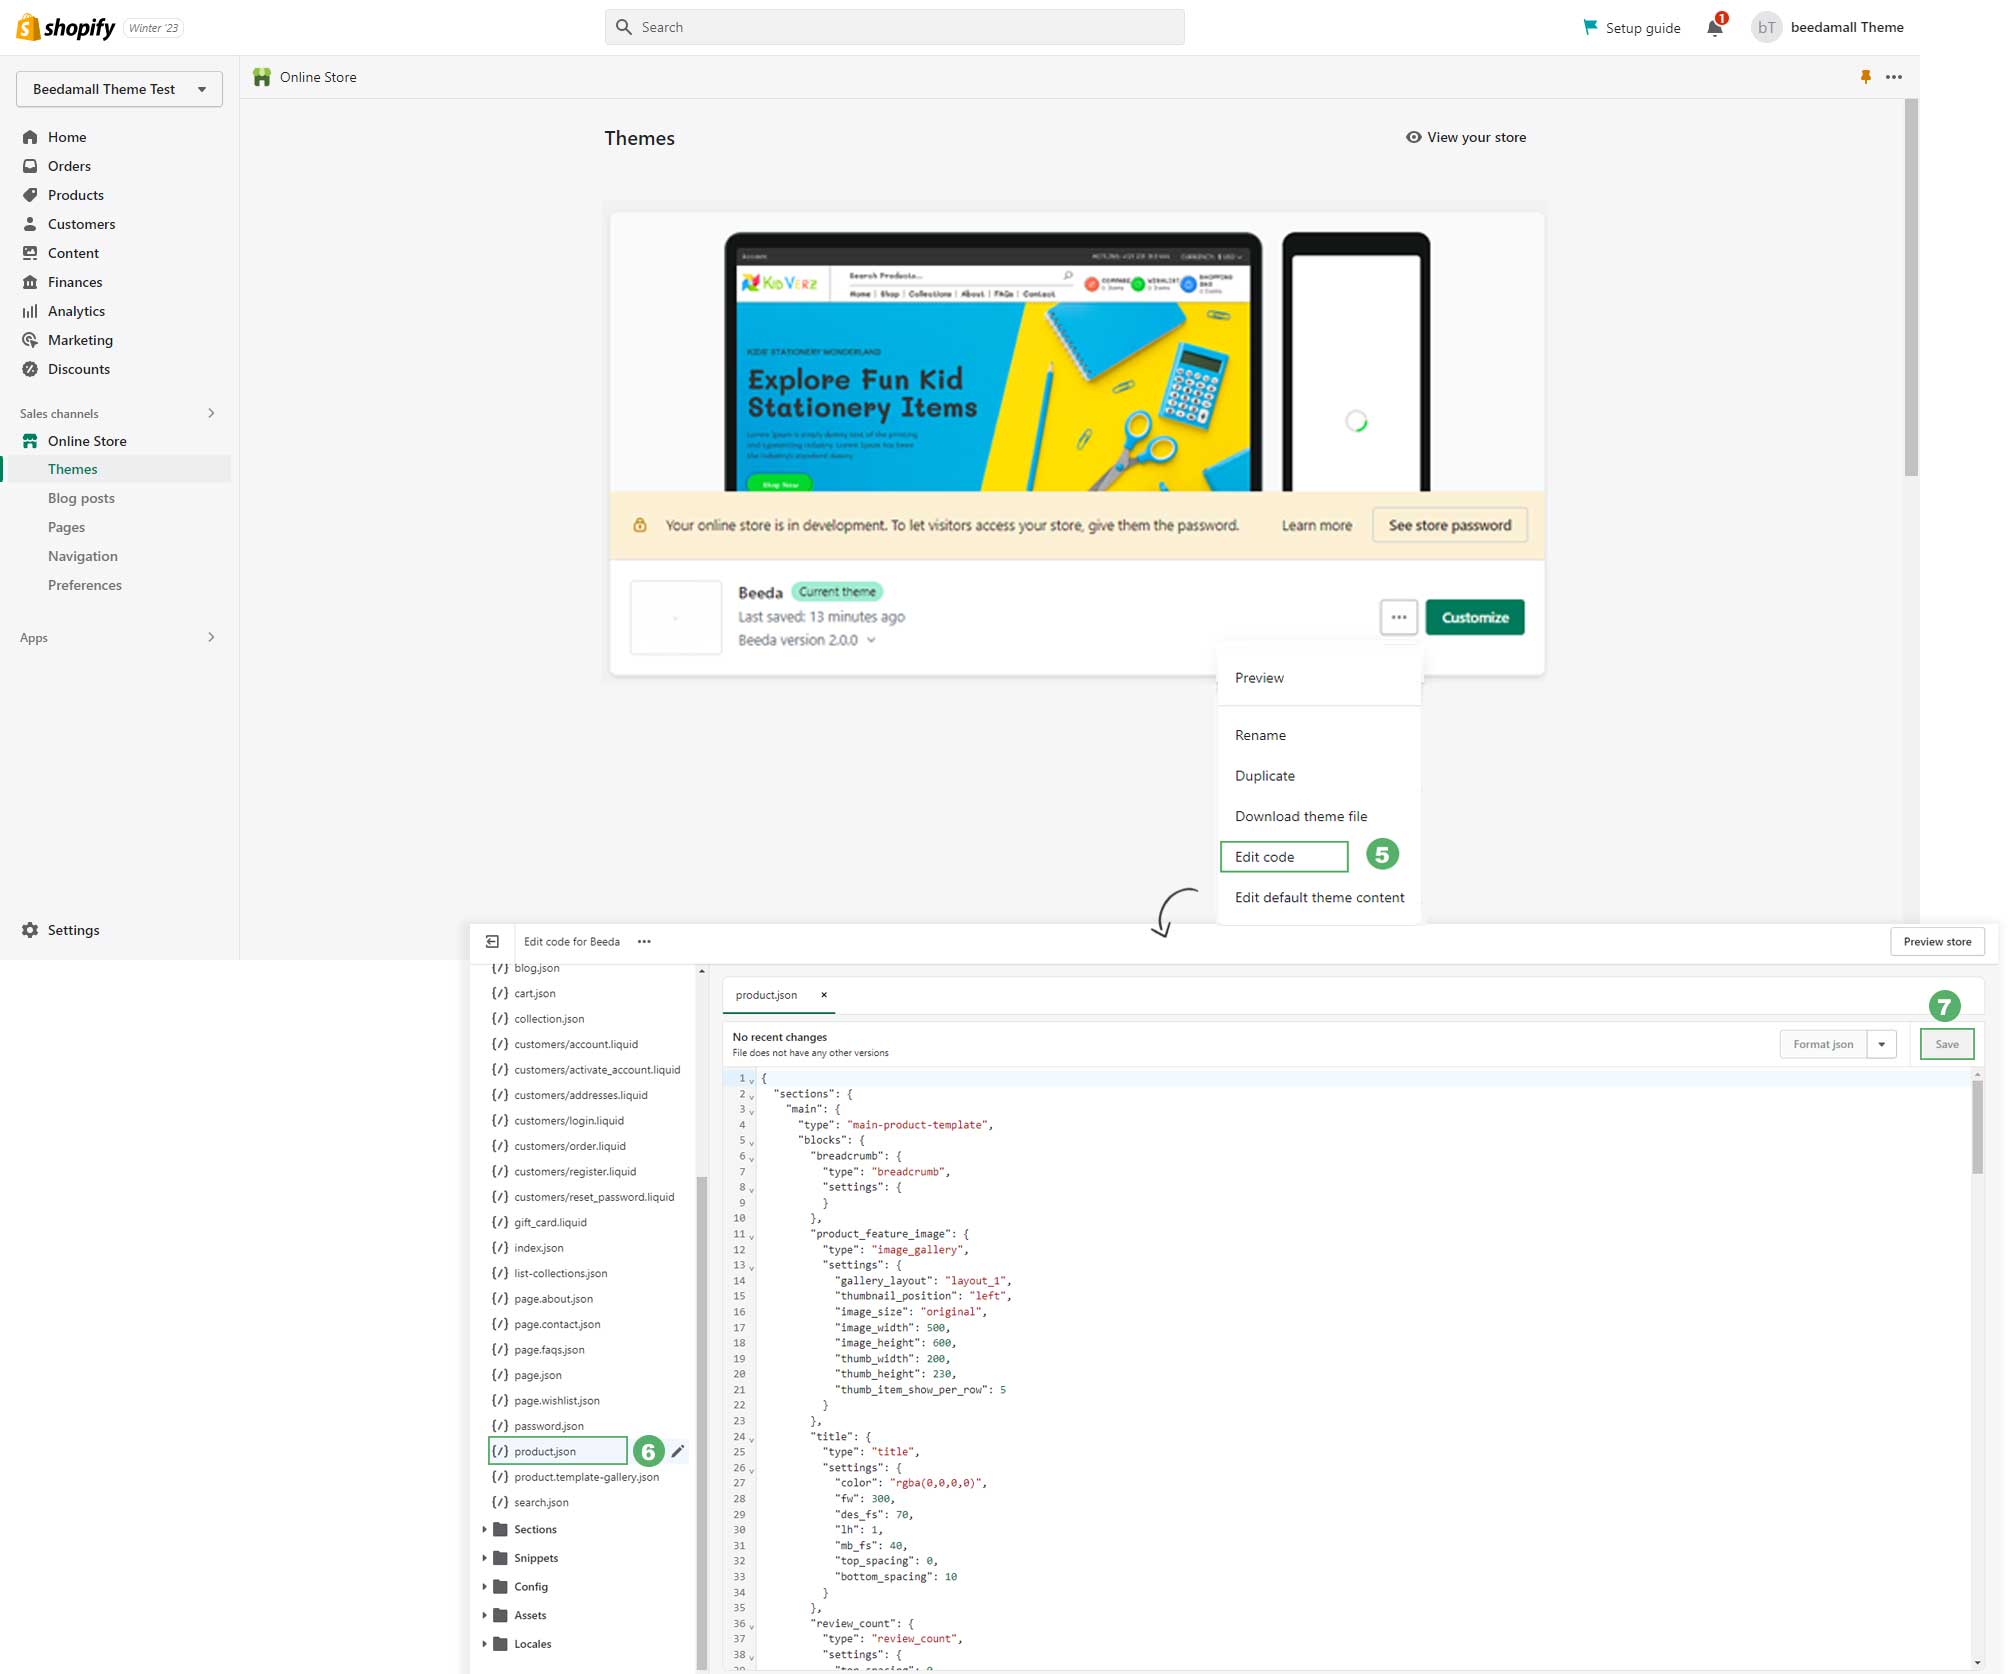
- From your Shopify admin, go to Online Store 🠚 Themes 🠚 More options.
- Select Edit code from the dropdown.
- Find folder named Templates Open the file named index.json SELECT ALL and DELETE then PASTE the copied preset from the external file.
Remember: You’ll get a pre-designed Homepage layout called index.json.txt
To set up the demo data for Kidverz Fashion Homepage Settings, please follow the below instructions:
To set up demo data for the Kidverz Fashion Homepage layout, please follow the below instructions:
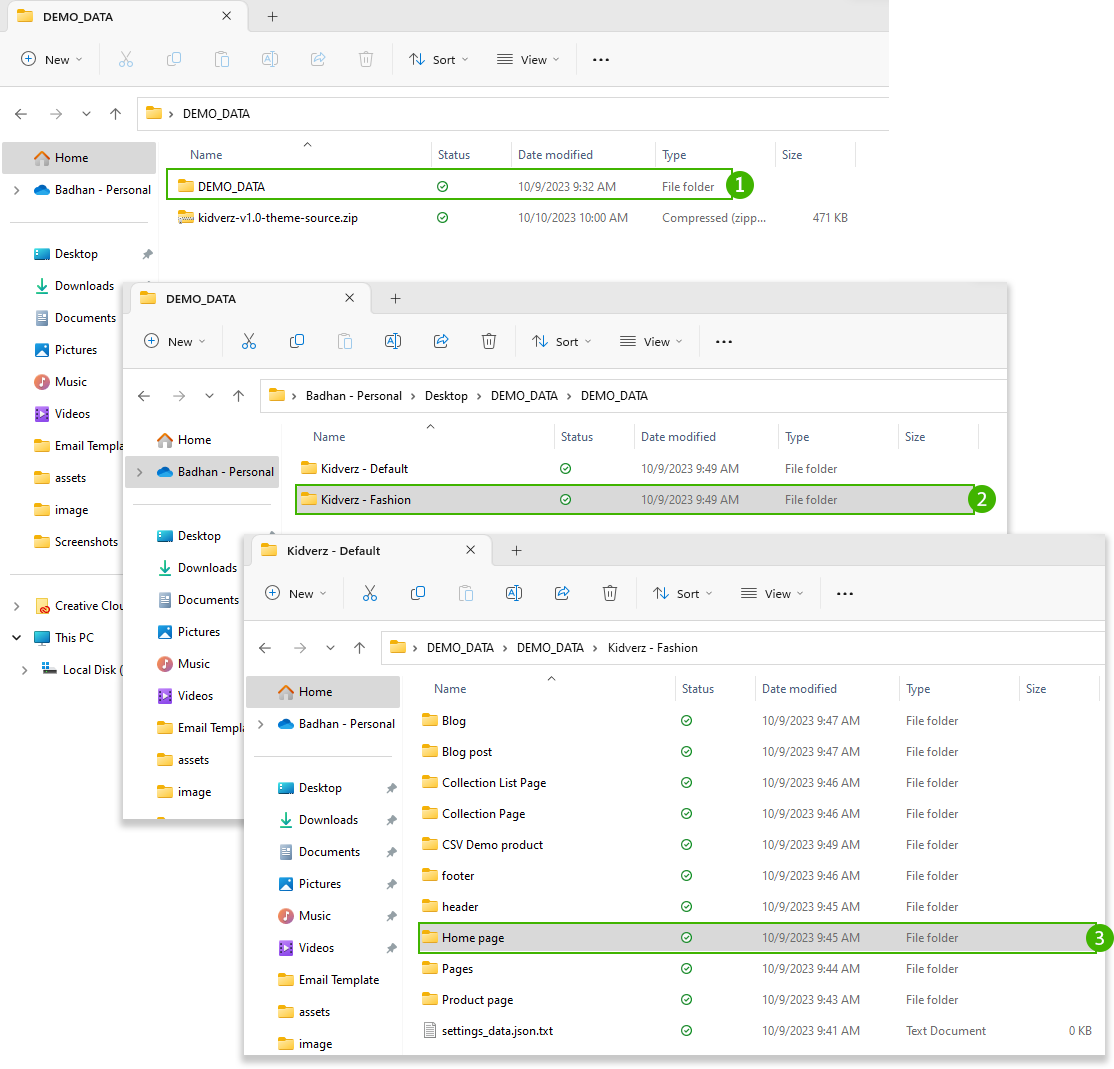
2: Insert Demo Data for Fashion Home Page Layout
- Open the downloaded theme folder named kidverz-v2.0 main
- In the DEMO_DATA folder you will find the folder named Kidverz – Fashion
- In the Kidverz – Fashion folder, you will find the folder named Home page
- In the home page folder, you will find the file named index.json.txt
- Open the “index.json.txt” file in the text editor.
- SELECT ALL and COPY.
- From your Shopify admin, go to Online Store 🠚 Themes 🠚 More options.
- Select Edit code from the dropdown.
- Find folder named Templates Open the file named index.json SELECT ALL and DELETE then PASTE the copied preset from the external file.
Remember: You’ll get a pre-designed Homepage layout called index.json.txt
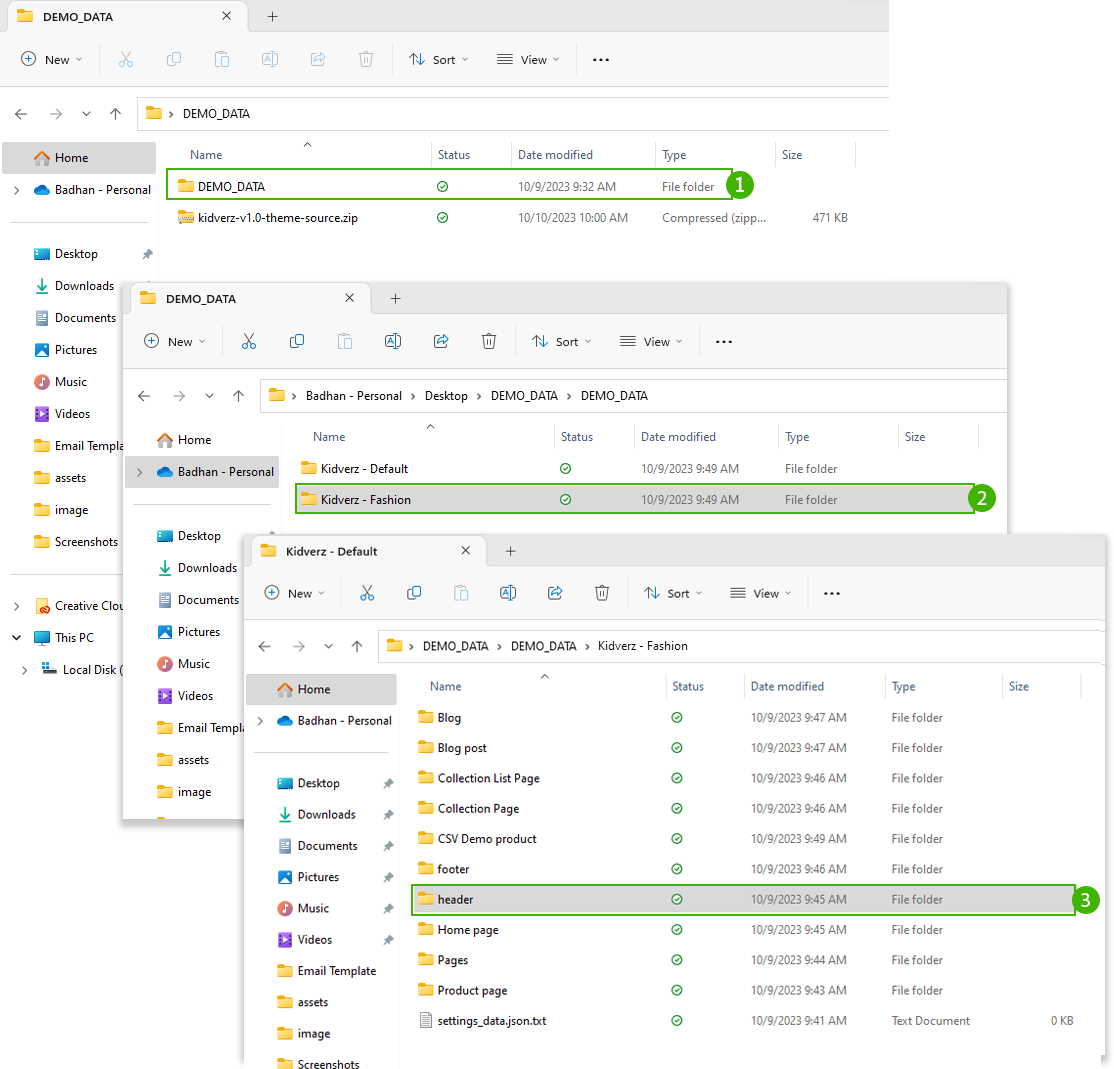
3: Insert Demo Data for Default Header Layout
To set up data for the Default Header layout, please follow the below instructions:
- Open the downloaded Theme folder named kidverz-v2.0 main
- In the DEMO_DATA folder you will find the folder named Kidverz – Default
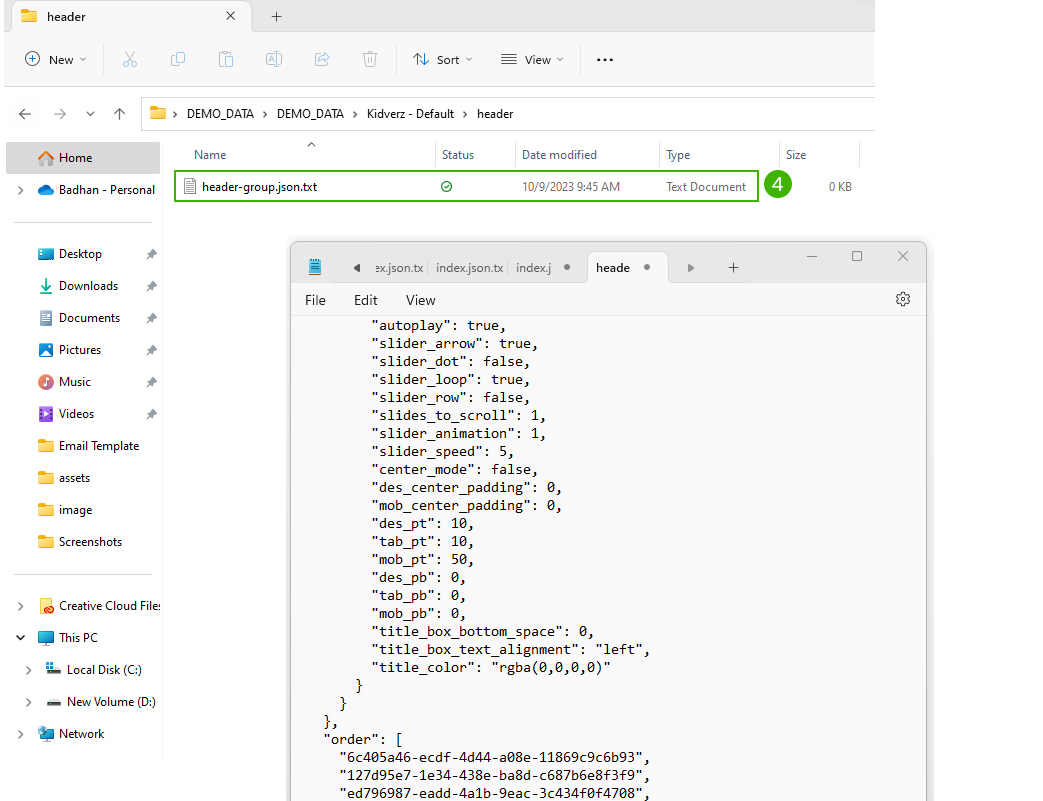
- In the Kidverz – Default folder you will find the folder named Header
- In the header folder, you will find the file named header-group.json.txt
- Open the header-group.json.txt file in the text editor.
- SELECT ALL and COPY.
- From your Shopify admin, go to Online Store 🠚 Themes 🠚 More options.
- Select Edit code from the dropdown.
- Find folder Sections Open file the file named header-group.json SELECT ALL and DELETE then PASTE the copied preset from the external file.
Remember: You’ll get a pre-designed Header layout called header-group.json.txt
4: Insert Demo Data for Fashion Header Layout
To set up data for the Fashion header layout, please follow the below instructions:
- Open the downloaded Theme folder named kidverz-v2.0 main
- In the DEMO_DATA folder you will find the folder named Kidverz – Fashion
- In the Kidverz – Fashion folder you will find the folder named Header
- In the header folder, you will find the file named header-group.json.txt
- Open the header-group.json.txt file in the text editor.
- SELECT ALL and COPY.
- From your Shopify admin, go to Online Store 🠚 Themes 🠚 More options.
- Select Edit code from the dropdown.
- Find folder Sections Open file the file named header-group.json SELECT ALL and DELETE then PASTE the copied preset from the external file.
Remember: You’ll get a pre-designed Header layout called header-group.json.txt

5: Insert Demo Data for Default Footer Layout
To set up data for the Default footer layout, please follow the below instructions:
- Open the downloaded Theme folder named kidverz-v2.0 main
- In the DEMO_DATA folder you will find the folder named Kidverz – Default
- In the Kidverz – Default folder you will find the folder named Footer
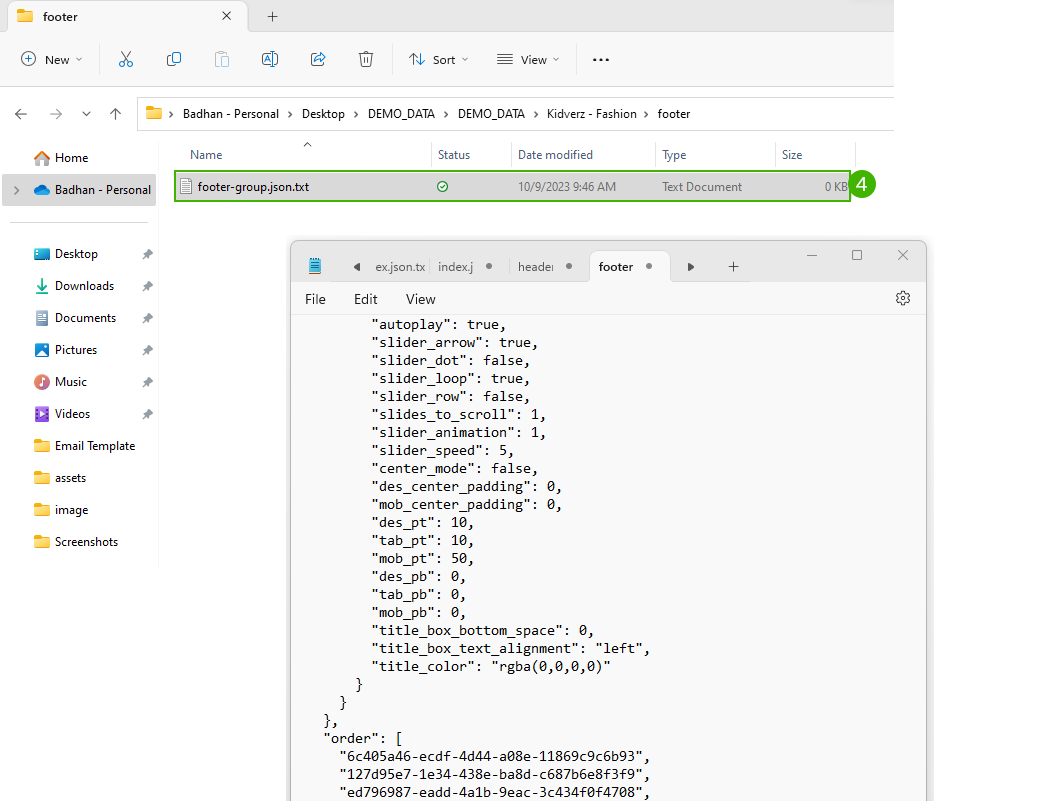
- In the footer folder, you will find the file named footer-group.json.txt
- Open the footer-group.txt file in the text editor.
- SELECT ALL and COPY.
- From your Shopify admin, go to Online Store 🠚 Themes 🠚 More options.
- Select Edit code from the dropdown.
- Find folder Sections Open file the file named footer-group.json SELECT ALL and DELETE then PASTE the copied preset from the external file.
Remember: You’ll get a pre-designed Footer layout called footer-group.json.txt


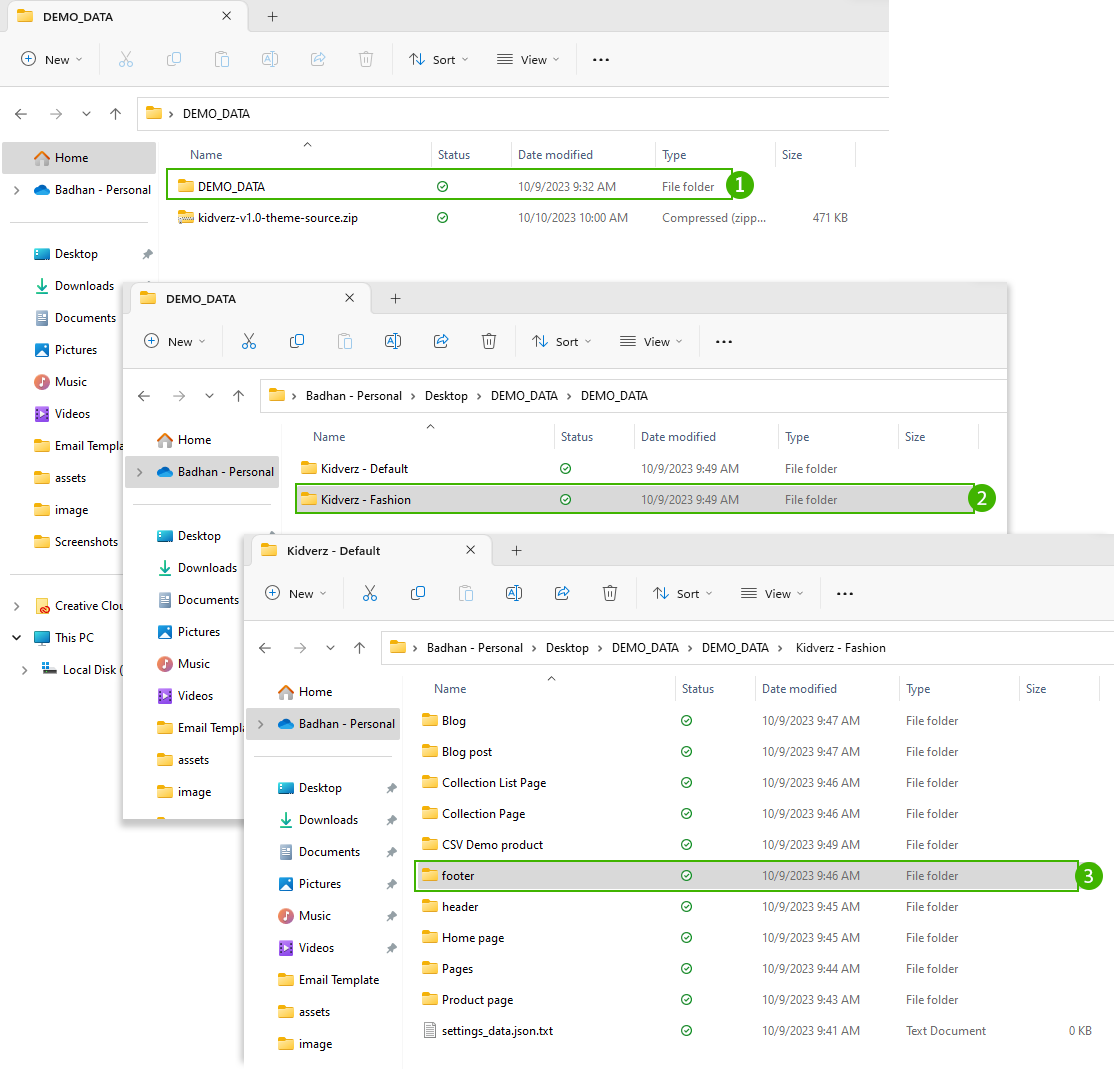
6: Insert Demo Data for Fashion Footer Layout
To set up data for the Fashion footer, please follow the below instructions:
- Open the downloaded Theme folder named kidverz-v2.0 main
- In the DEMO_DATA folder you will find the folder named Kidverz – Fashion
- In the Kidverz – Default folder you will find the folder named Footer
- In the footer folder, you will find the file named footer-group.json.txt
- Open the footer-group.txt file in the text editor.
- SELECT ALL and COPY.
- From your Shopify admin, go to Online Store 🠚 Themes 🠚 More options.
- Select Edit code from the dropdown.
- Find folder Sections Open file footer-group.json SELECT ALL and DELETE then PASTE the copied preset from the external file.
Please findout the below data table:
| Page Name | JSON Template | Demo Data (JSON with .txt format) |
|---|---|---|
| Default Homepage | index.json | index.json.txt |
| Fashion Homepage | index.json | index.json.txt |
| Default Header | header-group.json | header-group.json.txt |
| Fashion Header | header-group.json | header-group.json.txt |
| Default Footer | footer-group.json | header-group.json.txt |
| Fashion Footer | footer-group.json | header-group.json.txt |
container
If your customers create an account with your store, then they can add their address information to their account so that it auto-fills during checkout. They can also view their order history with your store, and see the current order status for any purchases they make.
- Customers need to go to the Registration page https://librarykit.myshopify.com/account/register/
- After submitting all the information customer can easily create a customer Account.
Shopify provides a number of options for enabling customer accounts and you can find out. More about this in their help article. See Shopify Customer Accounts guide here for more details. About enabling this setting in your store.
Add language for your theme
Selecting an appropriate language for your Shopify theme is crucial for effectively communicating with your target audience. It can help improve user experience, enhance customer engagement, and increase sales conversion rates.
Please follow the below steps to choose a language for your theme.
- Step 01: From your Shopify admin, go to Online Store > Themes > Settings
- Step 02: Store languages > Add language
- Step 03: Language: Choose a language.
- Step 04: ClickSave

Using the language editor, enter translations for your theme text. Your changes are saved automatically.
Changing your store currency
The currency used in your Shopify admin, which is also the currency you set your product prices in and is utilized in your reports, is known as your store currency. However, modifying your store currency could have an impact on your reports.
When you modify your store currency, it not only alters the currency used for pricing and reporting purposes, but also affects your primary market, which is determined by your store currency. To understand how your primary market could be impacted by a change in store currency, you may refer to additional resources.
To view or modify your store currency, you can navigate to the Store currency section within the Store details settings page.
Steps:
- Step 01: From your Shopify admin, go to Settings > Store details.
- Step 02: In the Store currency section, select your new store currency from the list.
- Step 03: Click Save.

Payment Configuration
Understanding the payment process is an important step toward getting paid by your customers. When a customer checks out, they can choose to pay for their order using any of the methods that you’ve enabled in the Payment providers area of your Shopify admin. You can enable a variety of payment methods using Shopify.
There are a few different things to consider when you’re choosing which payment methods to offer. If you want to let your customers pay using a credit card, then you can use Shopify Payments or a third-party provider.
There are also several ways for customers to pay online without using a credit card, like PayPal, Meta Pay, Amazon Pay, and Apple Pay. You might also want to accept additional methods of payment like cryptocurrency.
Steps:
- Step 01 Go to Store Admin > Settings > Payment.
- Step 02 In the Additional payment methods Add Payment methods
- Step 03 Search by Payment Methods
- Step 04 Active your desired payment Method

If you sell subscription products, then you need to use Shopify Payments as your primary payment gateway. To learn more about subscriptions, refer to Subscriptions.
General
- From your Shopify admin, go to Online Store > Themes.
- Find the theme that you want to edit, and then click Customize.
- Click Theme Settings > General.
1. Container

Container: You can modify the width container. You can customize the width by px, %, em, rem.
You can enable or disable the Back to Top Button and Preloader.
2. Favicon
You can use a free favicon generator website to create a custom favicon, or you can create your own. To find a favicon generator, search the internet for free favicon generators.
The ideal size for a favicon is either 16×16 pixels or 32×32 pixels. If your favicon file is too large, then it will be reduced to 32×32 pixels when you upload it to Shopify.
- In the Favicon area, click Select image.
- Add alt text to your favicon image.
- Click Save.
Typography
Typography is an essential design element that can greatly impact the look and feel of a website or any type of content. It refers to the style, arrangement, and appearance of text, including factors such as font, size, line spacing, and color.
- From your Shopify admin, go to Online Store Themes.
- Find the theme that you want to edit, and then click Customize.
- Click Theme Settings Typography.
- You can customize it in the global font setting like – Custom google font, font size, font weight, and font line height.
- you can control the body text font family, Heading font family, Heading Letter Spacing, Heading Text Transform, and Menu Font Family.
How to setup Google Font?
Thousands of open-source, fonts are free to access through Google Fonts.
- Search google fonts.
- Copy name of font which you choose.
- Paste text which you have copied to “Body Google Font” Textbox in Font Name Settings.
- You Can controll the body font size, Font weight , Line Height .
If need to Load more font weight you can put font weight like this: 200, 300, 400, 500, 600, 700, 800 .

- You customize the Heading font from (Heading 1 to Heading 6) by addinng font name, font-size, font-weight, Letter-spacing.
- Our Top Feature is you can controll the Heading size in Desktop and Mobile version just input the font size (ex. 60px) in a px.
- You can also customize the Product Card, product Price Title font-size, font-weight.
- Collection and Article card Title is also customizable.

Font And Text Typography Settings
| Select Font Type | Select which font family to apply on the heading and titles. |
| Font Size | Set the font size to apply on the heading, and titles ranging from 10px to 100px. |
| Font Weight | Set the font weight to apply to the heading and titles. |
| Font Style | Turn the heading, and titles to be either normal, capitalize, uppercase, or lowercase. |
| Text Transform | Set the font style on the heading, and titles to be either normal, italic, or oblique. |
| Line Height | Set the line height to apply to the heading and titles. |
| Letter Spacing | Set the spacing between letters to apply to headings and titles. |
| Border Height | Set the height of the border ( underline ) of the heading, and titles. |
Colors
Here you can change color for many elements of the theme:
- From your Shopify admin, go to Online Store > Themes.
- Find the theme that you want to edit, and then click Customize.
- Click Theme settings > Colors.
- Click Save

Product Item Card
You can also customize the product card content background, Crad tittle color, Item price color

Checkout
A Checkout allows customers to set Custom Banners, Background images,s and colors
- From your Shopify admin, go to Online Store > Themes.
- Find the theme that you want to edit, and then click Customize.
- Click Theme settings > Checkout.
- You can set the custom banner image, logo, position and background color.
- Click Save
Beedamall allows customers to design the Checkout page.

Shipping Rates Calculator
Shipping Rate Calculate shows a progress bar with a message when customers put more items in their shopping carts.
- From your Shopify admin, go to Online Store > Themes.
- Find the theme that you want to edit, and then click Customize.
- Click Theme settings > Shipping Rate Calculator.

Collection Filter
A “Collection Filter” is a tool that helps customers refine their search for products on a Shopify store. It allows customers to filter products based on specific criteria, such as size, color, price, or collection.
- From your Shopify admin, go to Online Store 🠚 Themes.
- Find the theme that you want to edit, and then click Customize.
- Click Theme settings 🠚 Collection Filter.
- You can enable or disable the Counter in the collection Filter Theme setting
- You can also edit the title color.
- click Save

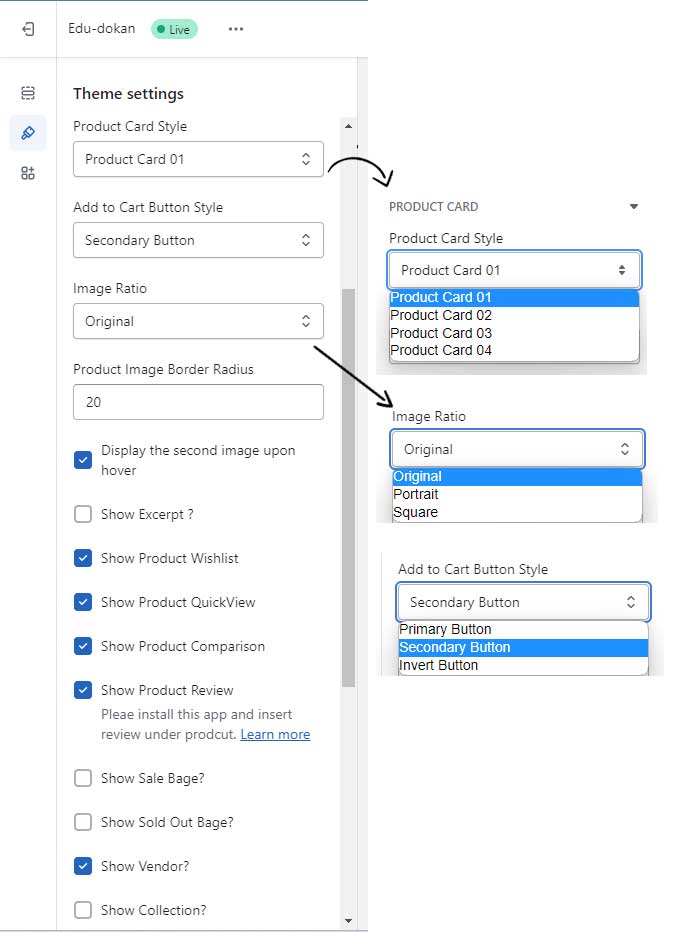
Product card

A product card is a graphical representation of a product that allows customers to quickly and easily see important information about the item, such as price, image, and product details. In a Shopify theme, a product card is an essential part of the design and can play a major role in the success of a store.
- From your Shopify admin, go to Online Store > Themes.
- Find the theme that you want to edit, and then click Customize.
- Click the Theme settings > Product Card.
- You can select four types of product cards that are earlier predesigned.
- You can select or deselect the cart button style, secondary image on hover, wishlist, quick view, product review, sale badge, sold out badge, vendor and collection.
- You can change the Add to Cart button style bt “Primary , Secondary and Invert Button“.
- Also you can set the image ration by orginal, portrait and square Ratio.
- Click Save

Breadcrumb
Breadcrumb is an important navigational tool that helps customers easily locate their current position within a website. Breadcrumbs are a set of links that appear at the top of a webpage, indicating the hierarchical path that the user has taken to arrive at their current location.

For example, if a customer is browsing a specific product category on an online store, the breadcrumb may appear as follows: Home > Products > Category Name. This lets the customer know that they are currently viewing products within a specific category and allows them to easily navigate back to previous pages or categories.
- From your Shopify admin, go to Online Store > Themes.
- Find the theme that you want to edit, and then click Customize.
- Click Theme settings > Breadcrumb.
- You can Enable and disable Breadcrumb, change the Breadcrumb Background color and also managing the breadcrumb spacing.
- Click Save

News Subscription
News Subscription helps store owners to stay in touch with their customers and keep them informed about new products, promotions, and updates. The news subscription can be customized to match the store’s branding and style, allowing it to seamlessly integrate into the website.
Here are the following steps for integrate the News subscription :
- From your Shopify admin, go to Online Store Themes.
- Find the theme that you want to edit, and then click Customize.
- Click Theme settings > News Subscription
- You can set the Subscription method by selecting Shopify (default) or Mailchimp.
- After that, you have to set the Mailchimp URL link.
- You are enable to setup the newsletter Popup system.
- Click Save

Blog

Shopify’s blog platform allows for easy management of blog posts, comments, and categories. Store owners can also customize the layout and design of their blog to match their store’s theme, ensuring a seamless user experience.
- From your Shopify admin, go to Online Store > Themes.
- Find the theme that you want to edit, and then click Customize.
- Click Theme settings > Blog
- You can change the Blog style by selecting the Article card style.
- You can enable or disable the Date , Author and comment sections.
- Click save

Sales Notification
Sales Notification is a powerful marketing tool that can help to create a sense of urgency and encourage customers to make a purchase. When other customers see that a product is selling quickly, they may be more likely to make a purchase to avoid missing out.
Here are the following steps for integrating the Sales Notification :
- From your Shopify admin, go to Online Store > Themes.
- Find the theme that you want to edit, and then click Customize.
- Click Theme settings > Sales Notification
- You can enable or disable the Sales Notification by marking the checkbox.
- You can customize the sales Notification by aligning the Sales notification, product settings, location, and time.
- Click Save

You can set at most 10 products in the sales notification setting.
Change Theme Style
Changing your theme’s style will affect both the settings and the look and feel of your store.
Remember: Some settings will be lost when you change your style, but you will not lose any content from your store
Collection & Search Filters

By using collection and search filters, customers can easily find the products they want, which can lead to increased sales and improved customer satisfaction.
To add collection and search filters to your Shopify theme, you will need to follow these steps:
- Login to your Shopify admin panel and navigate to the “Online Store” section.
- Click on the “Navigation” to access the collection & search filters option.
- Configure the filters by selecting the filter types you want to use, such as color, size, price, and brand.
- Customize the look and feel of the filters to match your store’s branding and design.
- Save the changes and preview your store to ensure that the filters are working correctly.
It’s important to note that not all themes support collection and search filters, so be sure to check the theme documentation or contact the theme developer for assistance if you are having trouble adding filters to your store.

Button Settings
Funvilla theme allows customers to customize the button background color, font size, border radius, border width, button spacing.
Here are the steps.
- From your Shopify admin, go to Online Store > Themes.
- Find the theme that you want to edit, and then click Customize.
- Click Theme settings > Button Settings.
- Click Save

Beeda theme allows you to set the Primary button style, Secondary button style and Invert button style as per the following image.

You can also select the Product Button Type by clicking the Primary Button , Secondary Button, or Invert Button.

Quick View
Funvilla theme allows customers to Quick view options by showing Vendor, SKU , Review , Availability , Product Type , and Description options.
Here are the steps.
- From your Shopify admin, go to Online Store > Themes.
- Find the theme that you want to edit, and then click Customize.
- Click Theme settings > Quick View Settings.
- You can enable or disable the selected filed which are showing in the quick view options.
- Click Save

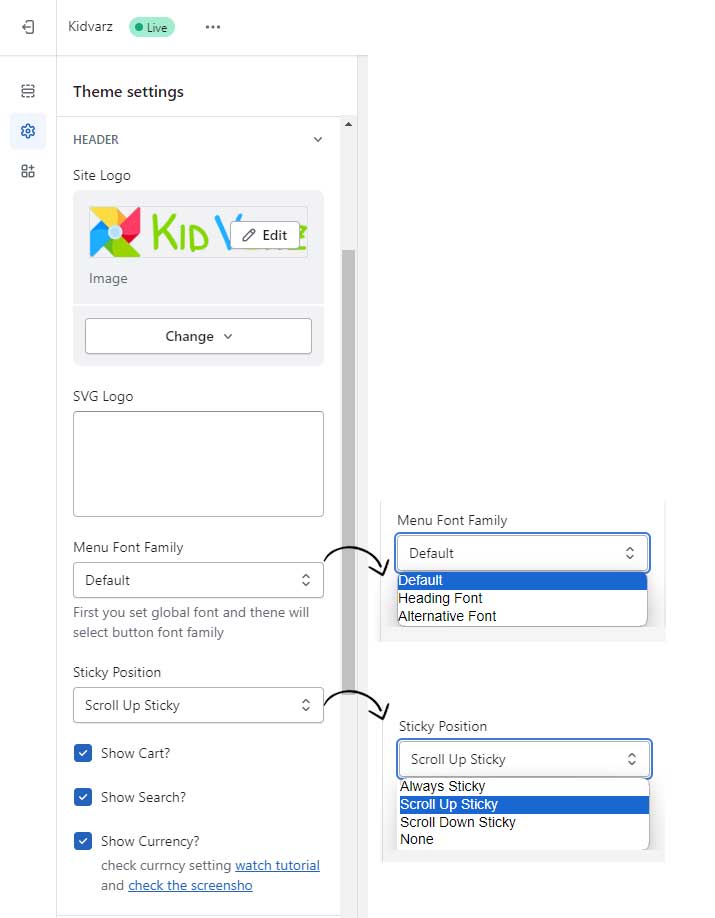
Header
The header is a crucial element of any Shopify theme as it provides the first impression to the website visitors. Shopify’s theme editor allows for customization of the header, including its size, color, font, and layout. By adjusting the header’s design, store owners can create a unique look and feel that matches their brand and attracts visitors to their website.
- From your Shopify admin, go to Online > Store Themes.
- Find the theme that you want to edit, and then click Customize.
- Click Theme Settings > Header.
- Kidverz allows you to set the SVG Logo options.
- You can the change the menu font-family by selecting the dropdown style.
- Kidverz is also allows you to set the Sticky position style as a Always sticky, Scrollup sticky, Scroll down sticky.
- You can enable or disable the Cart , Currency and Serach Options.
Bellow images are three premade style headers.


Kidverz theme editor allows for customization of the header, including its size, color, menu, font, and layout. A well-designed header can also improve the user experience by making it easy for visitors to find what they’re looking for and reducing the likelihood of them leaving the site.
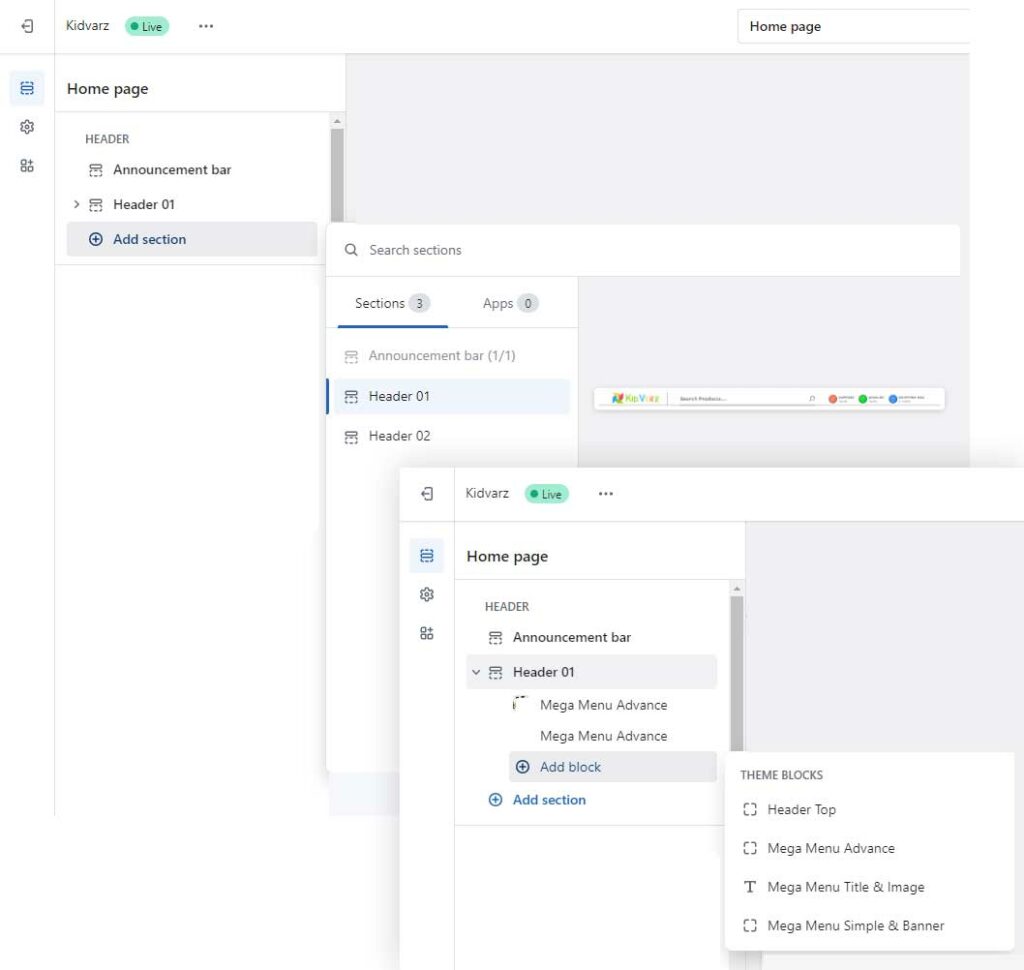
To set up the layout for the Header, please follow the below steps:
- From your Shopify admin, go to Online Store 🠚 Themes.
- Find the theme that you want to edit, and then click Customize.
- Click Sections 🠚 Header.
- You can add section with premade Header layout Header 01 & Header 02.
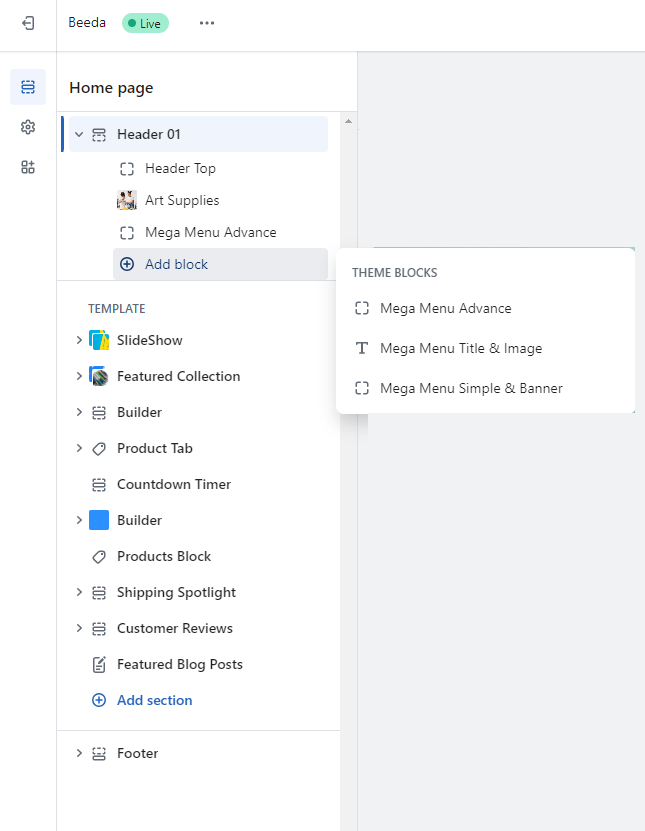
- In Header 01 or Header 02 you can add blocks like Megamenu Advance, Megamenu Title & Image, Megamenu Simple & Banner
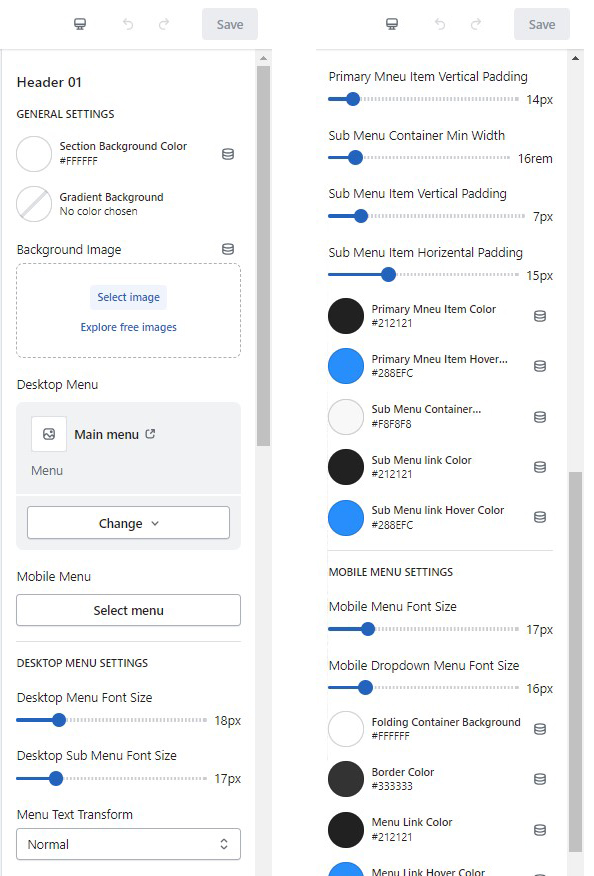
- In the header customization area, you set to change the background image, spacing, font settings, and color customization.
- you can also customize the Desktop and Mobile menu setting.
The first image is showing how you add the block in the header section
The Second image is showing the settings of how you customize your header.
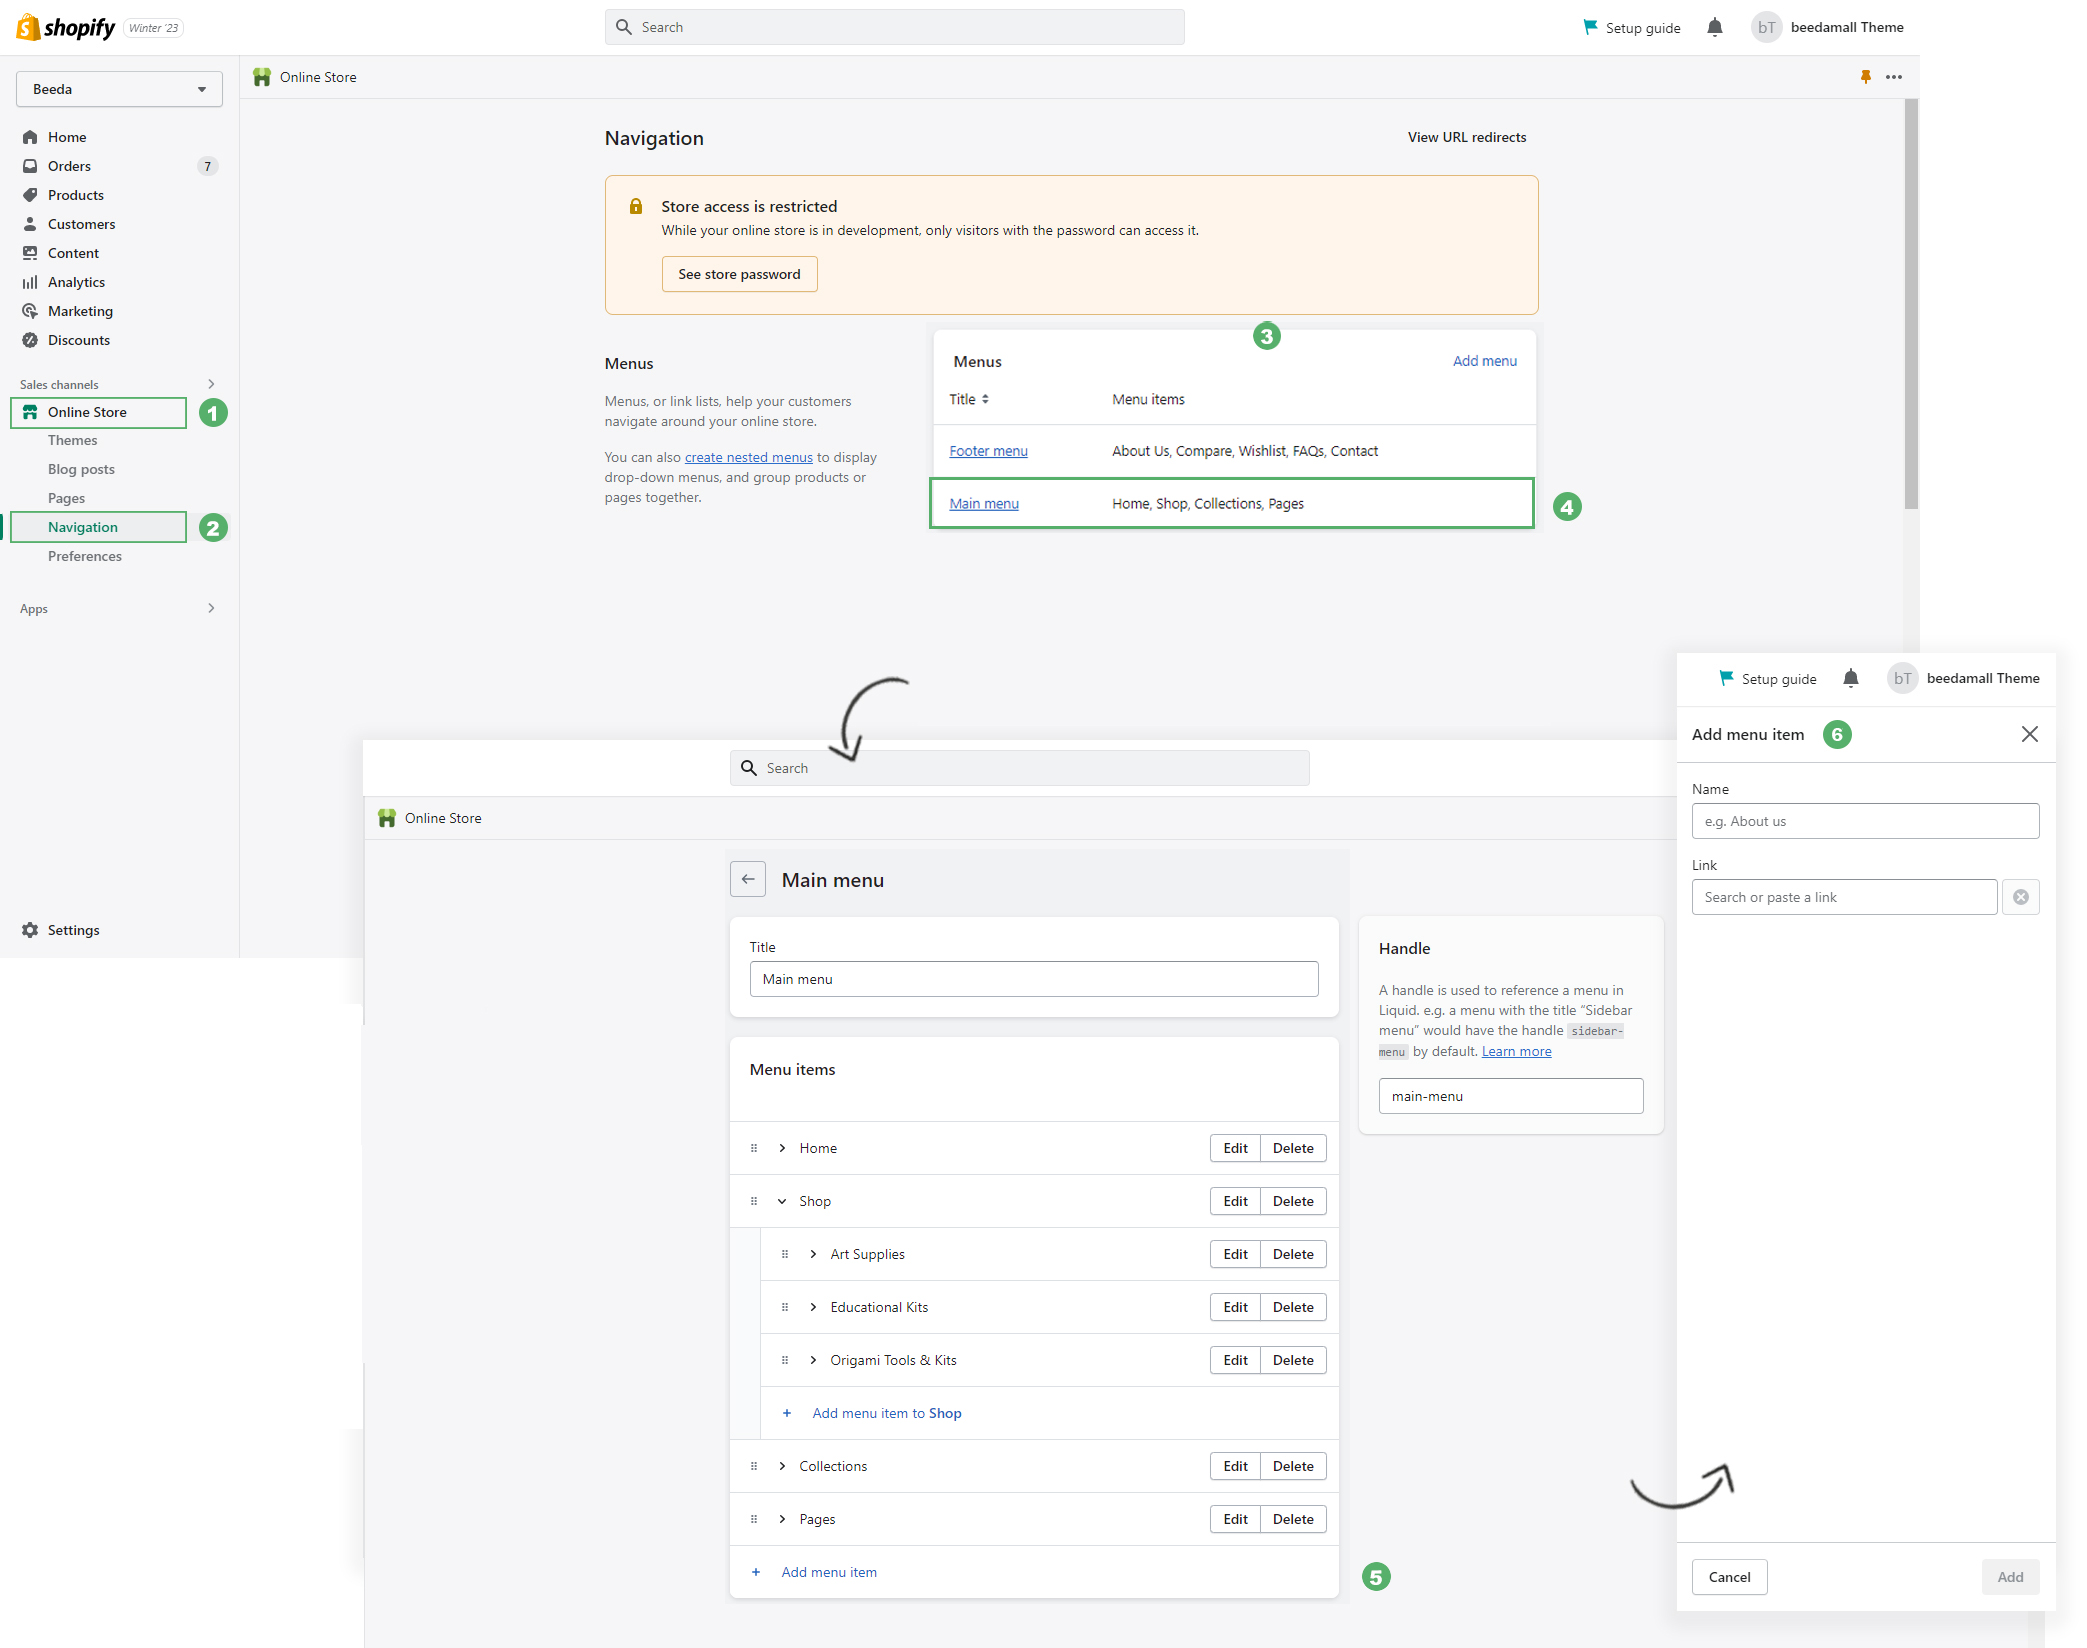
Menu Items
Beeda theme allows you to set up the menu on mobile and desktop separately.
To set up the mobile menu, please follow the instructions below:
- From your Shopify admin, go to Online Store ➝ Navigation.
- Click the title of your Main menu.
- Choose one of the menu items to be the header for your drop-down menu, or add a new menu item to be the header.
- Click the Add menu item.
- Click and drag the menu items to nest below the header menu item.
- Click the Save menu.

Note: Please fill out the Heading text box of the Mobile Menu. The heading for each mobile and menu section will be the same.
After adding the menu item, please reload Theme Editor View to see the change. You can check the change on actual devices like mobile or tablets.
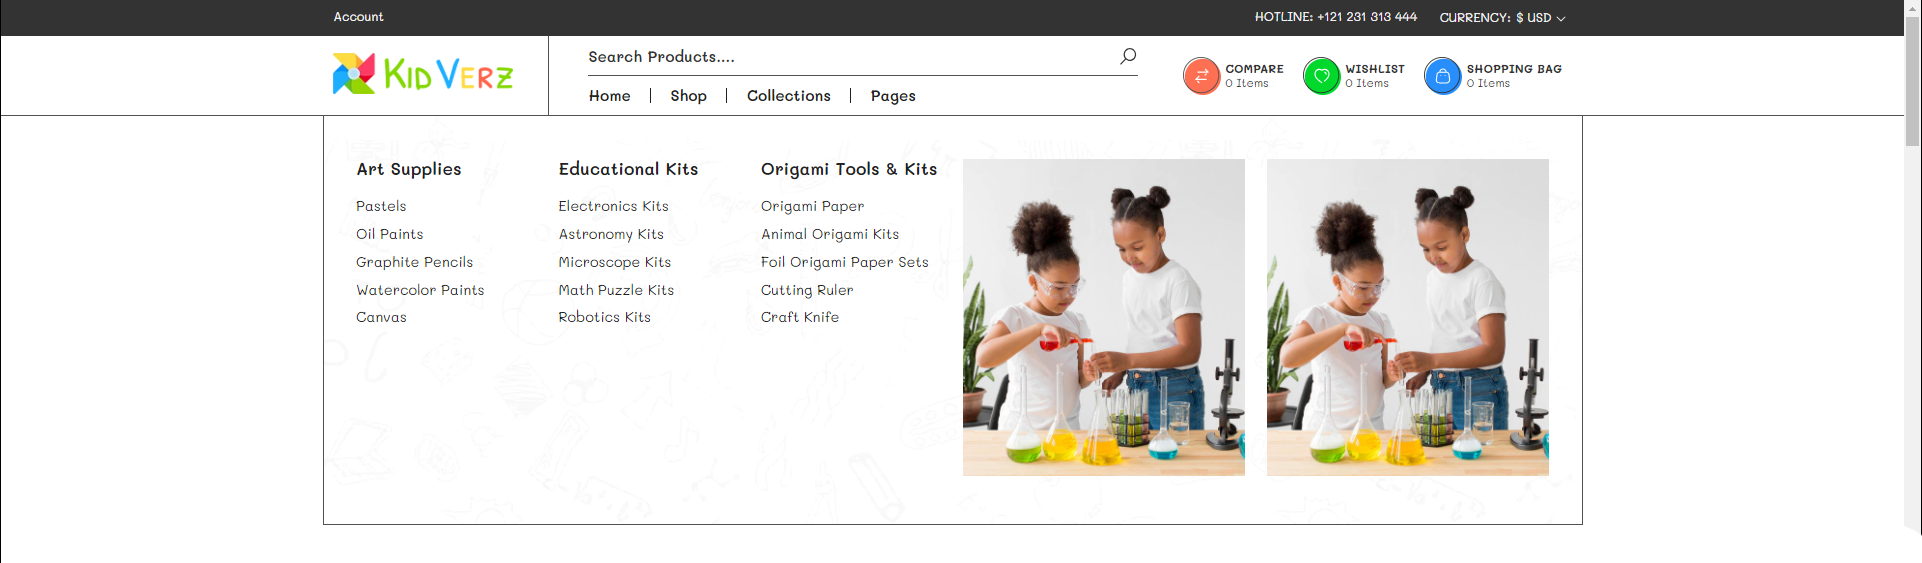
Dropdown / Advanced Mega Menu
How to create a multi-level dropdown mega menu?

-
- From your Shopify admin, go to Online Store ➝ Navigation.
- Click the title of your Main menu.
- Choose one of the menu items to be the header for your drop-down menu, or add a new menu item to be the header.
- To add the mega menu, go to Themes ➝ Customize | ➝ after that in the Header Section Add Block Mega Menu Advance.
- you will get three types of Theme blocks like Mega Menu Advance, Mega Menu Title & Images , Mega Menu Simple and Banner.
For Megamenu Advance Please follow the bellow Instructions:
-
-
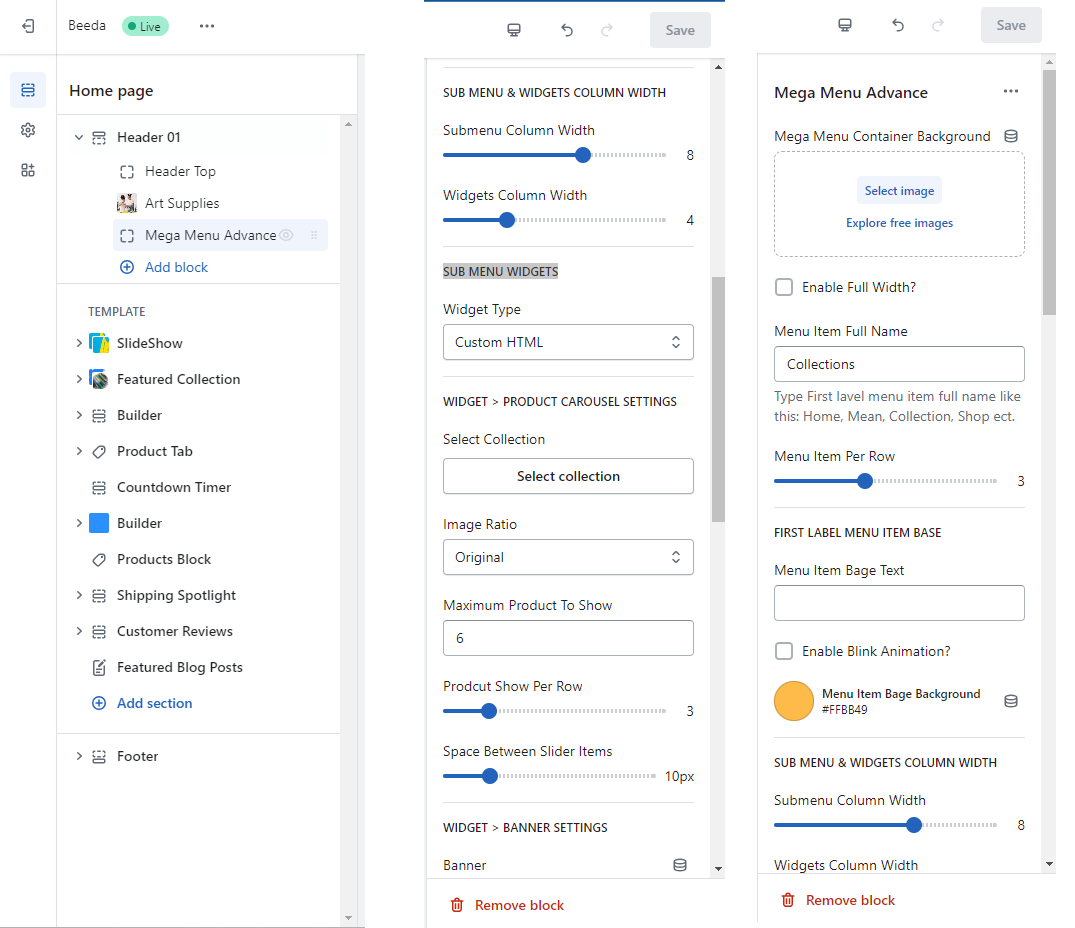
- You can change the Background container color in the megamenu advance section
- Please type the menu name where you want to show the mega menu items.
- Megamenu Advance is also allows you to setup the Background color and Badge setting by name and animation.
- You can control the Submenu & widget column width by Item Per Row.
- The most appealing feature in the Advance Megamenu is you can add Sub Menu widgets by Product Carousel, Banner, Banner+Banner, & Custom HTML.
- In Product Carousel you can controll the Carousel Setting like Select Collection, Image Ratio, Maximum Product To Show and product show per row.
- In the widget banner setting you can add banner and set custom link.
-
Bellow Image is showing the setting of Megamenu Advance
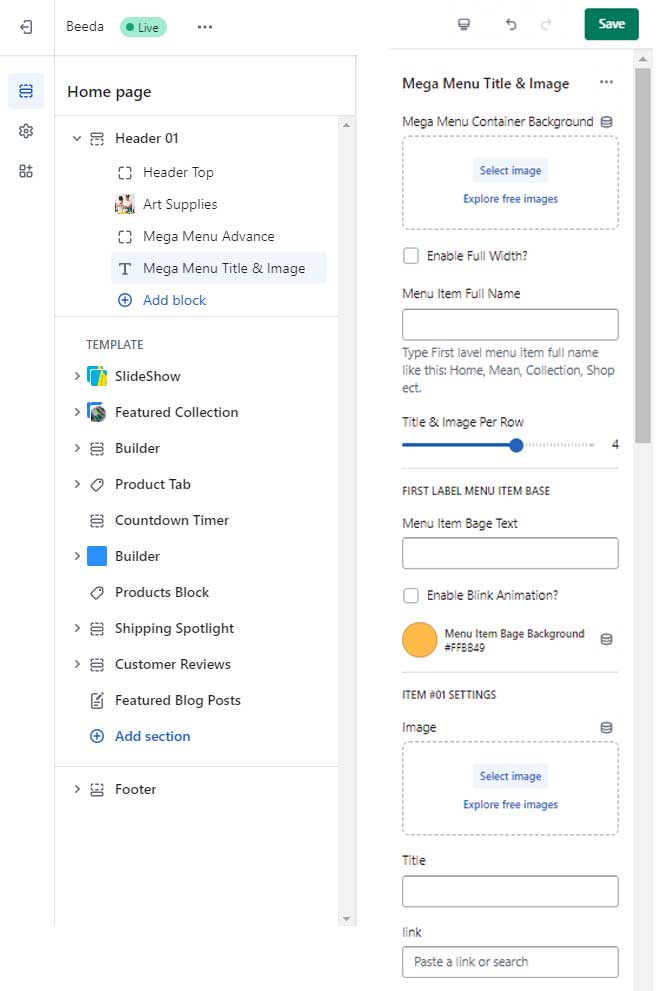
For Mega Menu Title & Images Please follow the bellow Instructions:
-
-
- You can change the Background container color in the megamenu advance section
- Please type the menu name where you want to show the mega menu items.
- You can control the Menu Item Per Row
- You can change the menu item badge by color and enable blink animations
- You can add Item settings from Item#01 to Item#06 with background image id , title and link
-
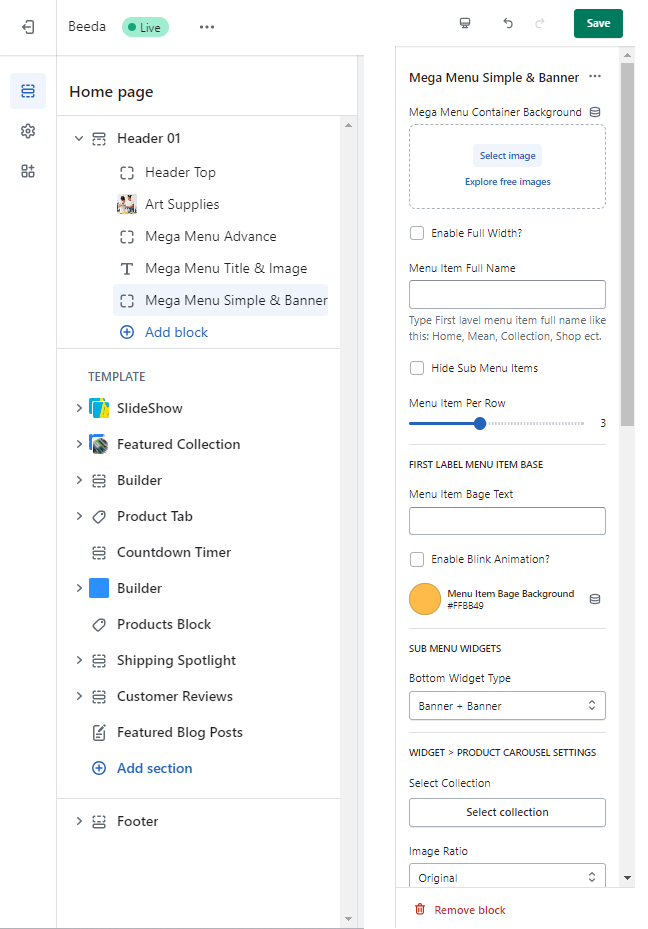
For Mega Menu Simple and Banner Please follow the bellow Instructions:
-
-
- You can change the Background container color in the megamenu advance section
- Please type the menu name where you want to show the mega menu items.
- You can control the Menu Item Per Row
- You can add product carrousel Setting by adding collection , image ratio, Maximum product to show
- Also you can customize the widget banner by adding background image and banner url link
-
Footer
To set up the Footer , please follow the instructions below:
- From your Shopify admin, go to Online Store ➝ Themes.
- Find the theme that you want to edit, and then click Customize.
- Click on the Footer Section.
- Add Block what you want to add.
- You can choose between two types of premade footers: footerone and footertwo.
- In the footer section block you can add menu, custom html , social media and logo.
- You can customize the Footer background style, spacing , footer content area style, footer heading style, and footer social icon style.
- Footer social icon style is also customizable by icon style color and background
- You can enable or disable the payment icon in the bottom footer
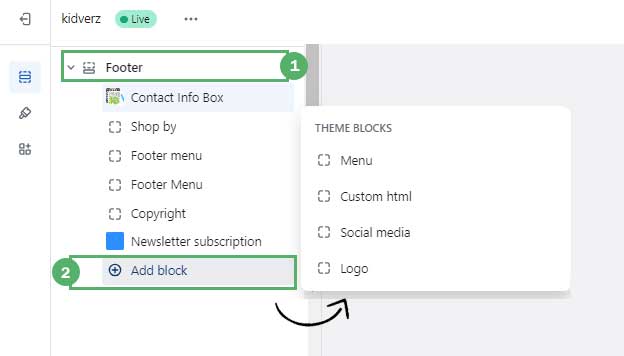
Bellow image is showing the footer customization area.
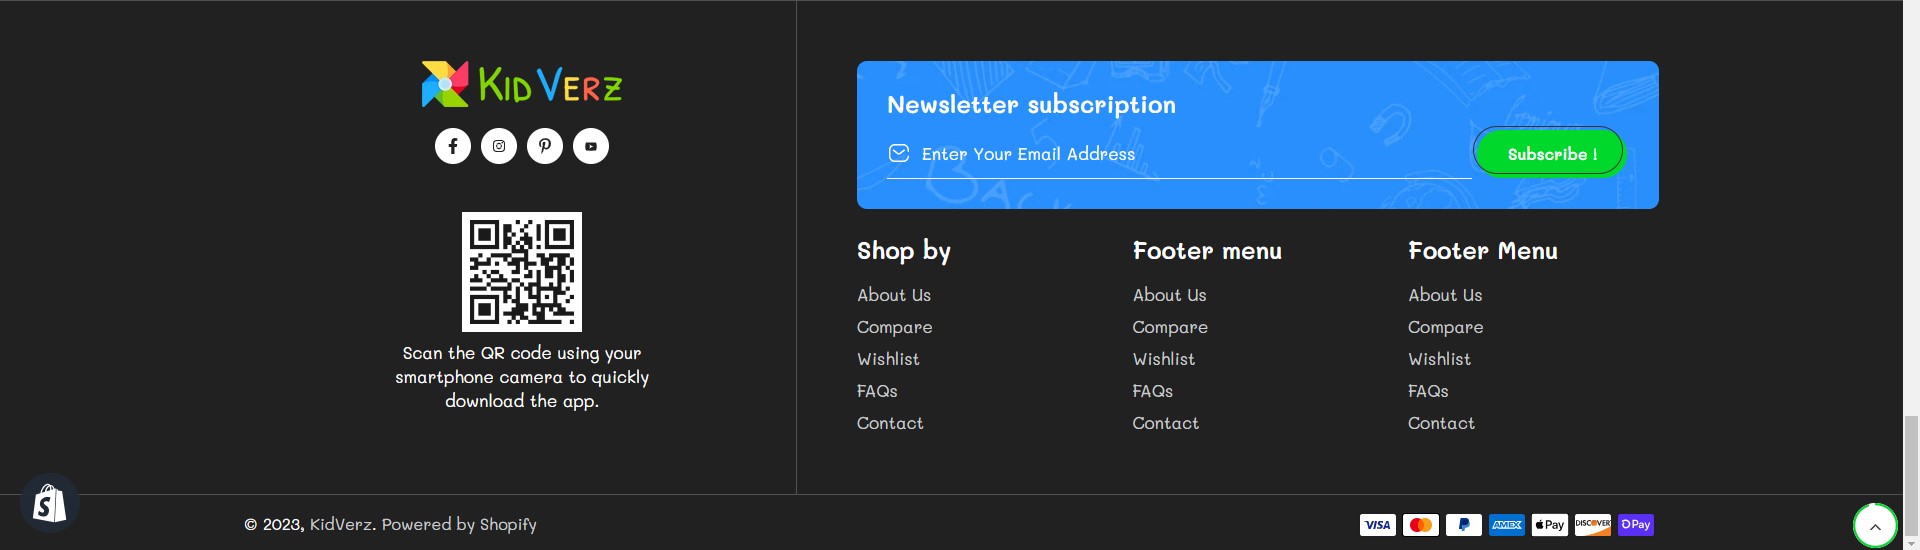
FooterOne

Find our few premade Footer design
Footer One
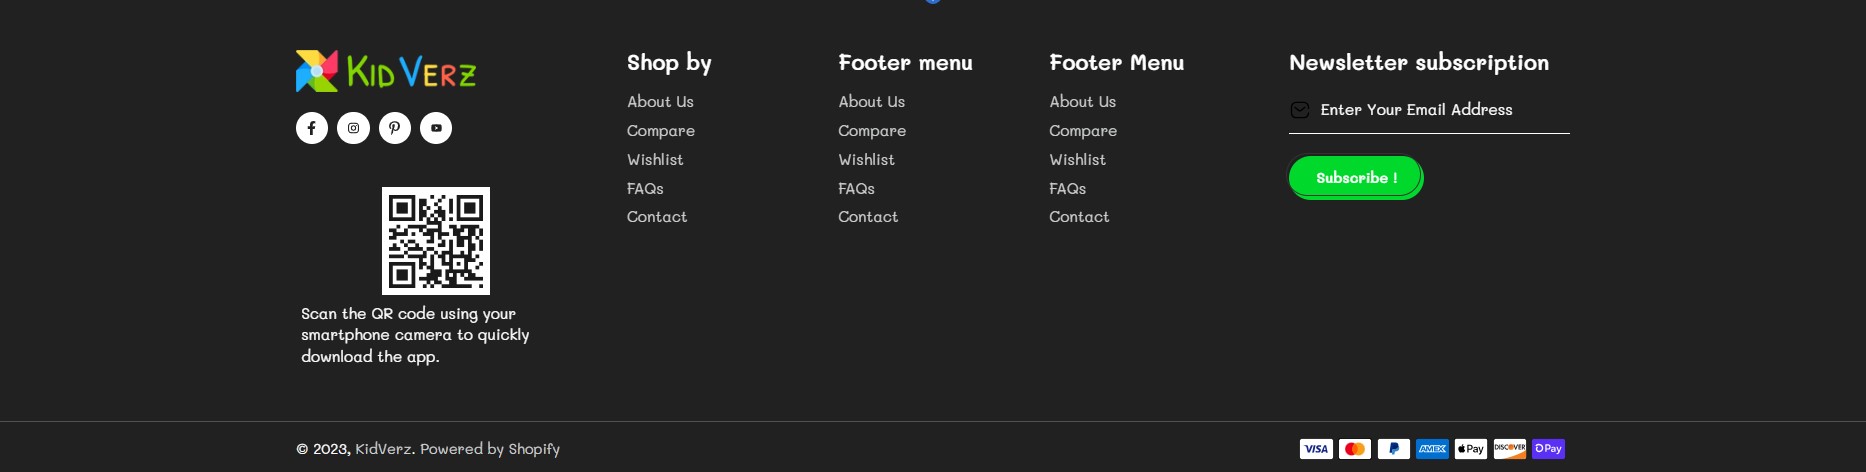
FooterTwo
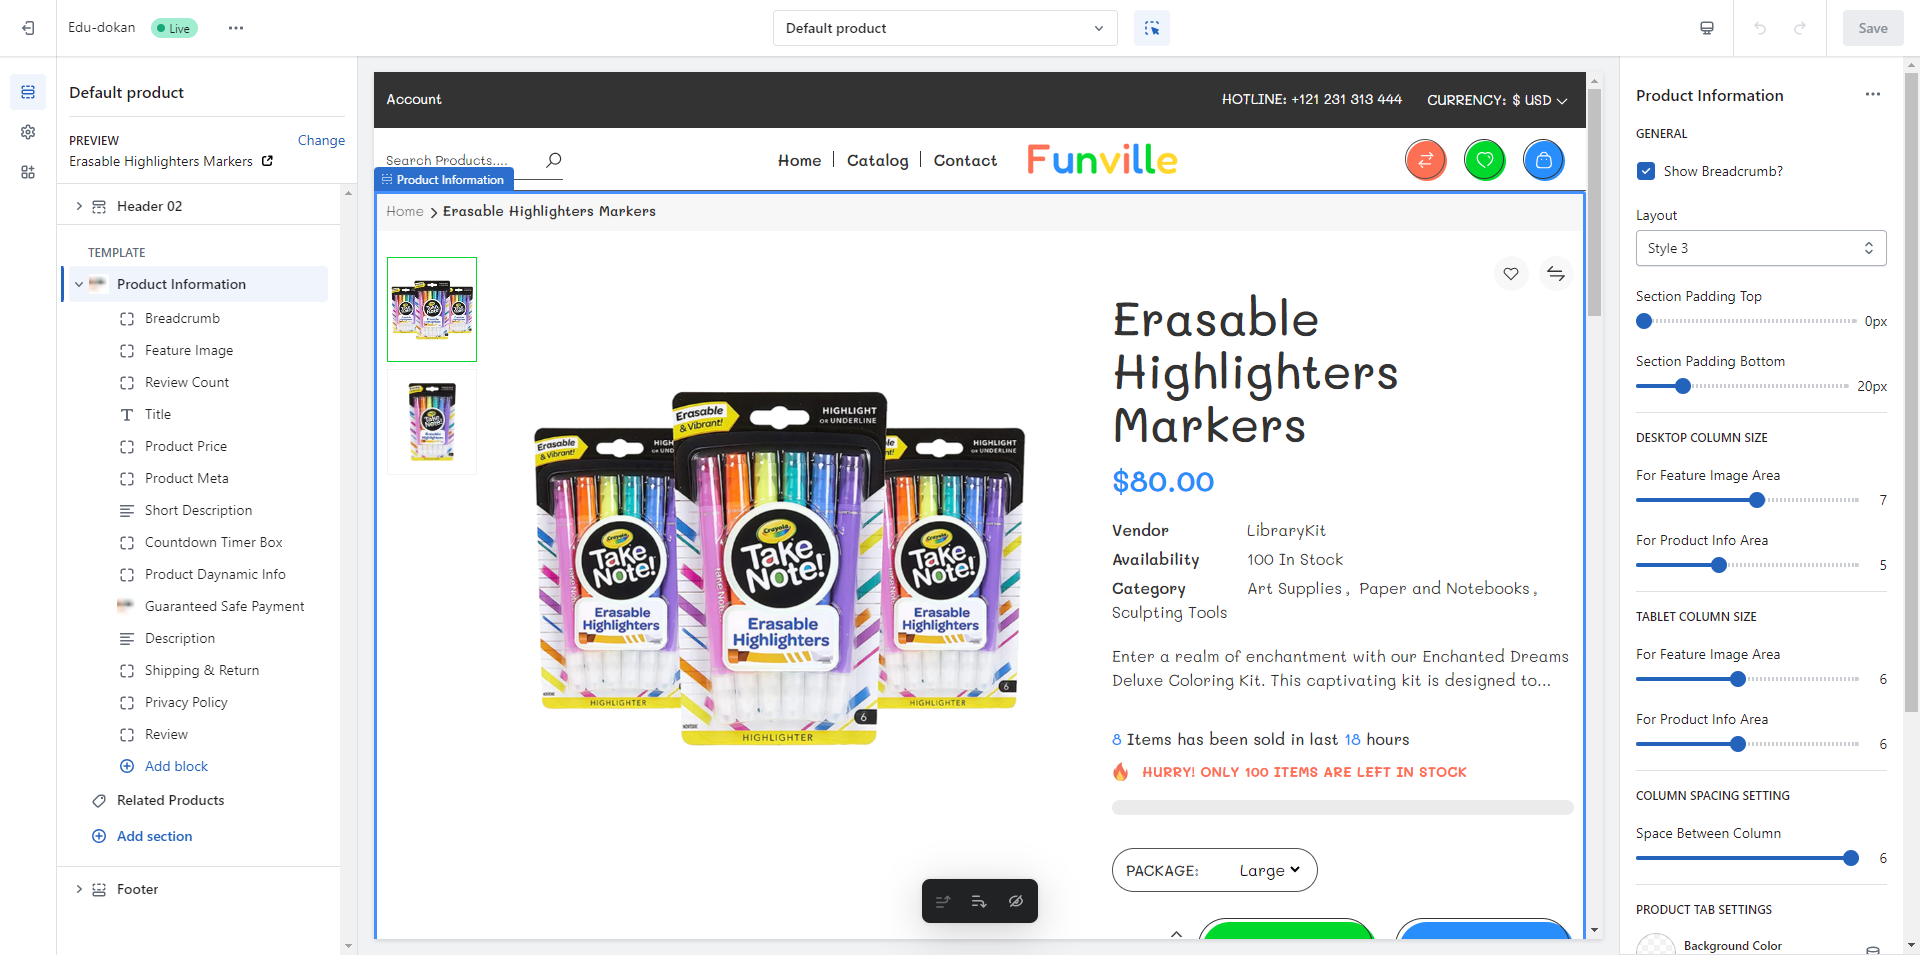
Product Setting
Choose Product Page Layout in Theme Editor:
- From your Shopify admin, go to Online Store ➝ Themes.
- Find the theme that you want to edit, and then click Customize.
- Click the Theme settings ➝ Product Card.
- You can select four types of product cards that are earlier predesigned.
- You can change the button style and image ratio
- You can select or deselect the secondary image on hover, wishlist, quick view, product review, sale badge, sold out badge, vendor and collection.
- Click Save
To get full instruction please follow our bellow image.
To set up for product demo data, please follow the below instructions:
- Open the downloaded the Theme folder. In the Demo Data folder choose the Theme Name you would liked to use and open the folder
- Ppen the “ Product.json.txt” file in the text editor
- SELECT ALL and COPY.
- From your Shopify admin, go to Themes Actions ➝ Edit Code.
- Find folder Templates Open file product.json SELECT ALL and DELETE then PASTE the COPIED preset from the external file.
- Cick Save

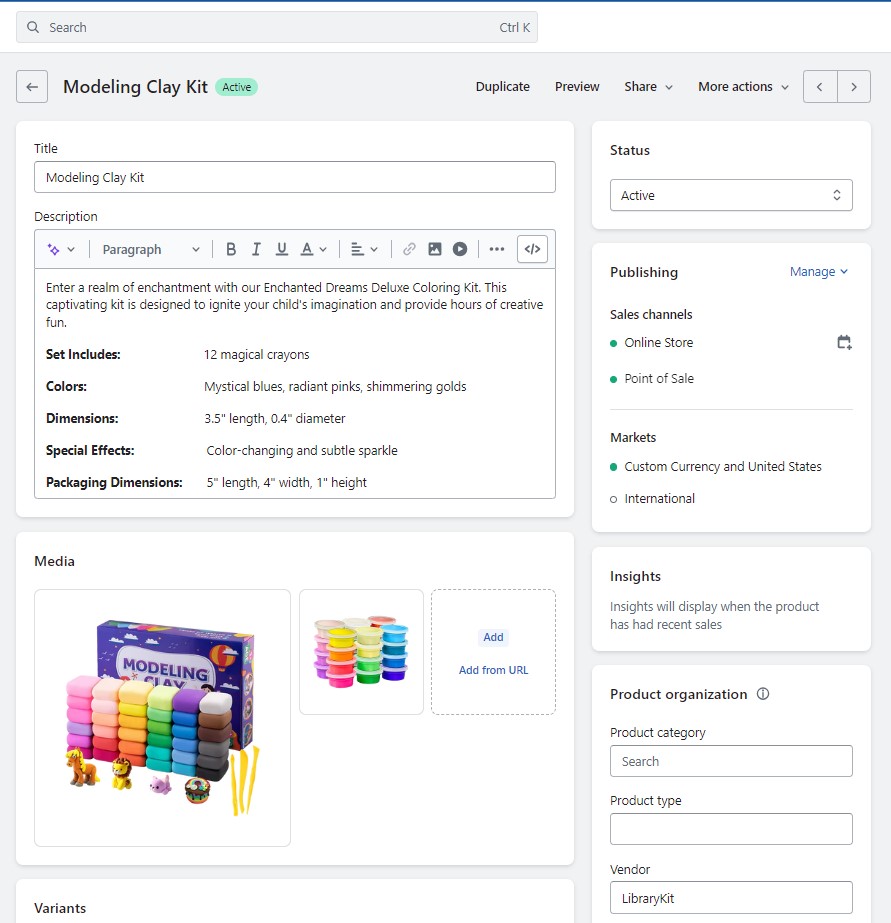
How to Add Product?
To Add Product please find out the bellow step
- From your Shopify admin, go to Products.
- You can add products by Importing the. CSV file.
- Or you can Add products Manually by clicking the Add Product button.

For more specifications please visit the below link.
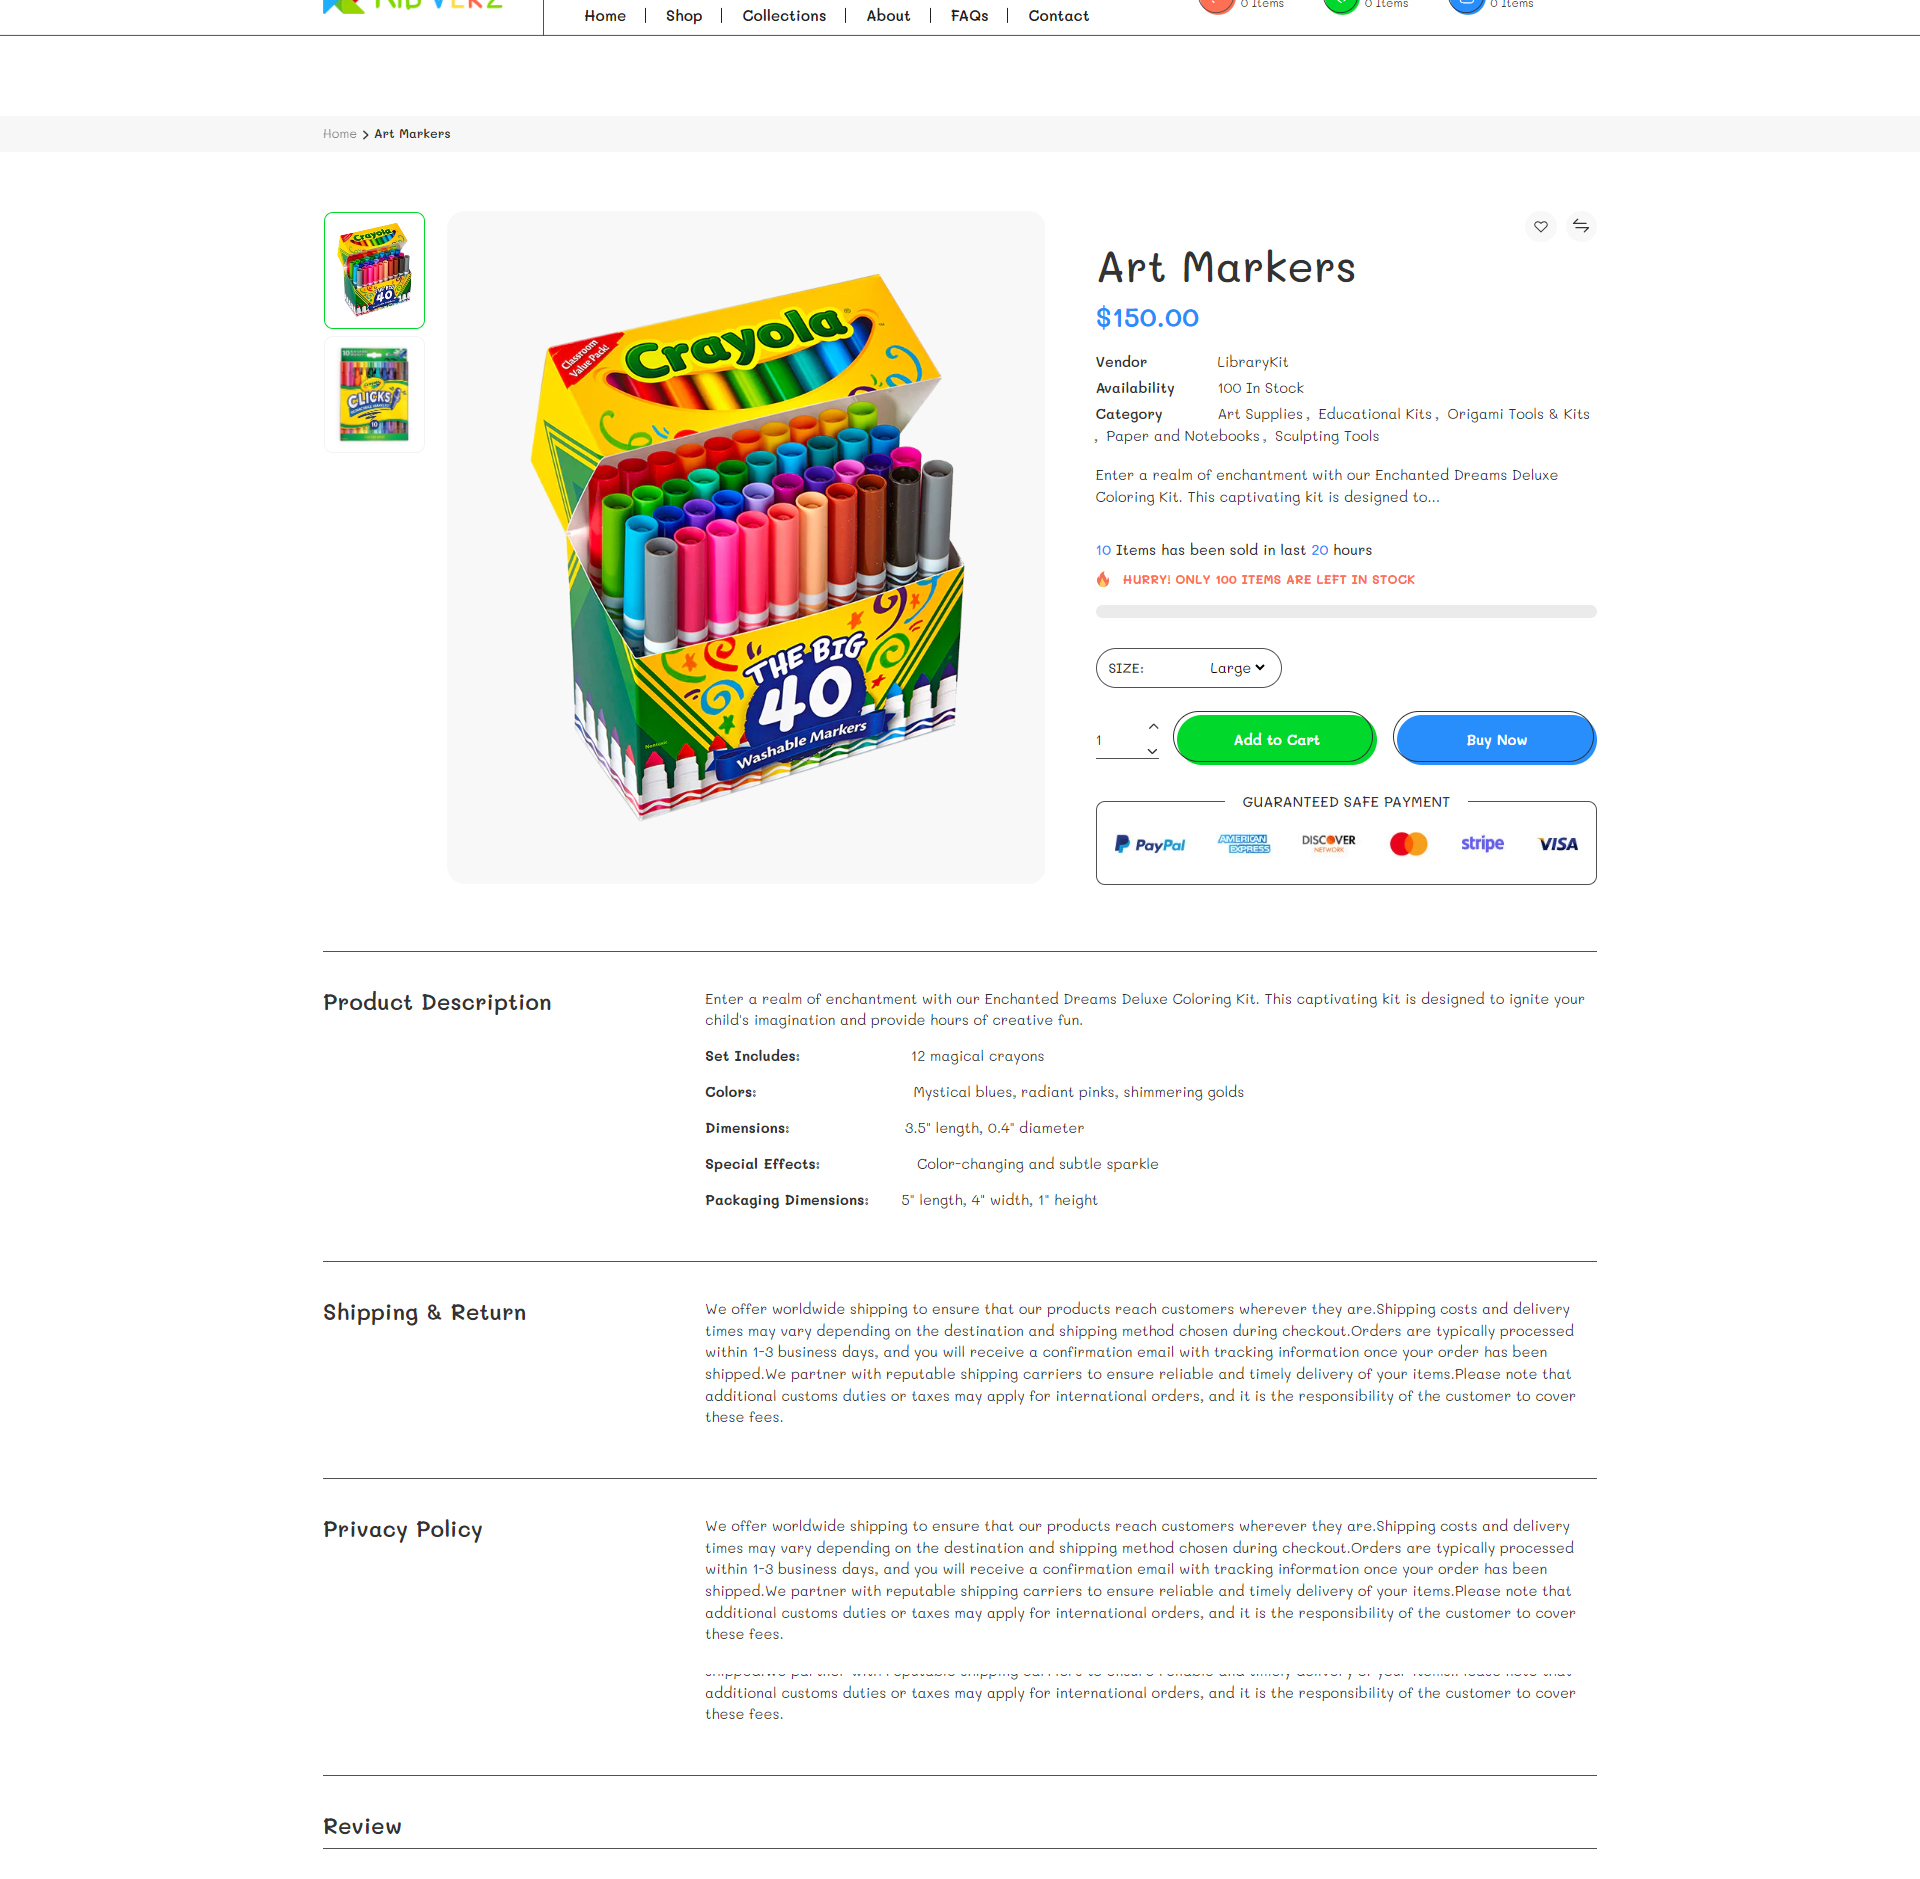
Product Page Design
Follow the bellow steps to customize the product page templates
- Please log in to your Shopify store, and click Online Store.
- Click on the customize button
- From the top header select the Products from the dropdown.
- In the product section select the Default product option
- You can Customize the prouct page by adding Section and Block
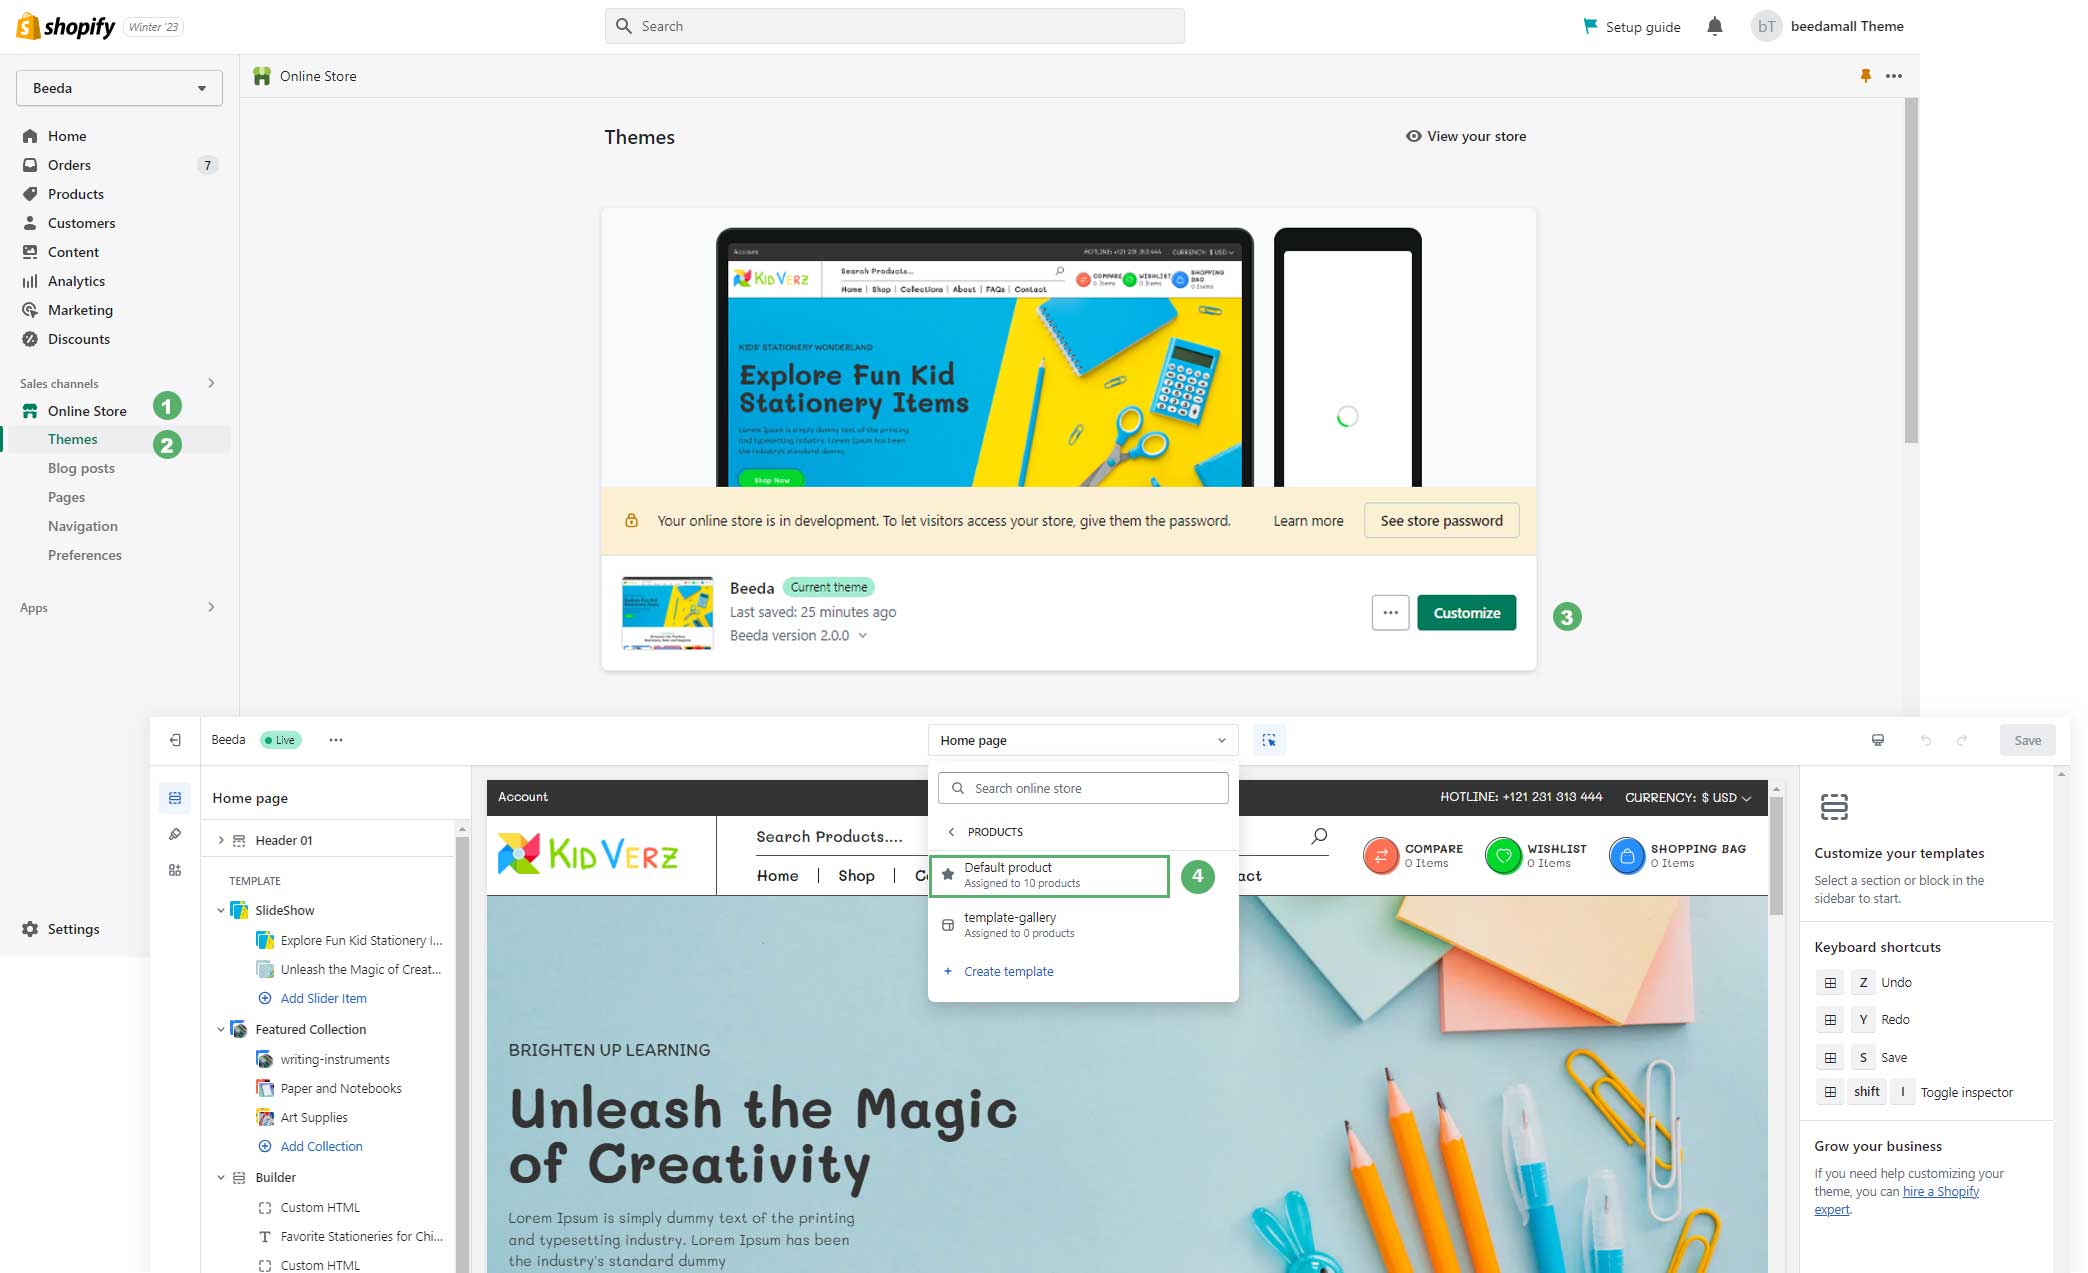

You can drag & drop all blocks in Product Information to arrange the position you want.
Product Media

Product media can include images and videos. For more information, see Product media.
You will upload and order it right in Product Admin.
Product Description
- From your Shopify admin, go to Online Store -> Themes.
- Find the theme that you want to edit, and then click Customize.
- Choose Products from the dropdown window.
- In Product Information section, add Description Tab block.
Information: In the Product description section you can add multiple Text, Image and Videos.
Similar Products
- From your Shopify admin, go to Online Store ➝ Themes.
- Find the theme that you want to edit, and then click Customize.
- Choose Products from the dropdown window.
- Click Product Tabs.
How to create a Page ?
Web pages are a way to provide general information about your business or products.
- go to Online Store Pages.
- Click Add Page
- Enter a title and content for the page. Be descriptive and clear when choosing your webpage title. The webpage title displays in the tab or title bar of browsers.
- Under Visibility, select when the page should be published. By default, your new webpage will be visible when you click Save. Select the Hidden option if you want your new webpage to be hidden from your online store, or click Set a specific publish date to control when your webpage is published.
- Click Save.
- Optional: To make a published webpage appear in your online store navigation, add a link to it in a menu.
Please publish the theme as a live site to be able to create the page. For more information, see Pages.
Login Page

The login page shows where customers can access their account.

- From your Shopify admin, go to Online Store ➝ Customize.
- Find the theme that you want to edit, and then click Customize.
- Choose Classic customers accounts from the dropdown window.
- Select Customer login.
- Edit Customer login page
- click Save

FAQ Page
Kidverz Theme offers FAQs Page which known as the frequently asked questions section, is a web page in your online store where you address common concerns, questions, and objections customers have..
- go to Online Store ➝ Pages.
- Click Add Page
- Enter a title (ex: FAQs). After that, choose the Theme template look like the below image
- Click Save.

Contact Us Page
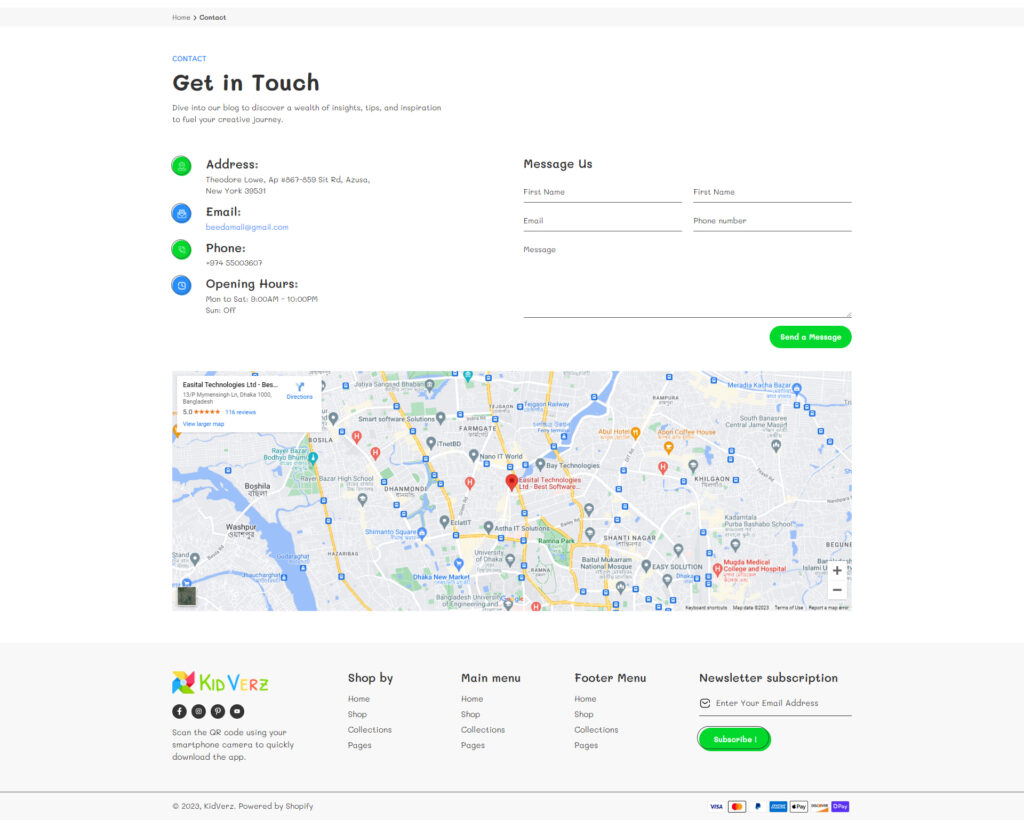
The Contact Us Page brings questions of customers to the store owner individually as well as provides them with information on how they can get in touch with you. When customers submit the form, the information will be sent to the email you set up in Settings. You will check your email and reply to them manually.
- go to Online Store > Pages.
- Click Add Page
- Enter a title (ex: Contact Us). After that, choose the Theme template to look like the below image
- Click Save.

There are various Contact Us templates that you can set up.


How To Set Up Sections For Contact Us Page?
- From your Shopify admin, go to Online Store > Themes.
- Find the theme that you want to edit, and then click Customize.
- Choose Pages from the dropdown window Choose template contact
Others Page
404 Page
404 Page tells the visitors that the requested page is unavailable or it does not exist for certain reasons.
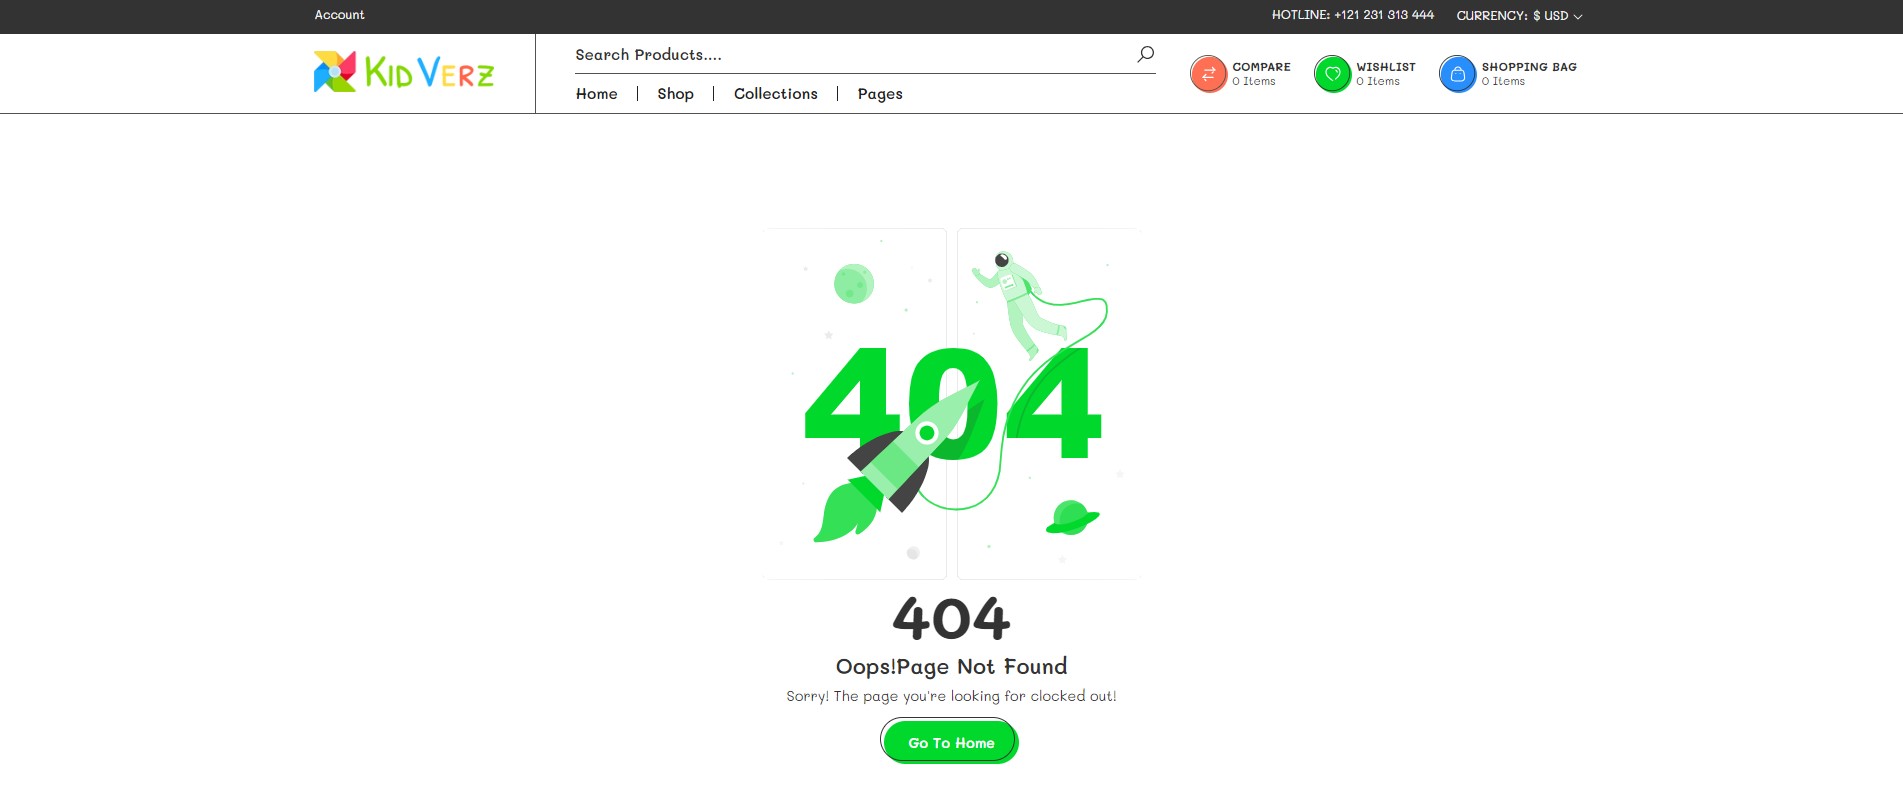
How to set up 404 Pages?
- From your Shopify admin, go to Online Store ➝ Themes.
- Find the theme that you want to edit, and then click Customize.
- Choose others from the dropdown window ➝ Choose 404 Page
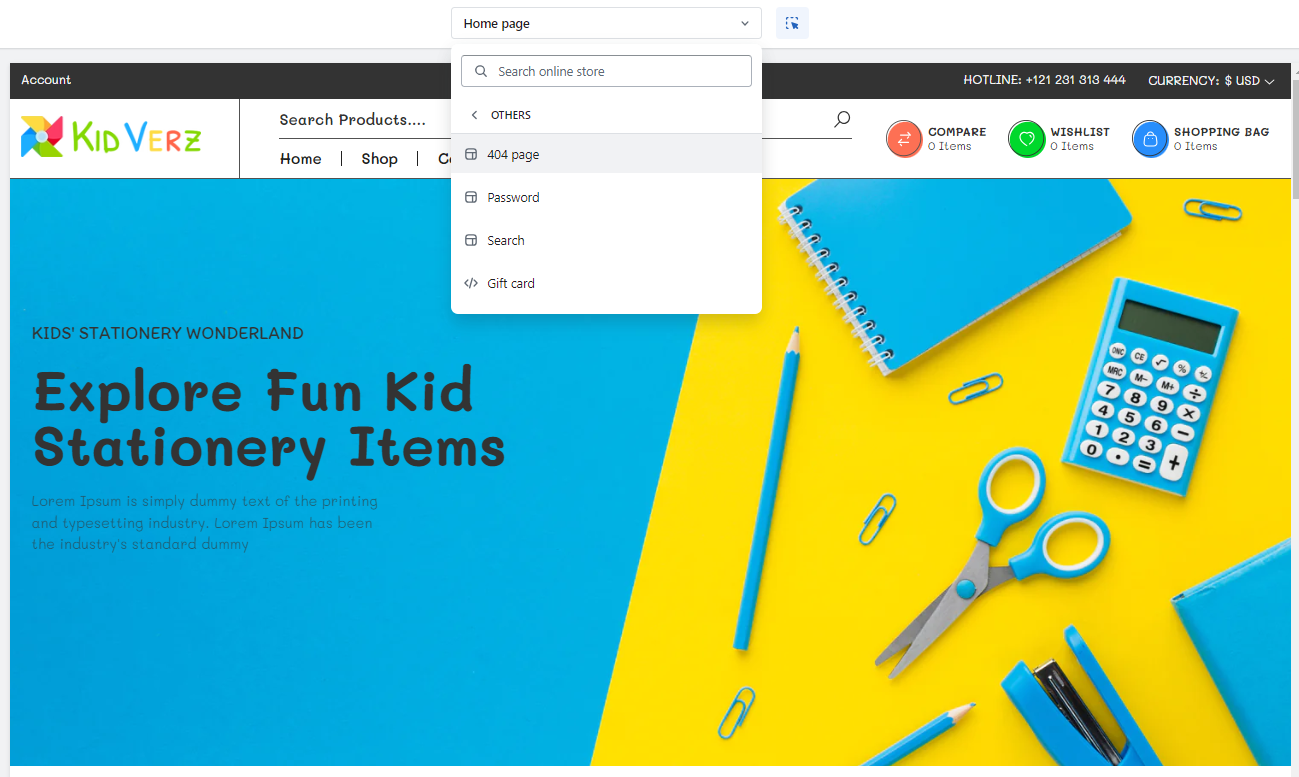
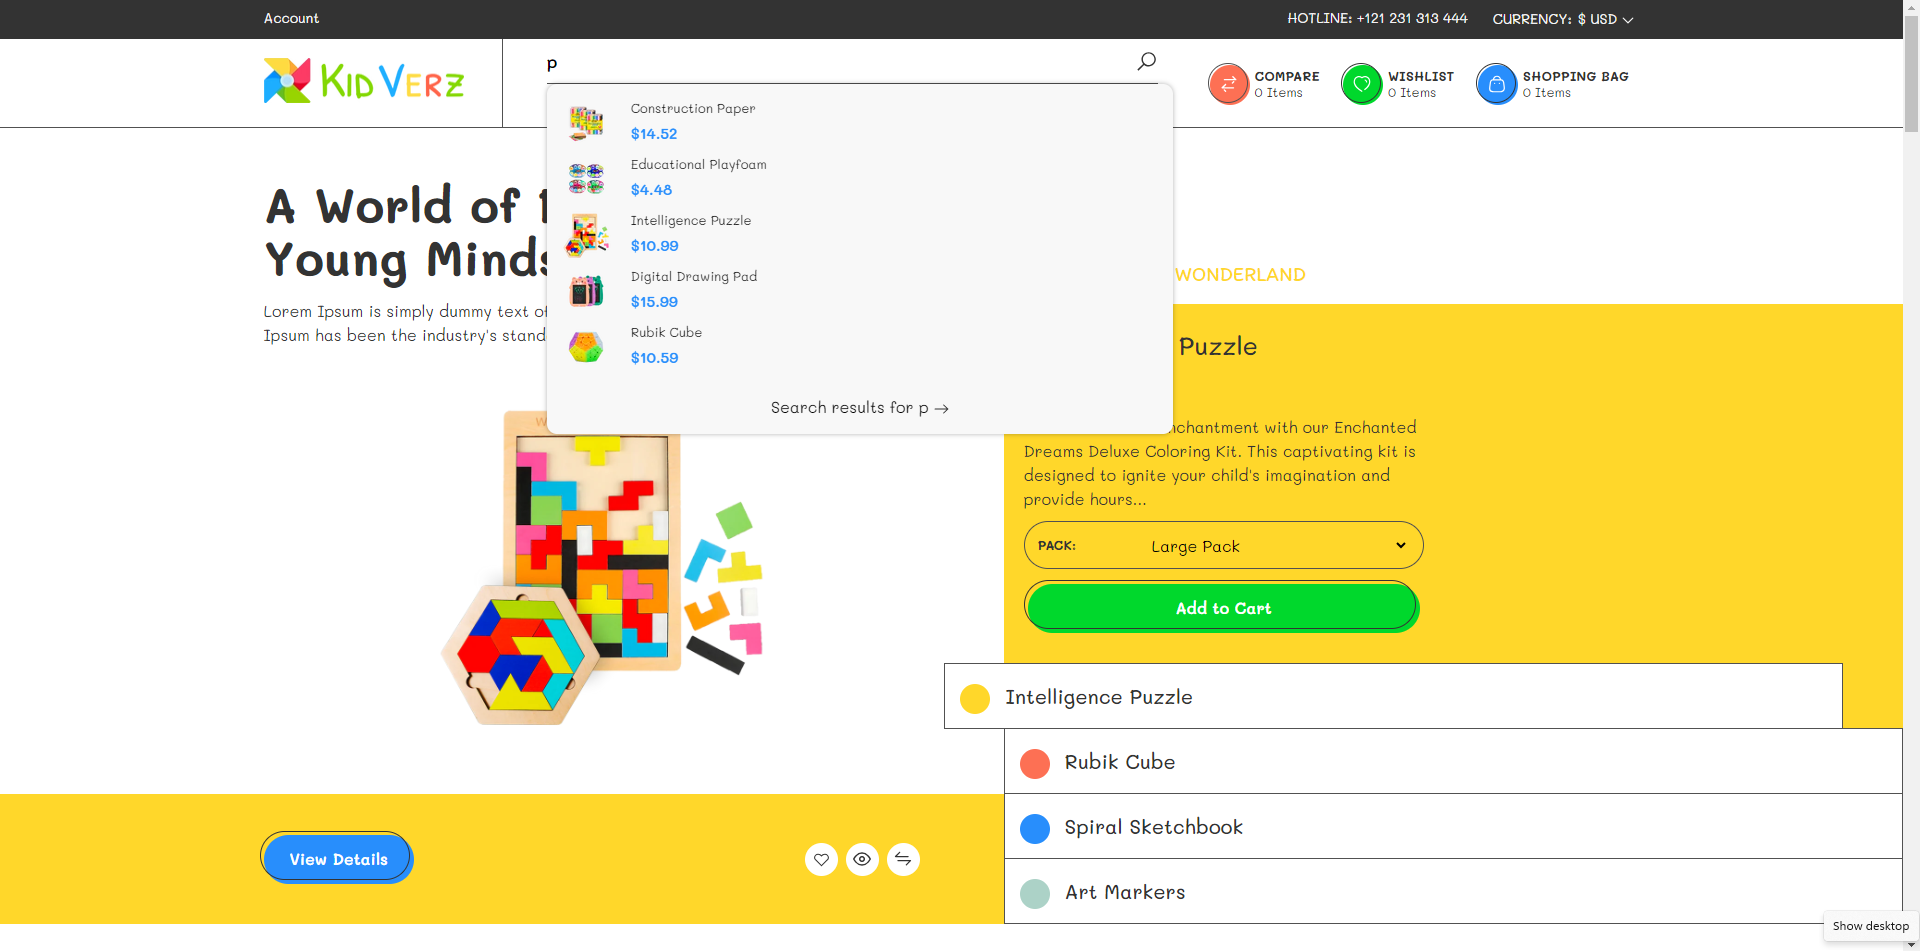
Advance predictive search
A search Page is a page where customers can search for specific products or pages. It helps them find the products, brands, features, and content that they care about.
How to set up sections for the Search Page?
- From your Shopify admin, go to Online Store ➝ Themes.
- Find the theme that you want to edit, and then click Customize.
- Choose Others from the dropdown window ➝ Choose Search.
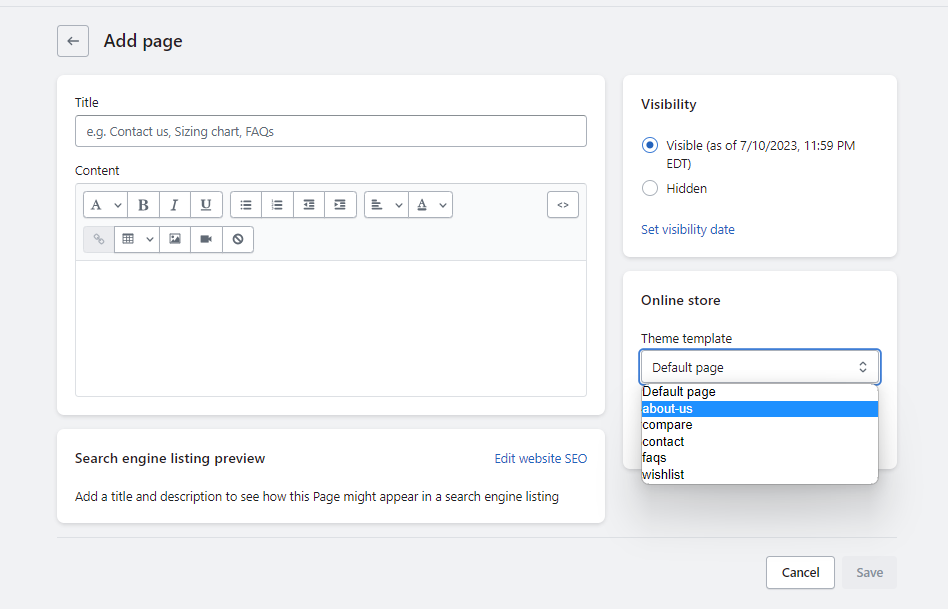
About Us Page
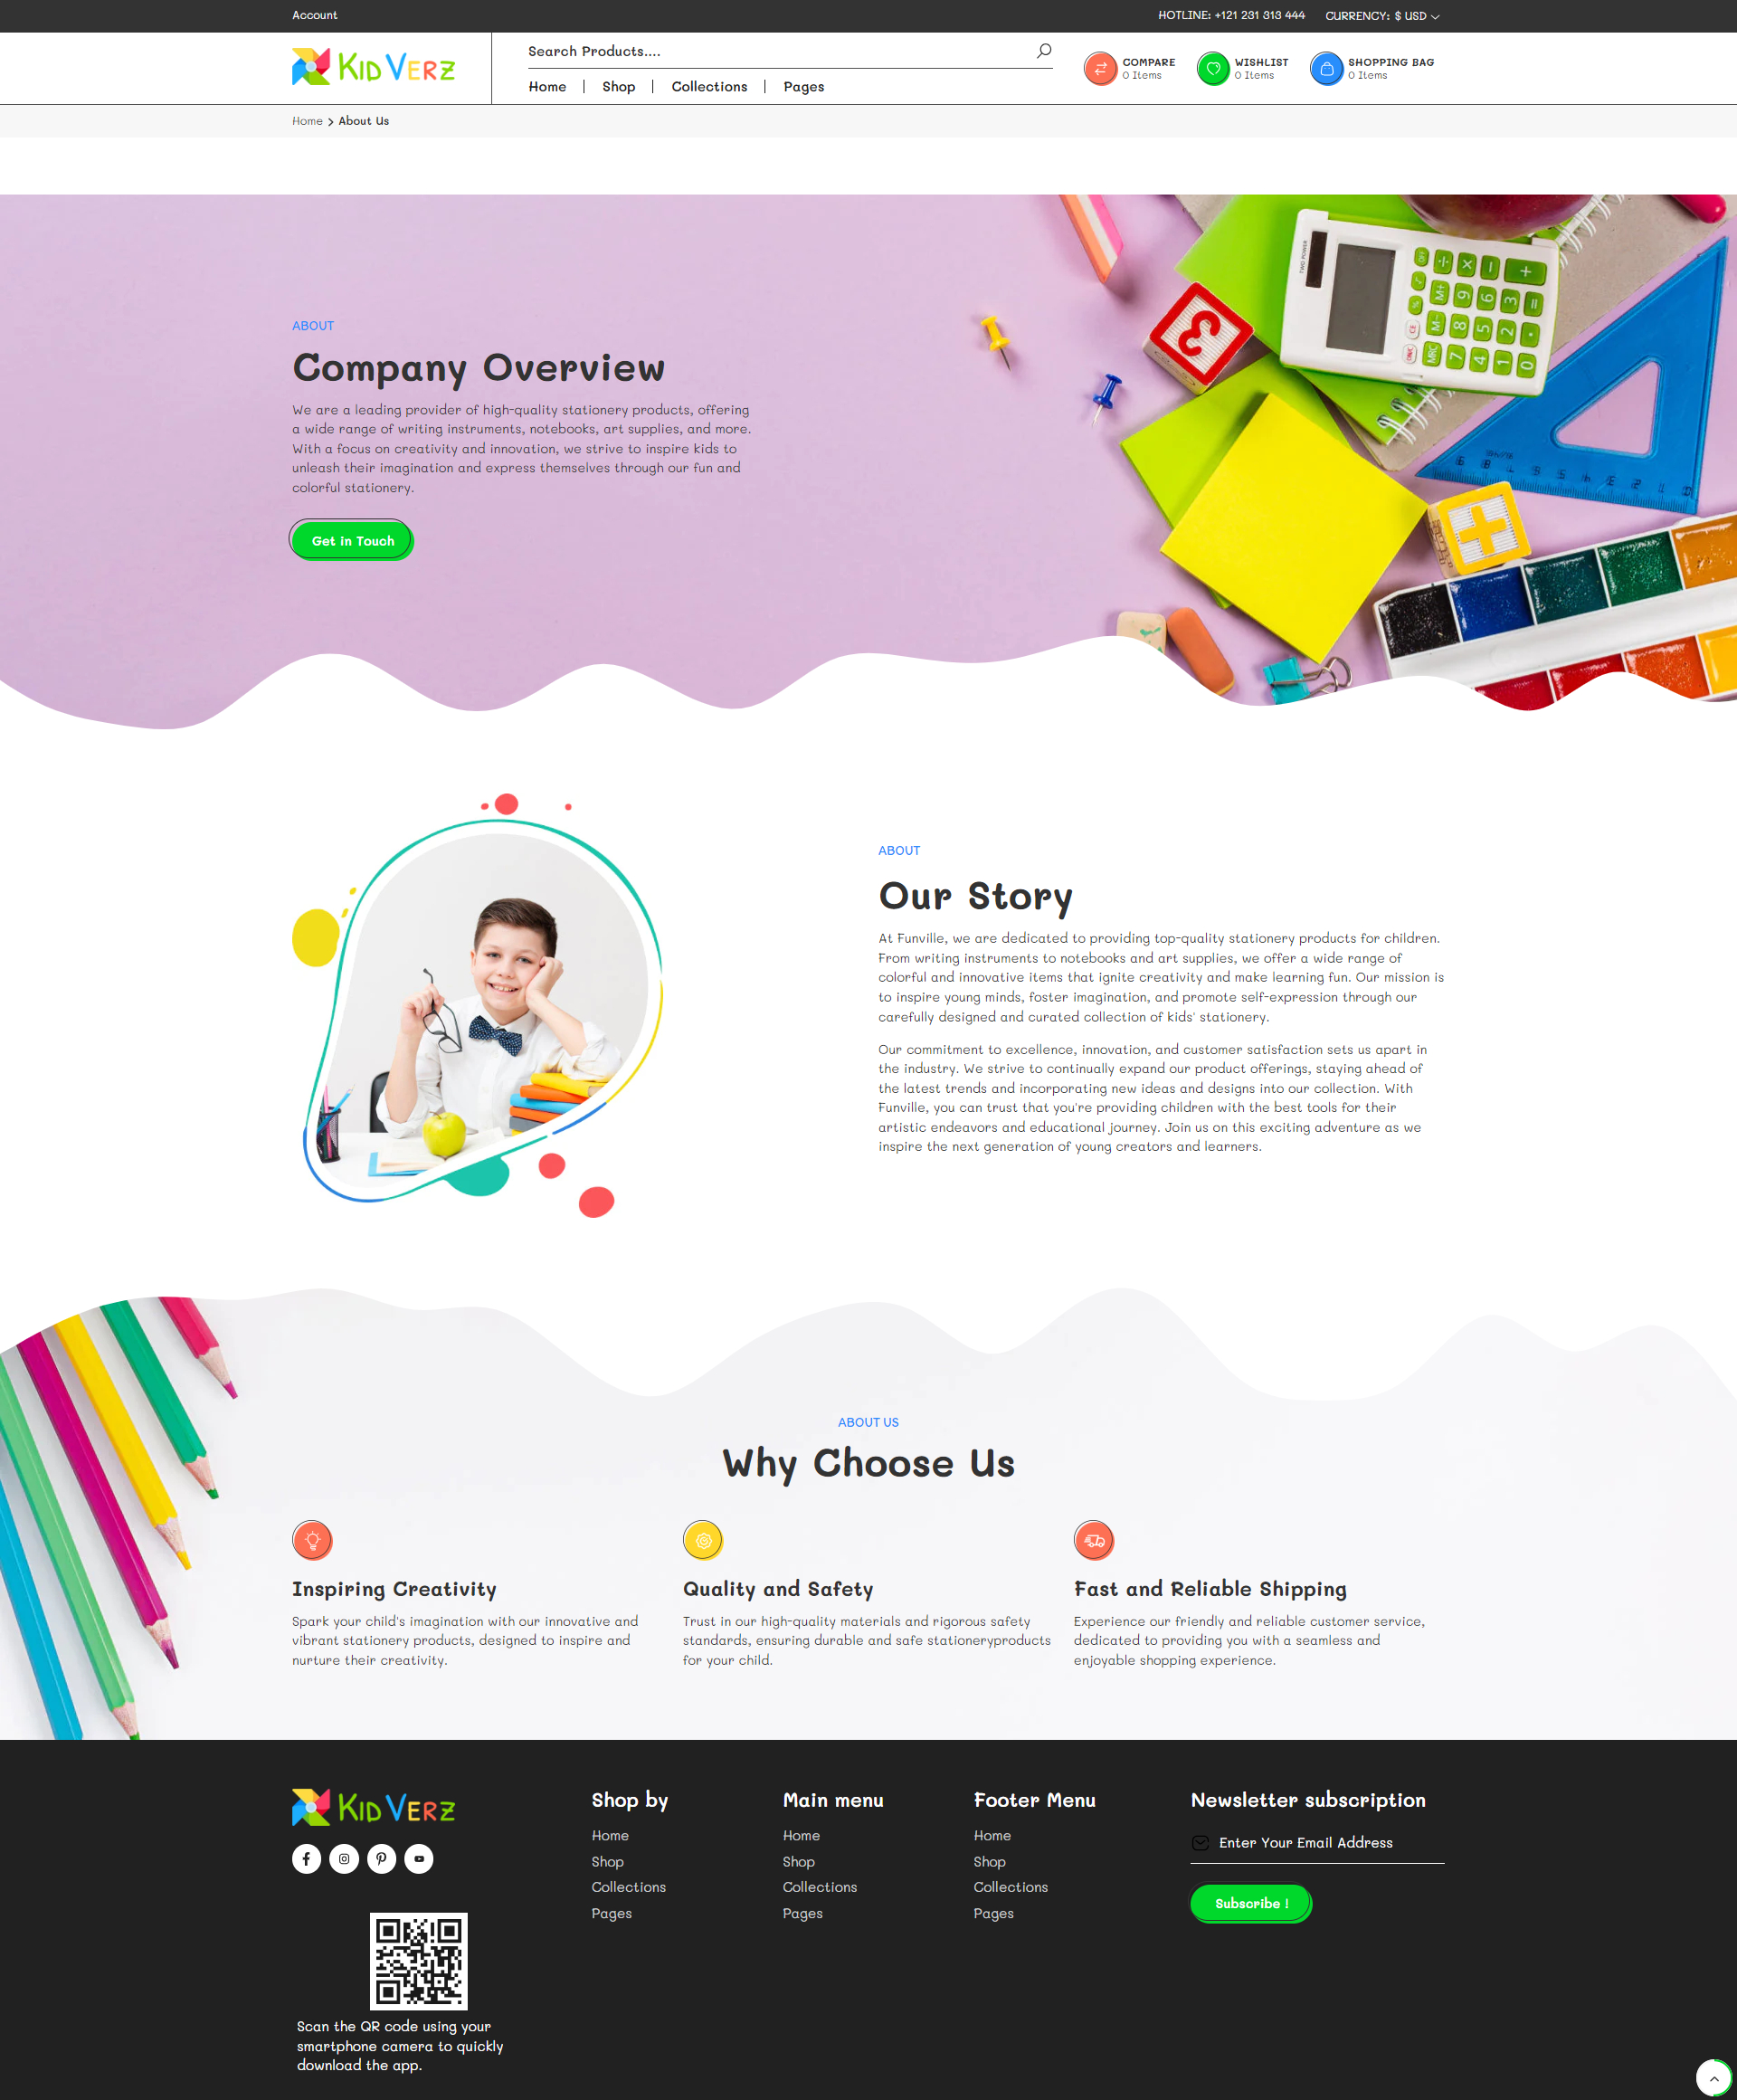
Kidverz Theme offers the “About Us” page is an essential part of a Shopify store as it helps establish trust, convey your brand’s story, and engage with customers on a personal level.
- go to Online Store ➝ Pages.
- Click Add Page
- Enter a title (ex: About). After that, choose the Theme template look like the below image
- Click Save.
Section on Every Page
Online Store 2.0 introduces a new JSON template format that lets you add new and existing sections to most pages in your theme, and add and remove sections from any page directly in the Shopify theme editor. This feature lets merchants personalize many more aspects of a store without relying on a developer. It also lets developers build maintainable themes with more modular components. For more information, see Shopify 2.0.
Some core pages such as: Password page, Checkout page, Account page, Order page will not support sections on these pages due to the structure of Shopify.
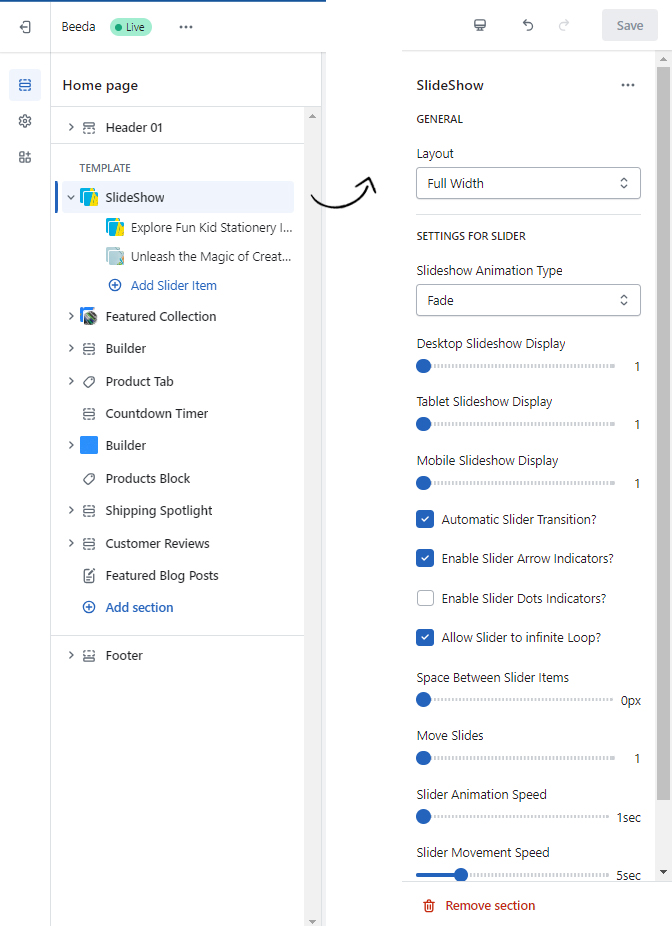
Slide Show
To add this section, please follow the below steps:
- From your Shopify admin, go to Online Store ➝Themes.
- Find the theme that you want to edit, and then click Customize.
- Click Add section and choose Slideshow.
- More Slider Item you can add
- In the slide show setting you can customize layout, slideshow animation
- You can customize the slideshow display in multiple device
- Moreover you can enable or disable the slider transiction, arrow indicator, dots indicator & slider loop.
- Finally it can be customizable the spacing, slider animation speed.
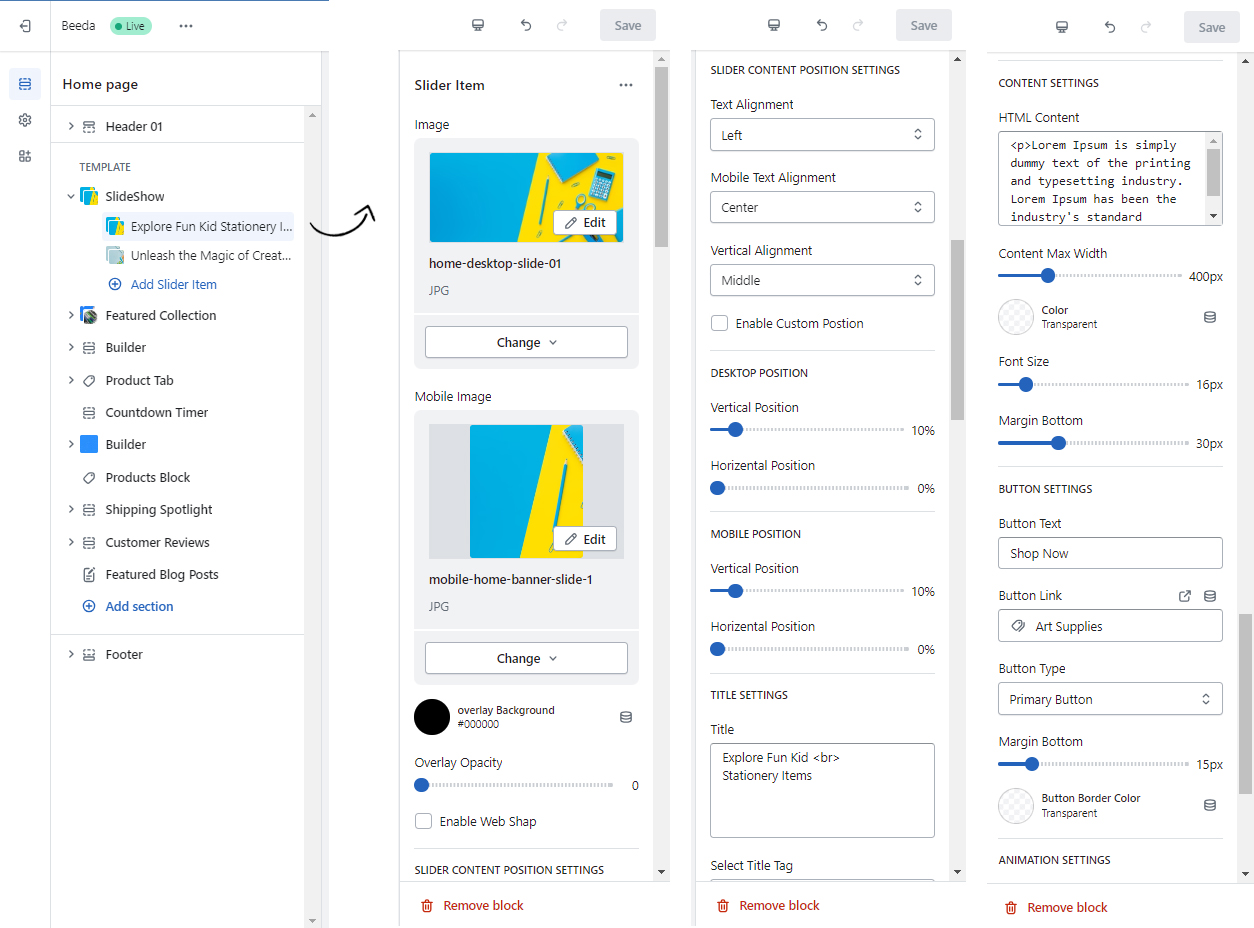
Bellow Steps is for Slider Item customization instructions :
- In the Slider Item , you can add image for desktop and mobile, overly opacity , slider content position.
- You can customize the position for all devices
- Title, Description & Button setting like > title tag, font size, font weight, color & spacing is customizable
- You can also controll the title, text and button animaton type & duration.
the second image is showing the Slider Item setting
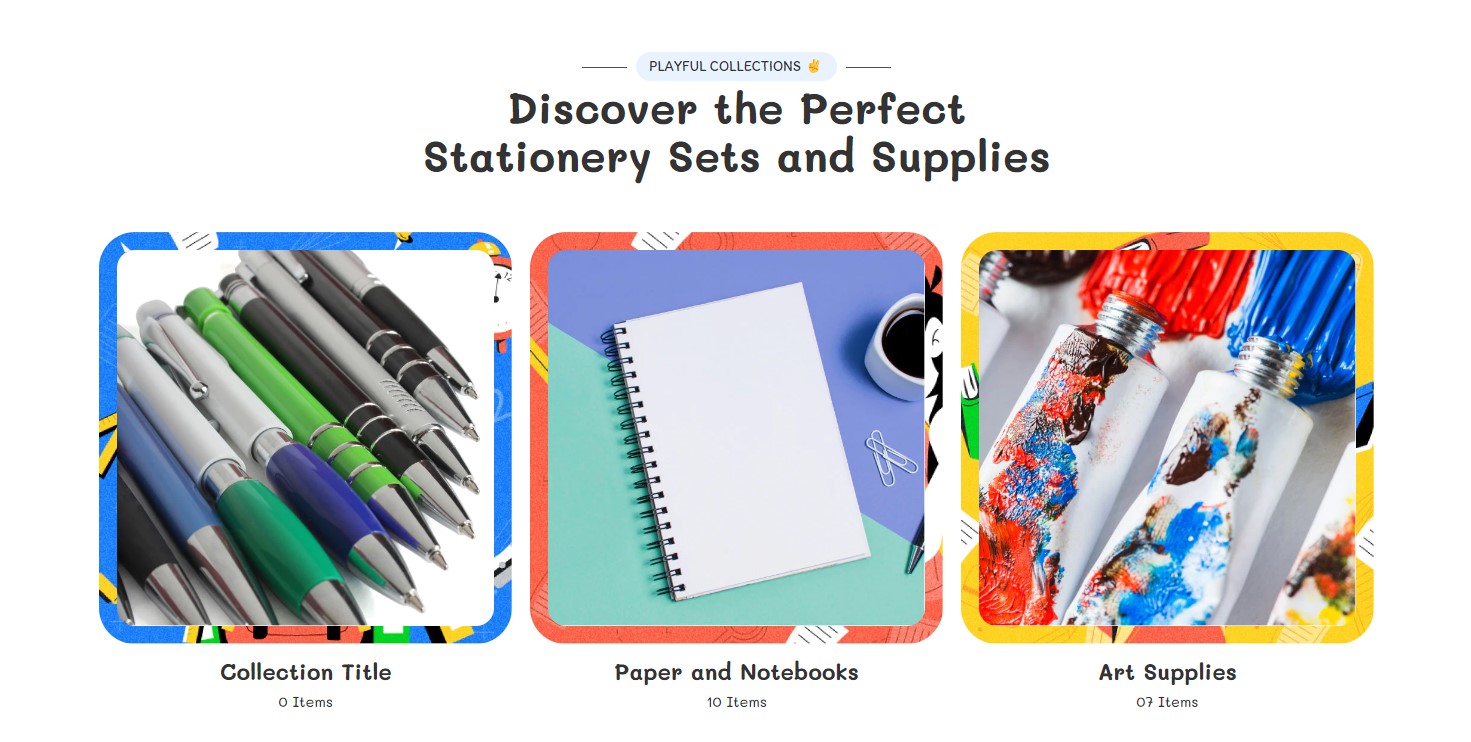
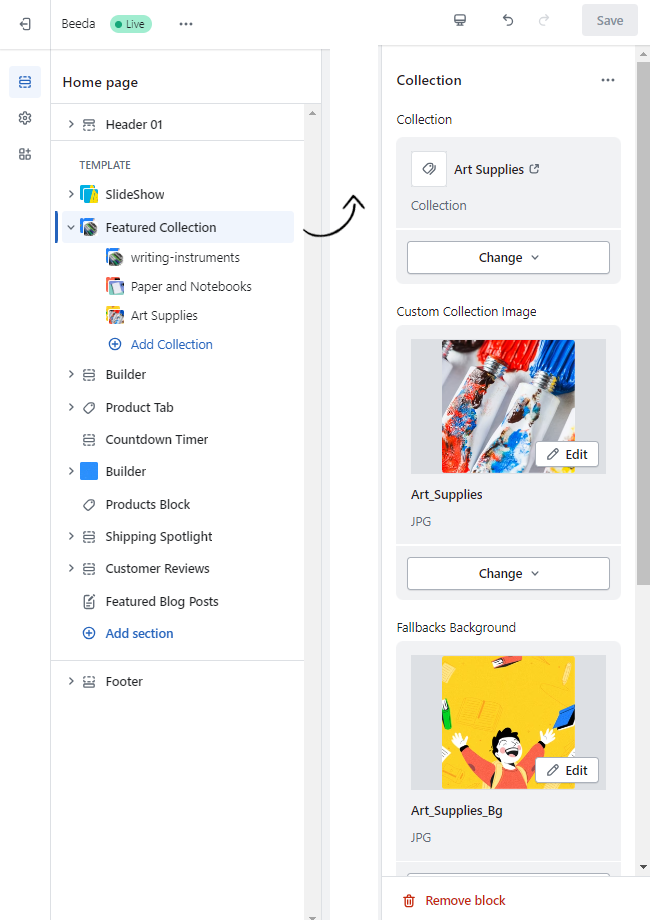
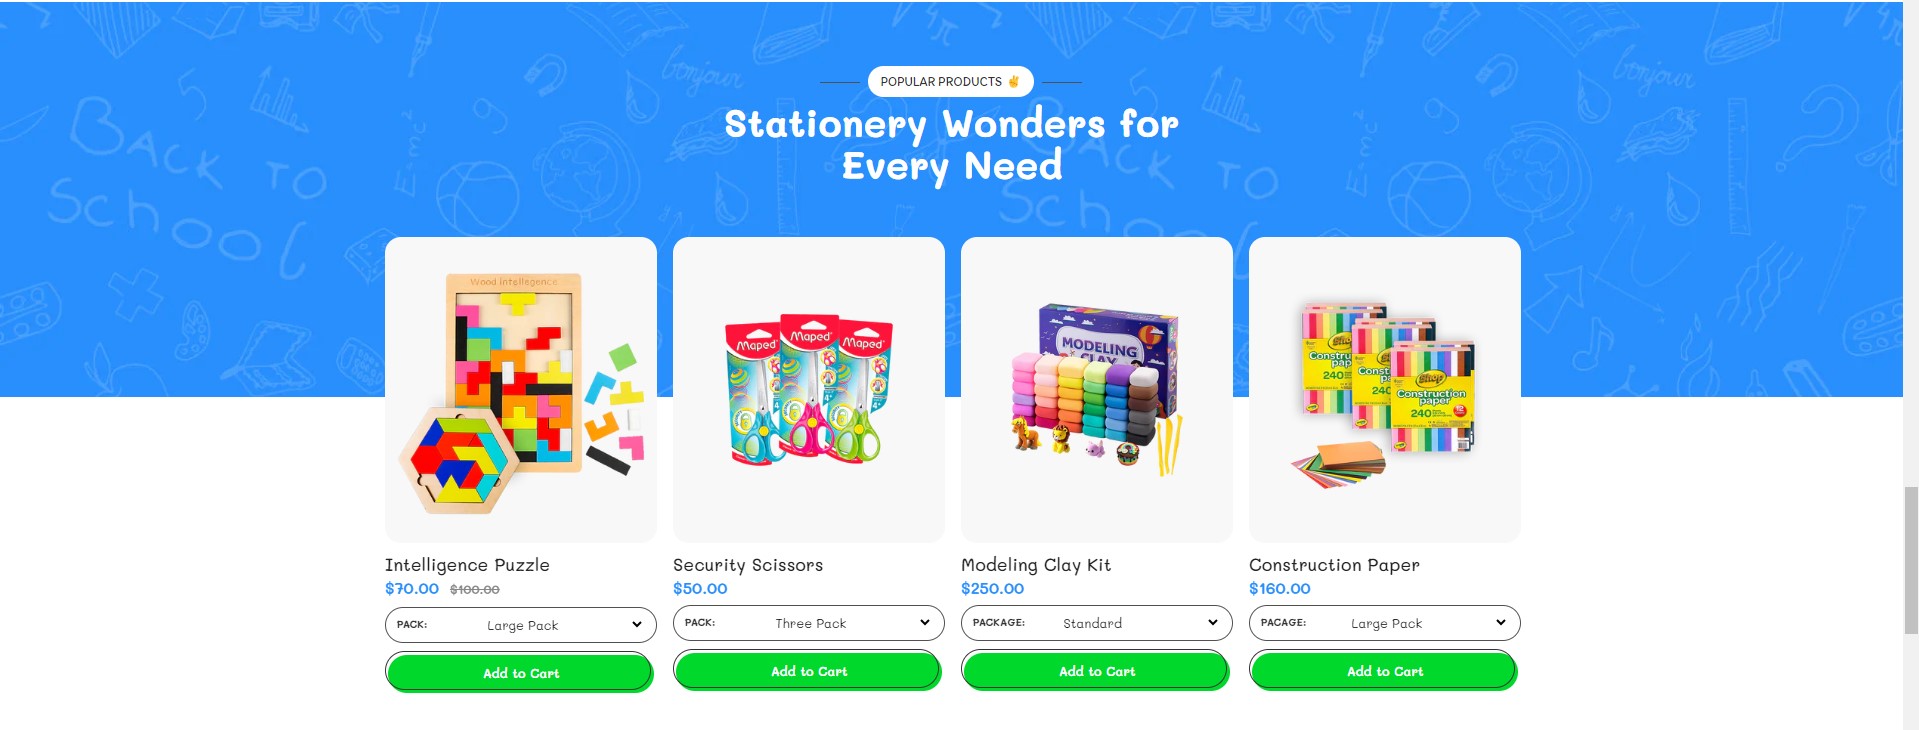
Featured Collection
To add this section, please follow the below steps:
- From your Shopify admin, go to Online Store ➝ Themes.
- Find the theme that you want to edit, and then click Customize.
- Click Add section and choose Featured Collection.
- In Featured Collection you can change the four premade layout style.
- You can also control the grid setting for multiple devices as Per Row
- Featured collection section allows you to change the Section Title, Title Tag, Sub Title setting.
- You can also customize the spacing and Title Box setting like Alignment , Image Radius and Alignment

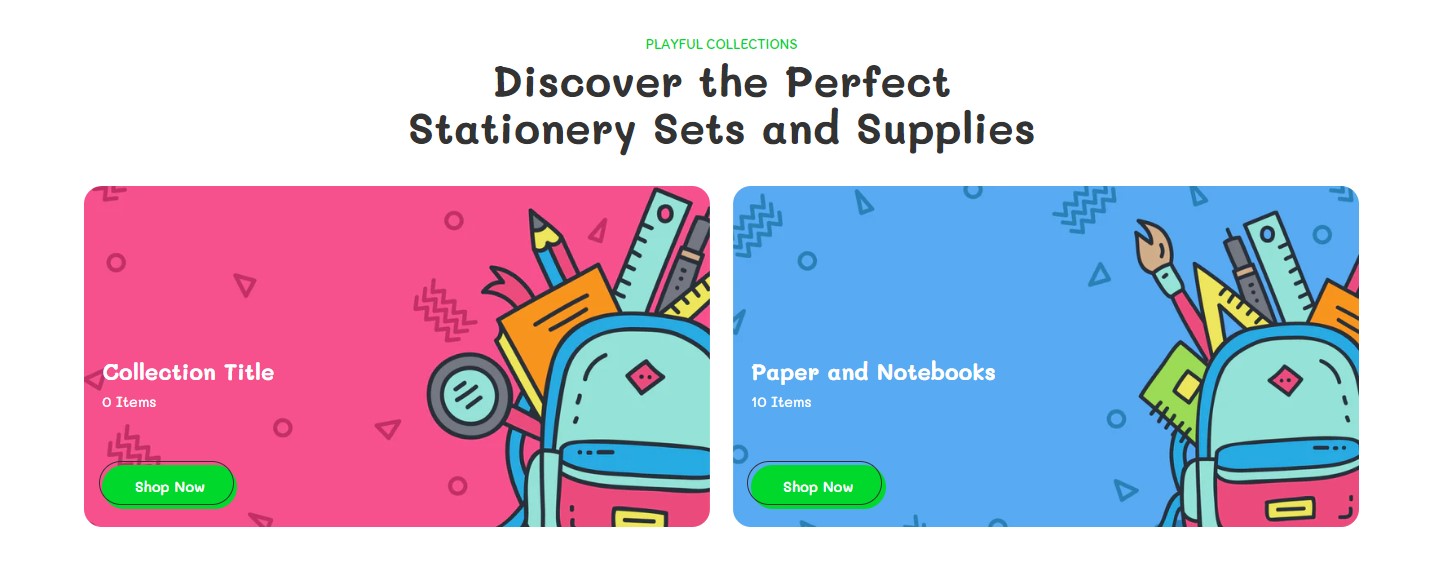
In the featured collection section you can add multiple Collection.
- In the Collection setting you can add images for Responsive devices
- You can add custom collection title and description
- There are three type of premade Button style Primary, Secondary and Invert Button You can add
Brand Logos
To add this section, please follow the below steps:
- From your Shopify admin, go to Online Store ➝ Themes
- Find the theme that you want to edit, and then click Customize.
- Click Add section and choose Brand Logos.
- In the Brand Logos, you can customize the Title Box Bottom Space and Section spacing.
- Also, you can customize your logo grid type by slider and grid.
- You can control your slider setting by slider scroll, slider animation, and slider speed.
![]()
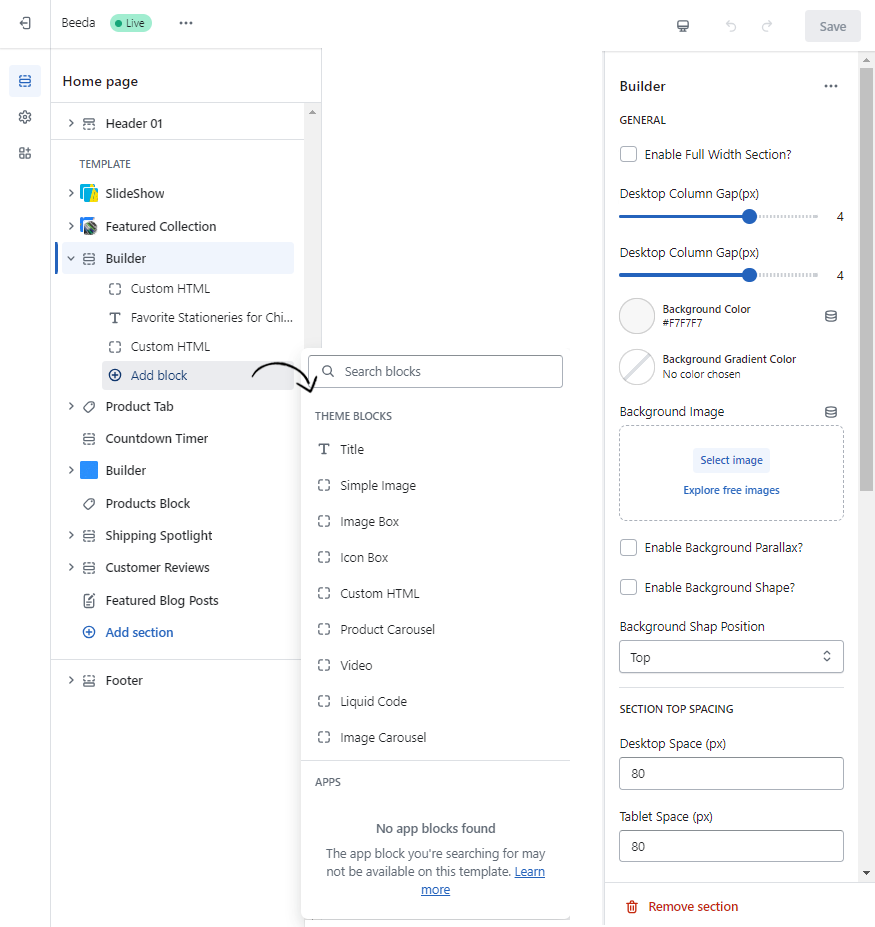
Builder
To add this section, please follow the below steps:
- From your Shopify admin, go to Online Store ➝ Themes
- Find the theme that you want to edit, and then click Customize.
- Click Add section and choose Builder.
- In the Builder section, you can add several “Theme Blocks” like Title, Simple Image, Image Box, Icon Box, Custom HTML, Product Carrousel, Image Carrousel, Videos, and Liquid code.
- In the different theme block you are allows to customize the setting as per theme block
- You can customize the section block by managing full width section enabling, Background shape position by (top and bottom), column gaps and spacing.
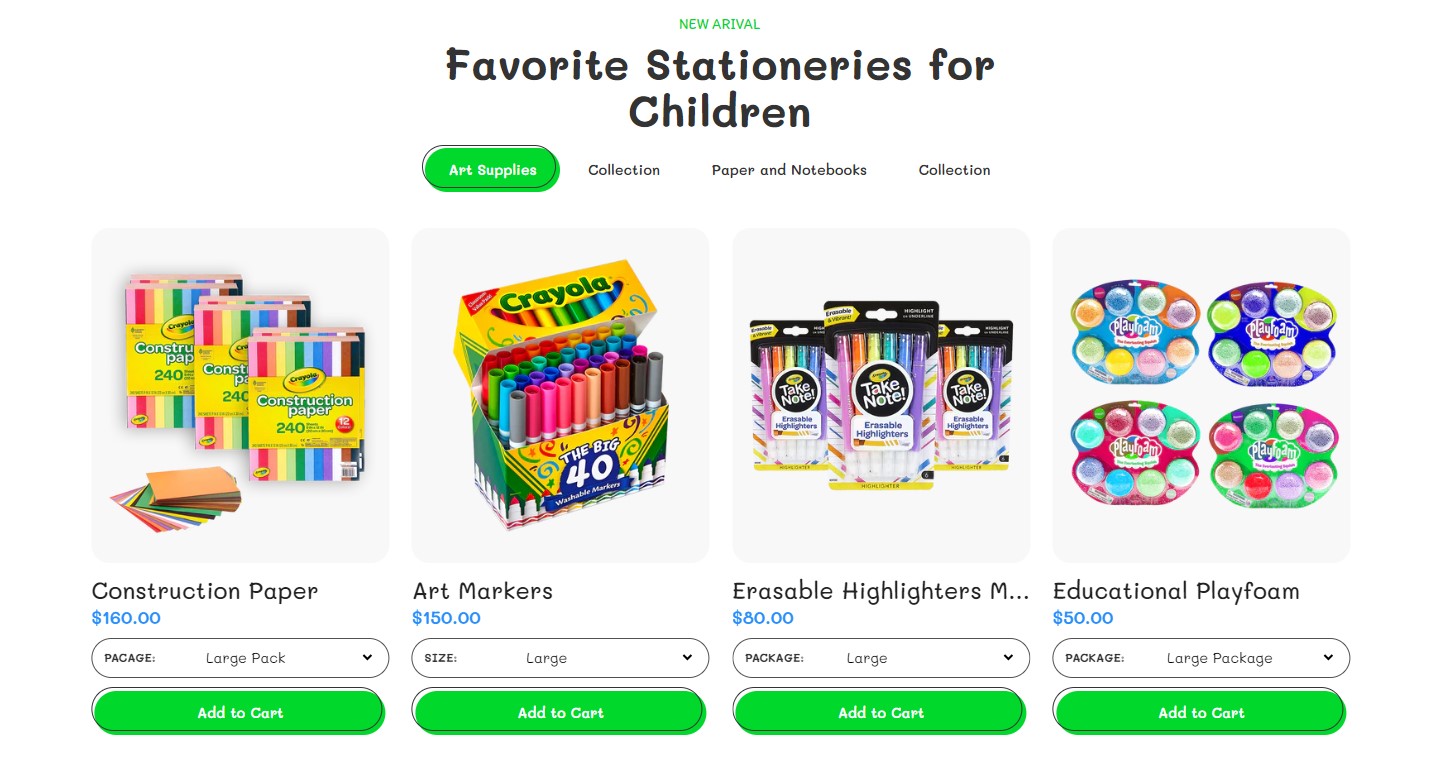
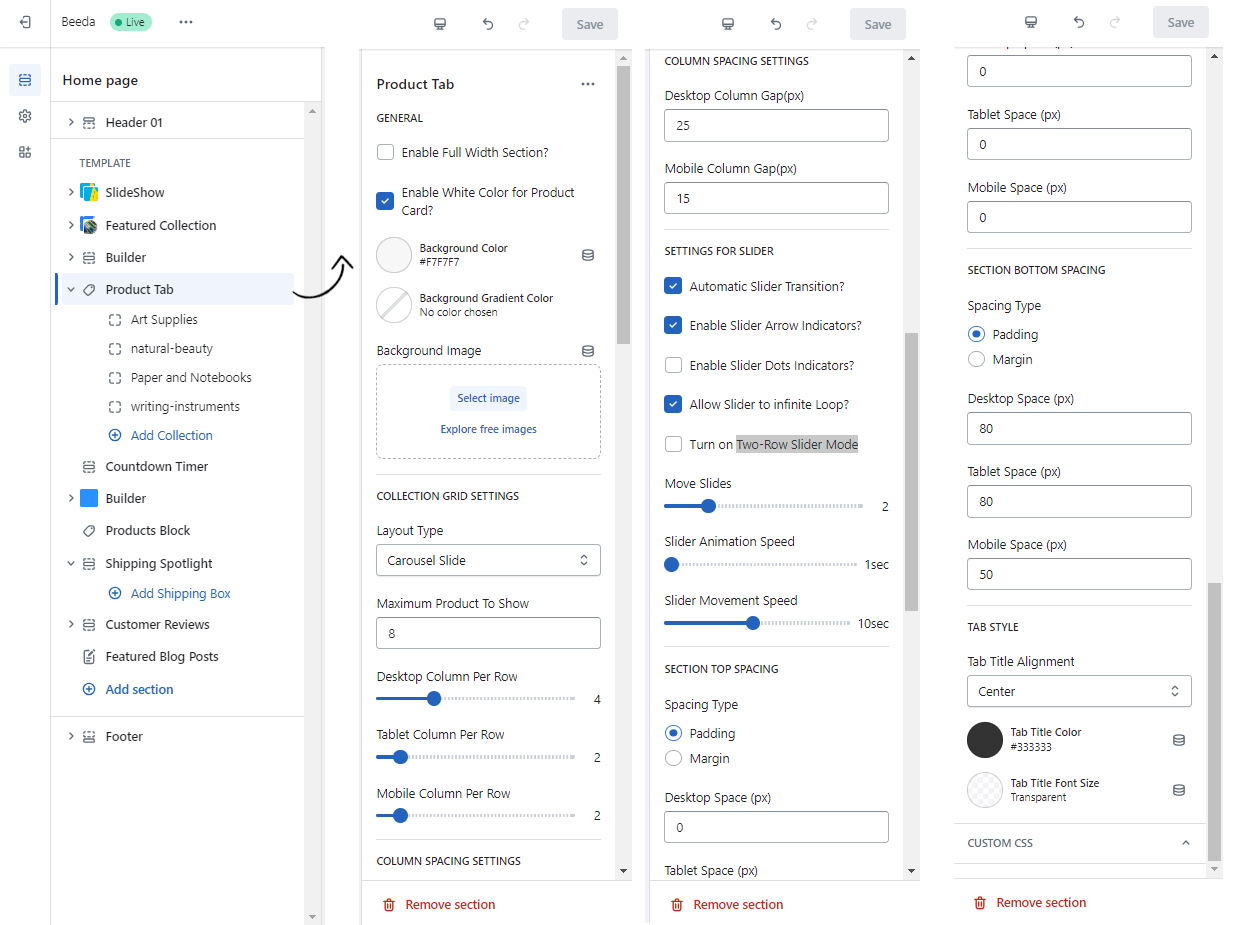
Product Tab
To add this section, please follow the below steps:
- From your Shopify admin, go to Online Store ➝ Themes.
- Find the theme that you want to edit, and then click Customize.
- Click Add section and choose Product Tabs.
- You can customize the Collection Product Tabs by managing Maximum Product Count.
- Kidverz allows you to control the grid setting by layout type (Grid and carrousel) and maximum product to show
- In the Product Tab you can enable or disable the slider settings like, slider Transition, arrow indecator,
dot indecator, infinite loop and Two-Row slider mode.
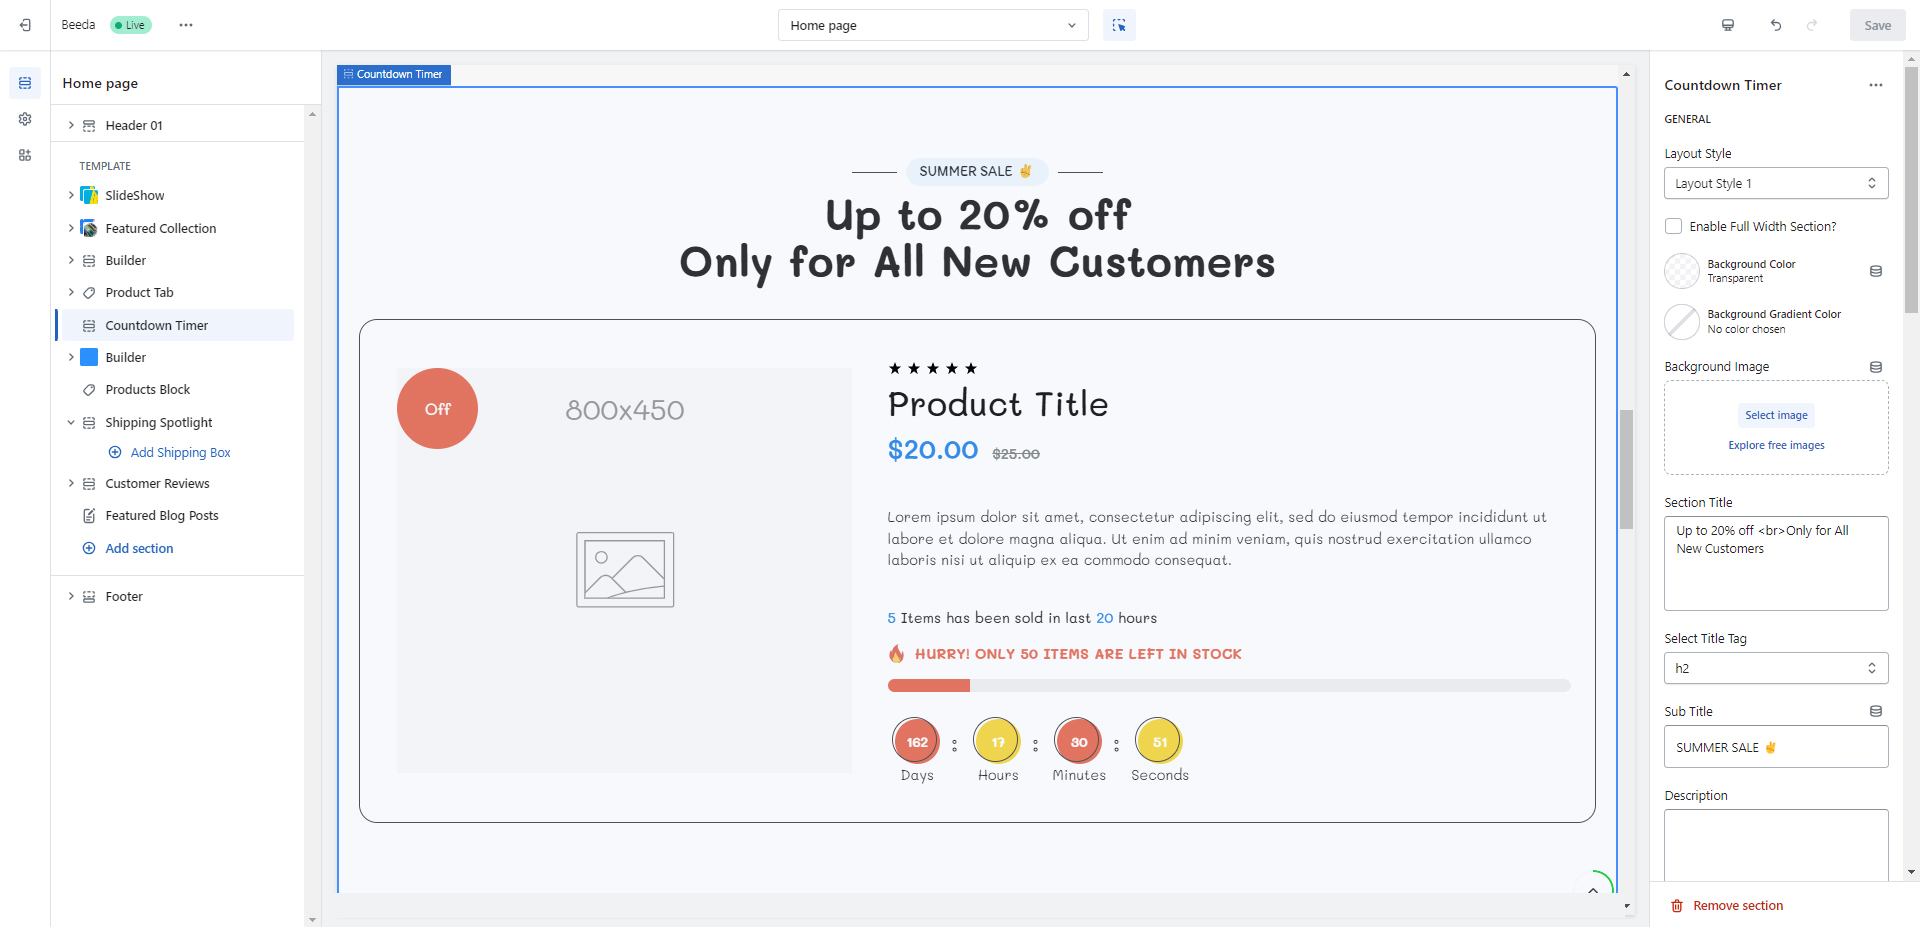
Countdown Timer
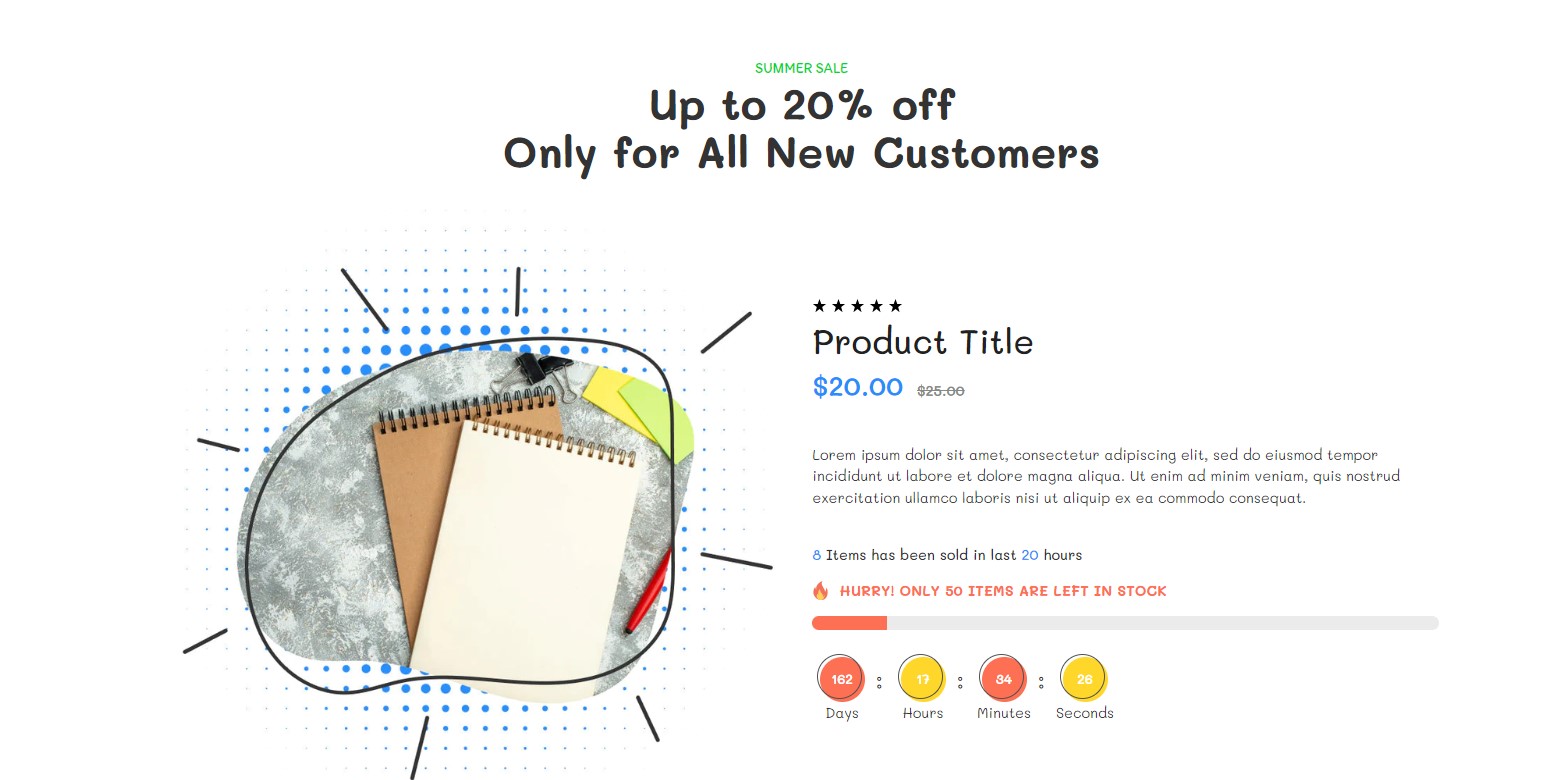
To add this section, please follow the below steps:
- From your Shopify admin, go to Online Store ➝ Themes.
- Find the theme that you want to edit, and then click Customize.
- Click Add section and choose Countdown Timer.
- You can customize the countdown timer by managing offer countdown settings, Banner images, product settings, and spacing.
- You can add Product description, Soldout Timer Setting like (Number Of Products & Hours)
- Also you can change the title box alignment
- Title box spacing
- click Save to update the changes
Featured Blog Posts
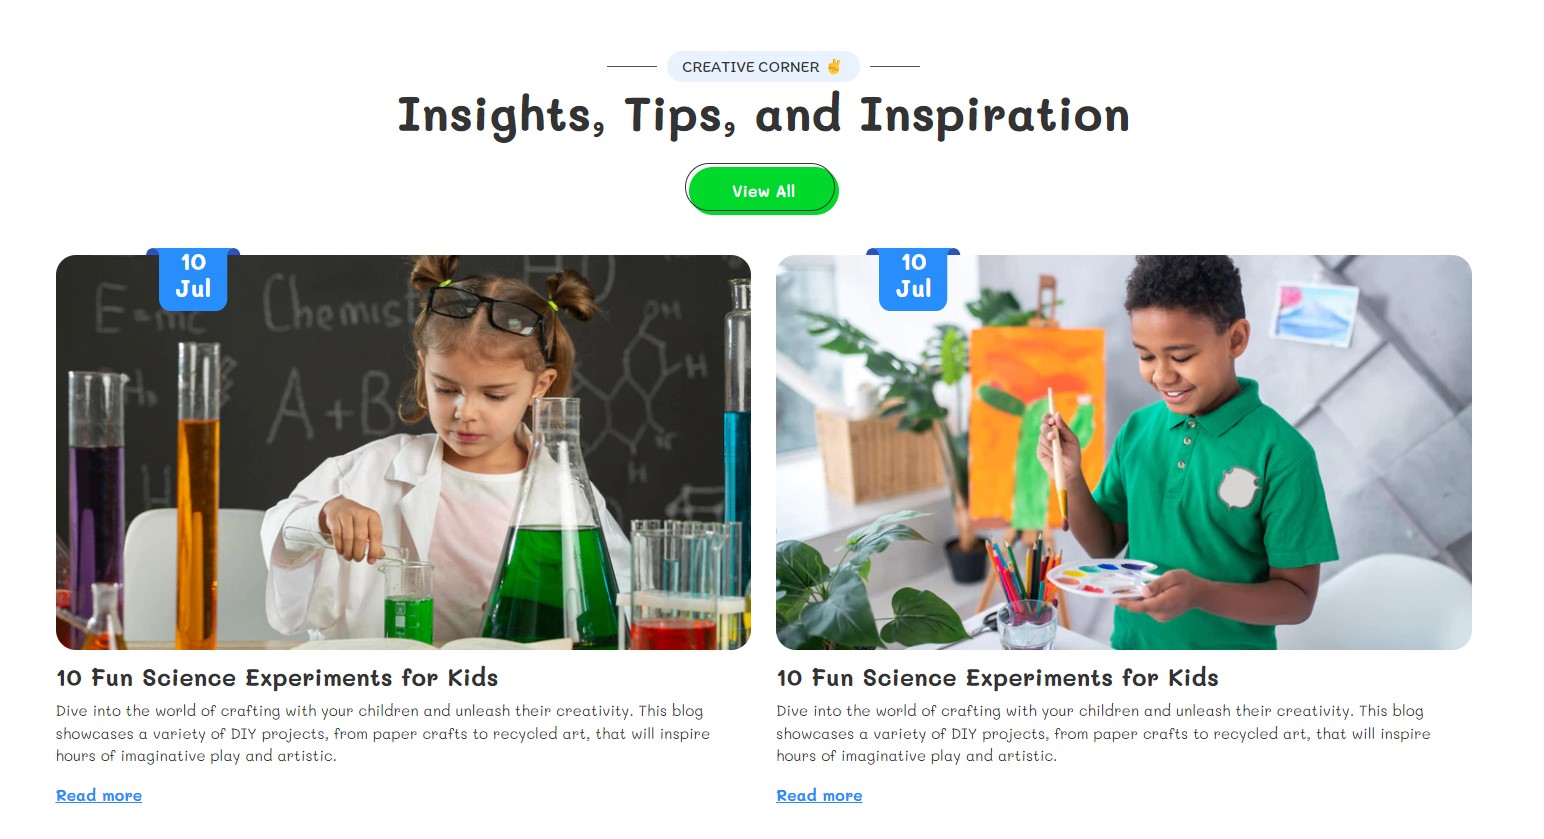
To add this section, please follow the below steps:
- From your Shopify admin, go to Online Store ➝ Themes.
- Find the theme that you want to edit, and then click Customize.
- Click Add section and choose Featured Blog Posts.
- Kidverz allows you to select two types of premade blog style
- You can customize the Featured blog posts by ‘ Spacing and Blog Grid style ny grid and carousel slide
- Also you can control the Maximum Number of Blog Posts
- spacing and Settings for Slider Transition, Arrow Indicators, Dots Indicators is also avaliable for you.
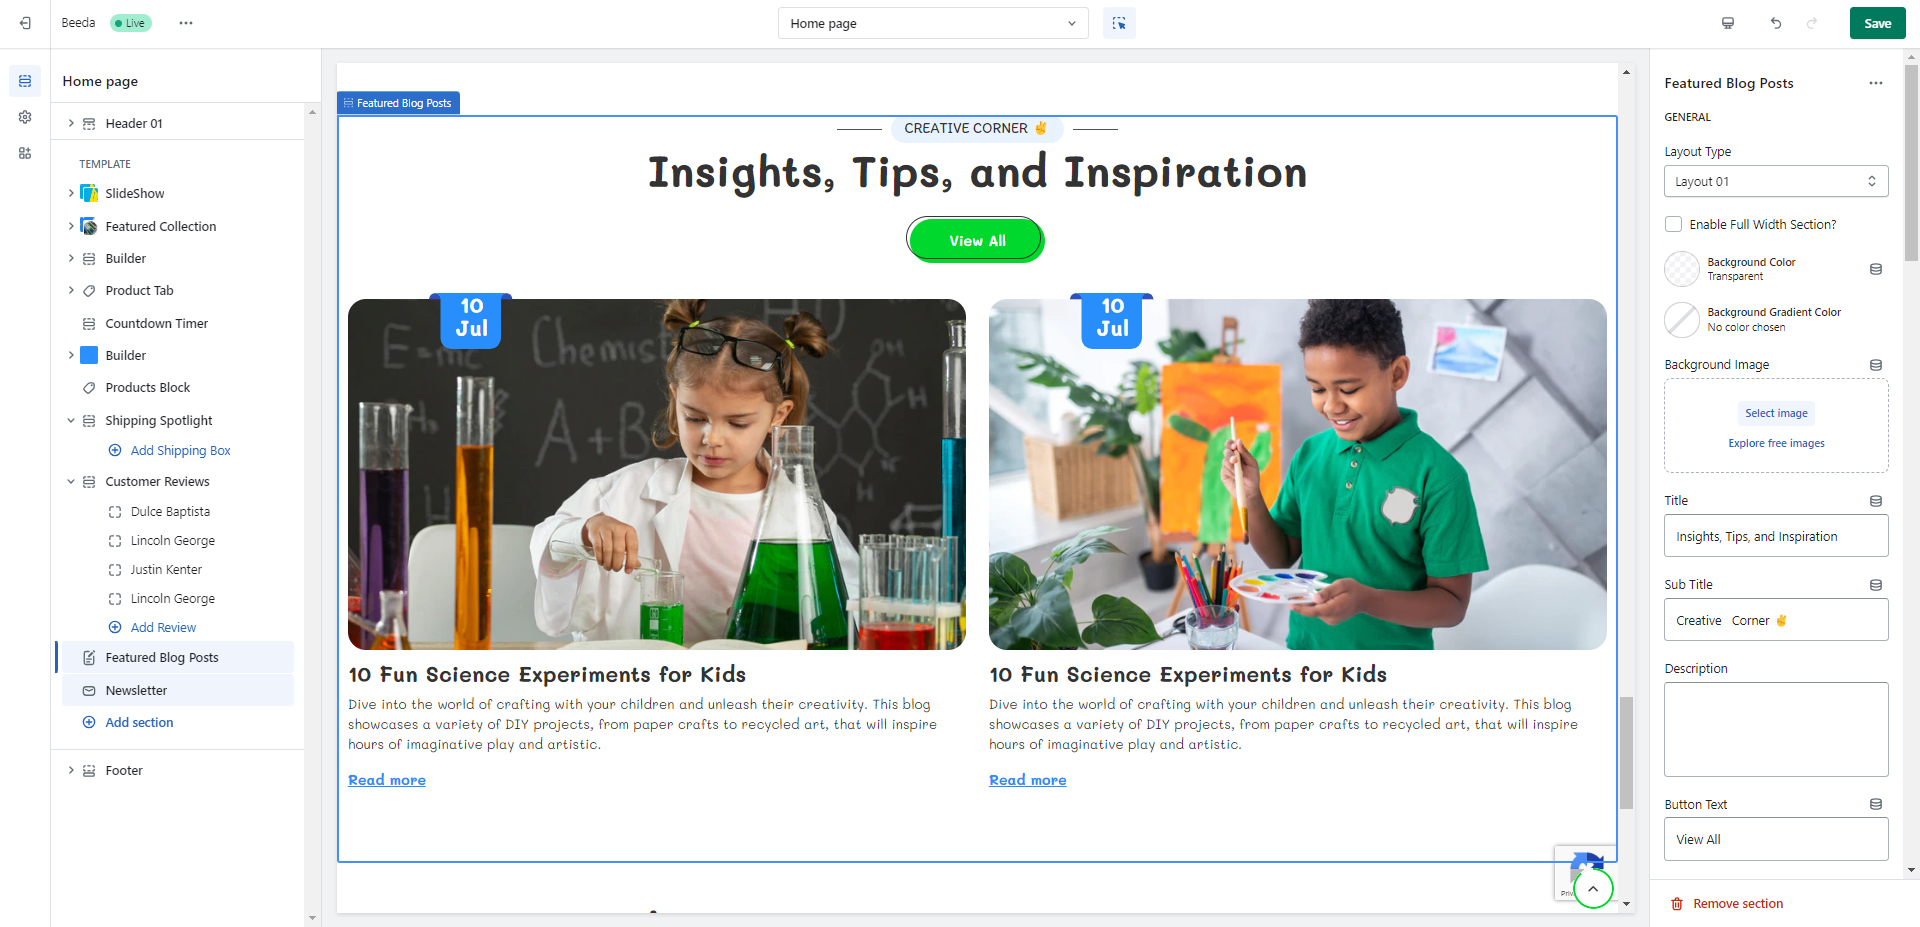
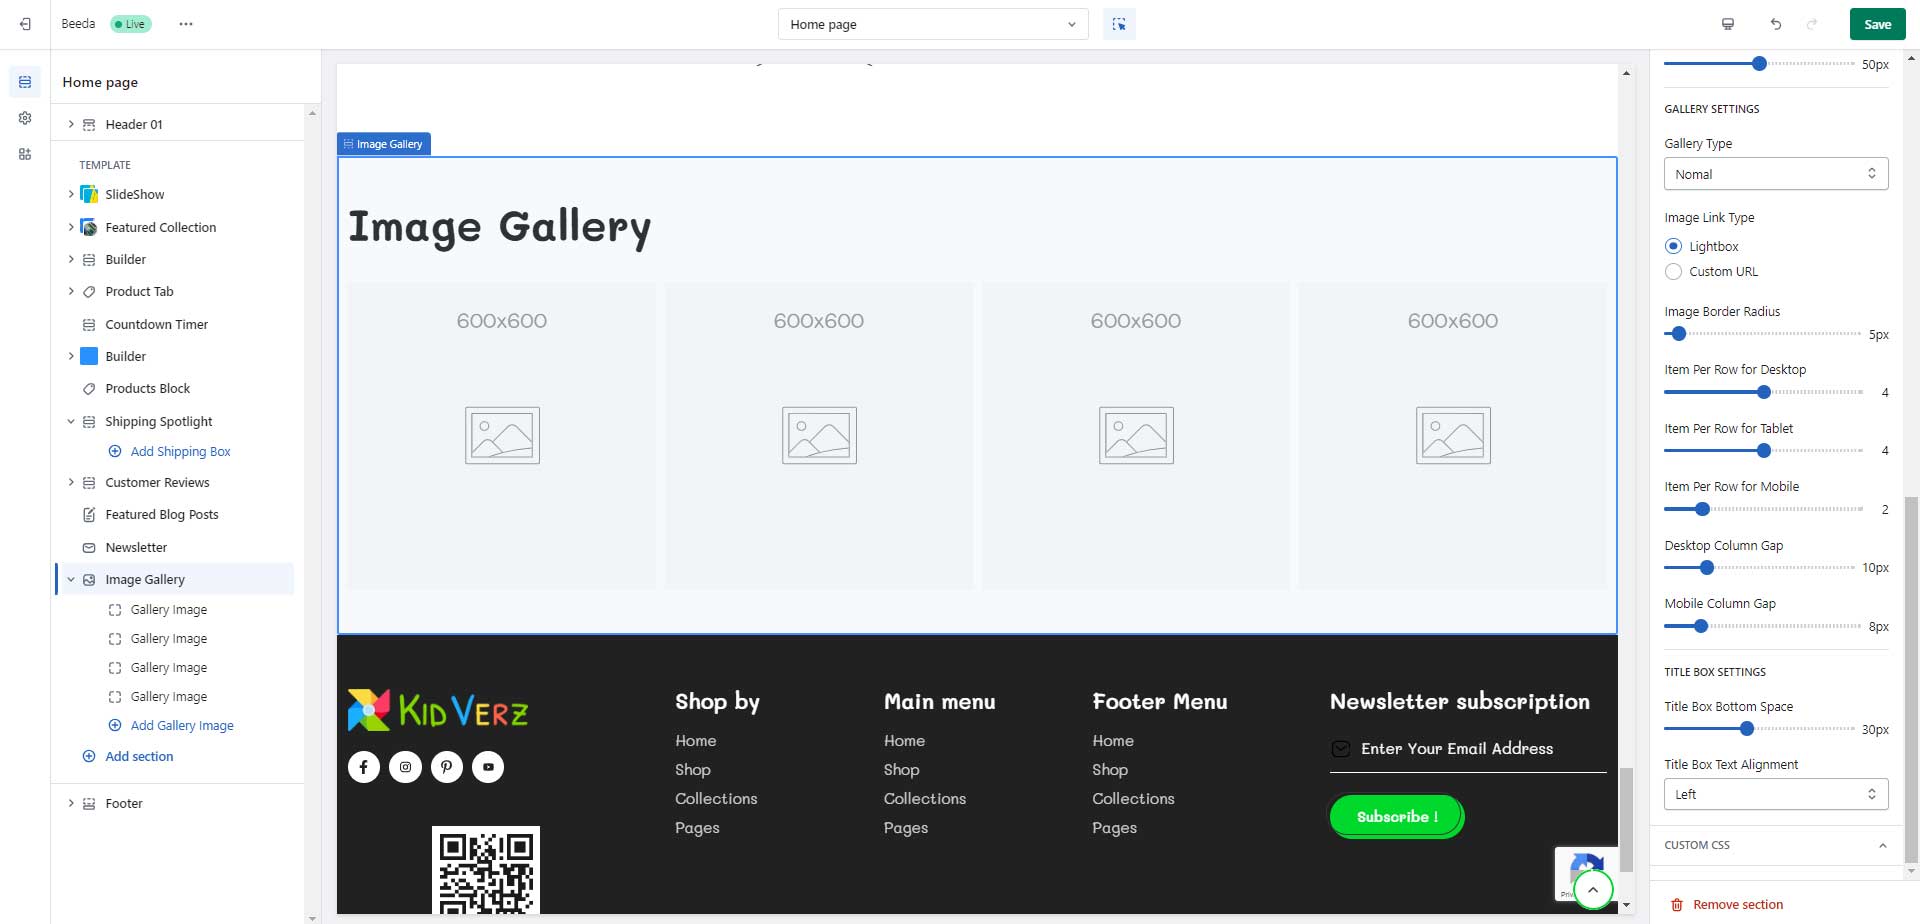
Image Gallery
To add this section, please follow the below steps:
- From your Shopify admin, go to Online Store ➝ Themes.
- Find the theme that you want to edit, and then click Customize.
- Click Add section and choose Image Gallery.
- You can customize the Image gallery by Spacing, Settings for Slider layout, Slider center mode settings, and style settings. gallery lightbox settings, and title box settings.
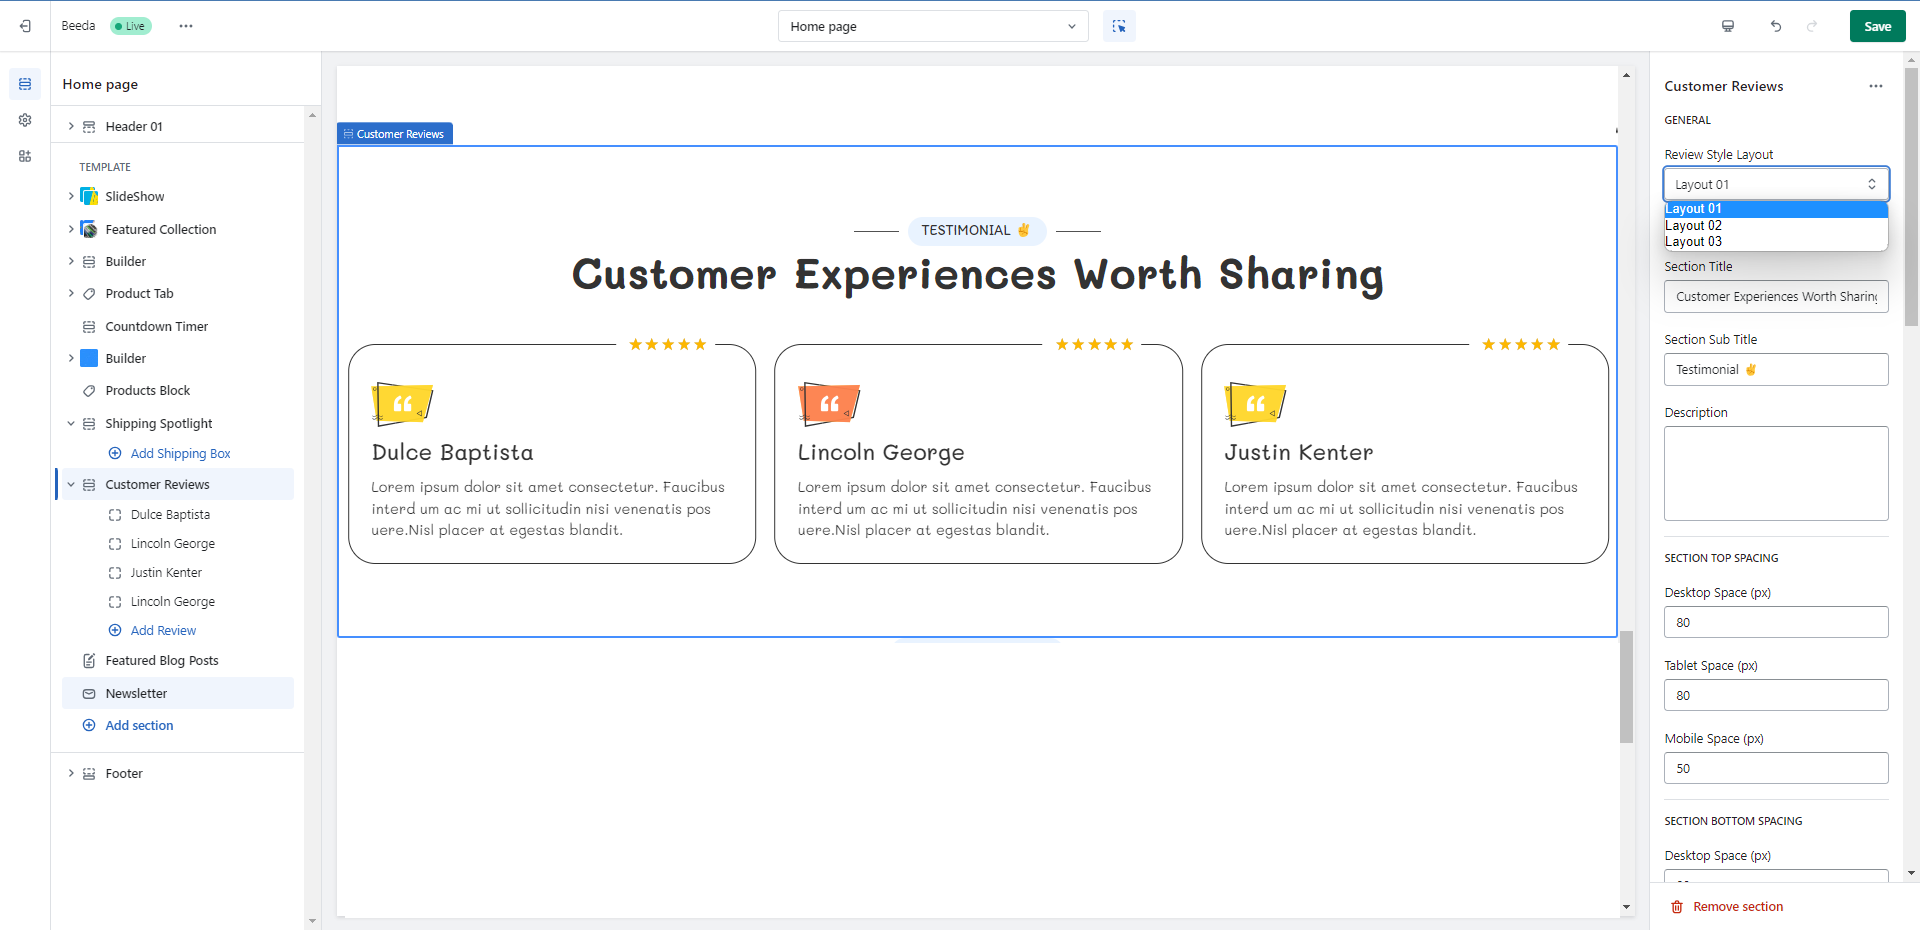
Cusmoter Reviews
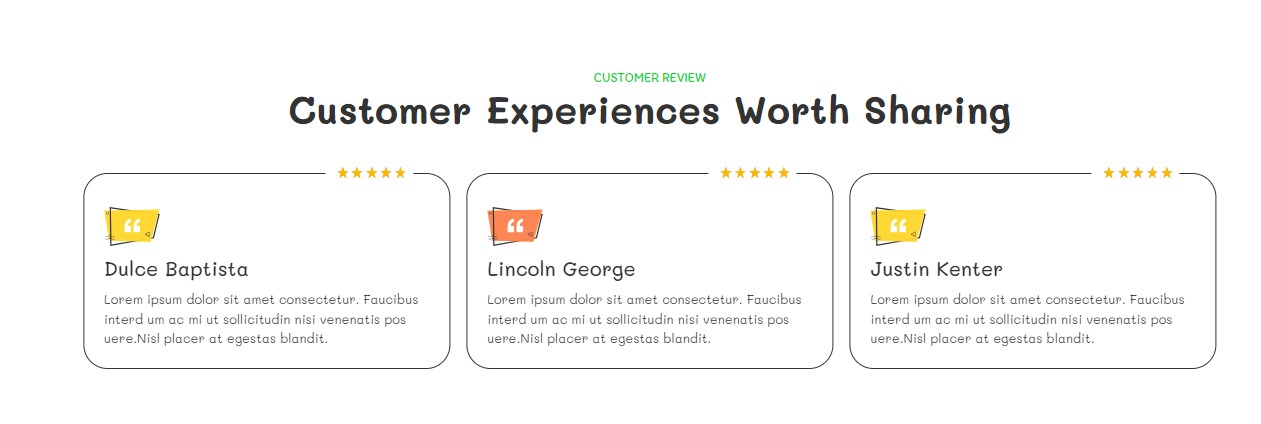
To add this section, please follow the below steps:
- From your Shopify admin, go to Online Store ➝ Themes.
- Find the theme that you want to edit, and then click Customer Reviews.
- Click Add section and choose Testimonial.
- You can select three types of premade review style
- In the Customer Reviews section, you can customize the Section Title, Title Box Text Alignment, Title Box, and Spacing.
- Also, you can customize the Review grid type, Column per row, Slider layout and and Item background color
- For Slider setting you can enable or disable the “Quote Icon , Slider Transition , Arrow Indicators , Dots Indicators and infinite Loop.”
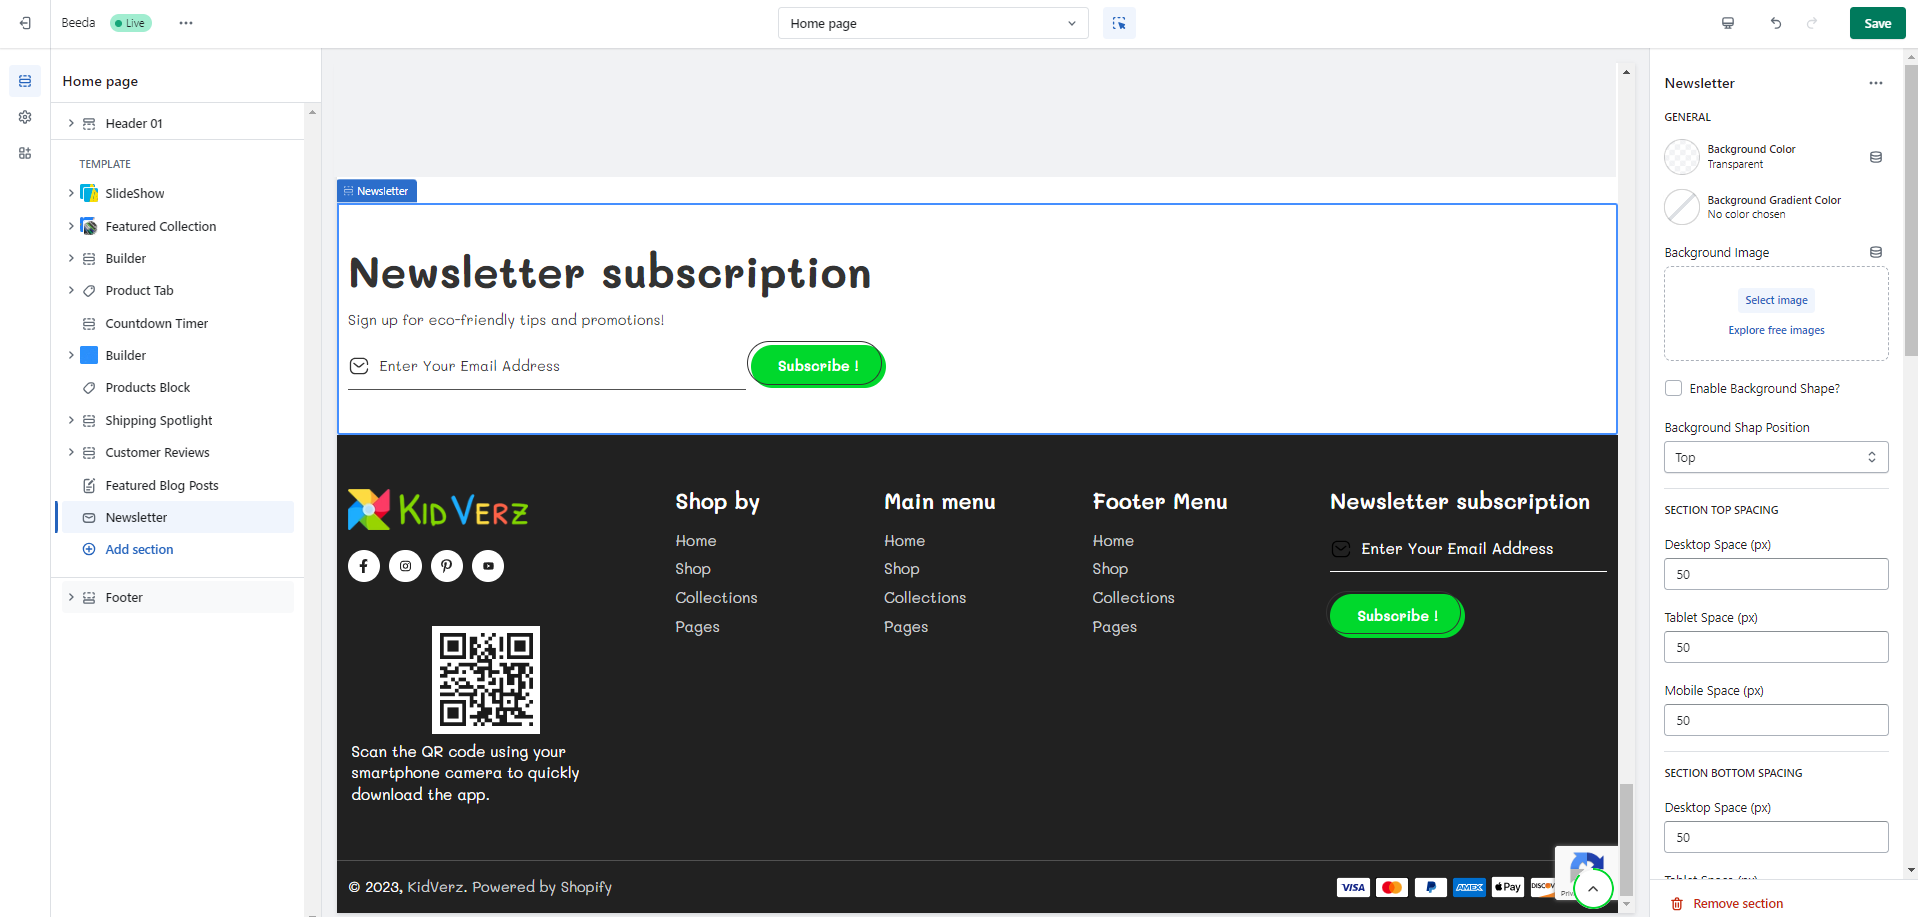
Newsletter
To add this section, please follow the below steps:
- From your Shopify admin, go to Online Store ➝ Themes.
- Find the theme that you want to edit, and then click Customize.
- Click Add section and choose Newsletter.
- You can customize the background color with background image, change the background shape position by (top and bottom)
- Also you can controll spacing, title and paragraph setting with color and font size, and Newsletter form setting with form alignment and button type.
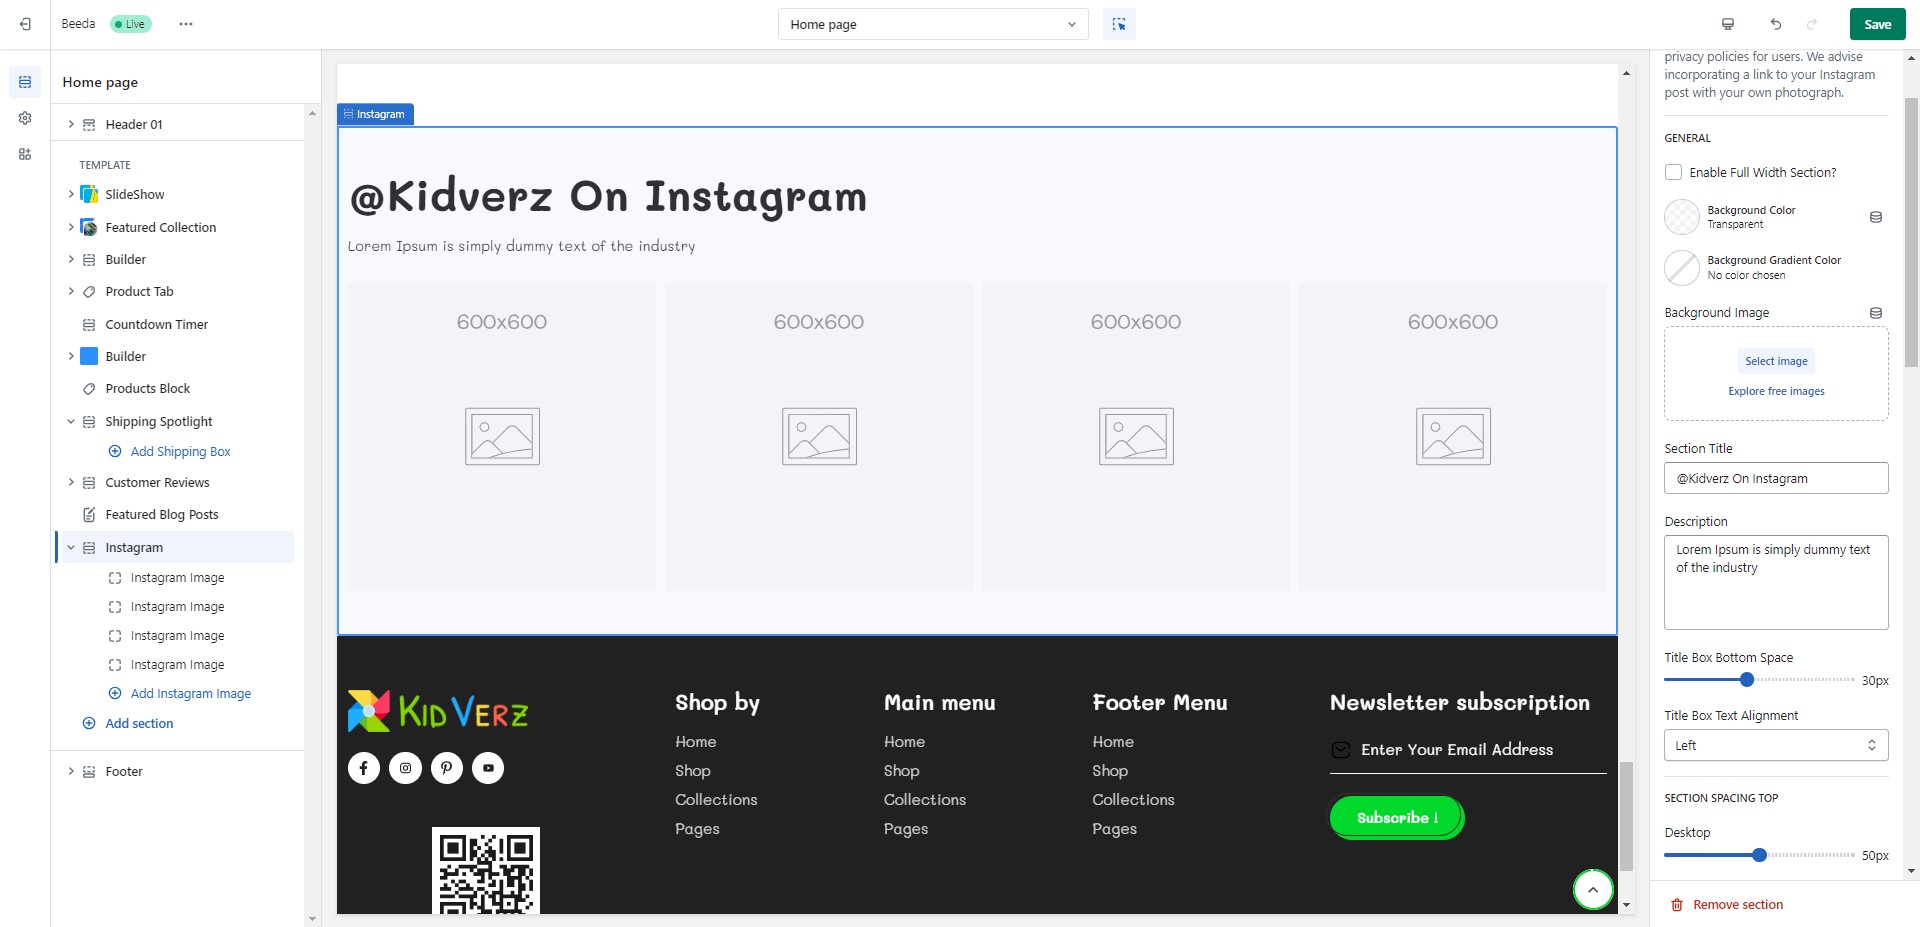
To add this section, please follow the below steps:
- From your Shopify admin, go to Online Store ➝ Themes.
- Find the theme that you want to edit, and then click Customize.
- Click Add section and choose Instagram.
- You can add Gallery image and link with url.
- In the instagram section you can manage section title, section spacing, instagram type, image with lightbox.
- You can also manage the instagram image border radius, responsive view, and slider setting.
Shipping Spotlight
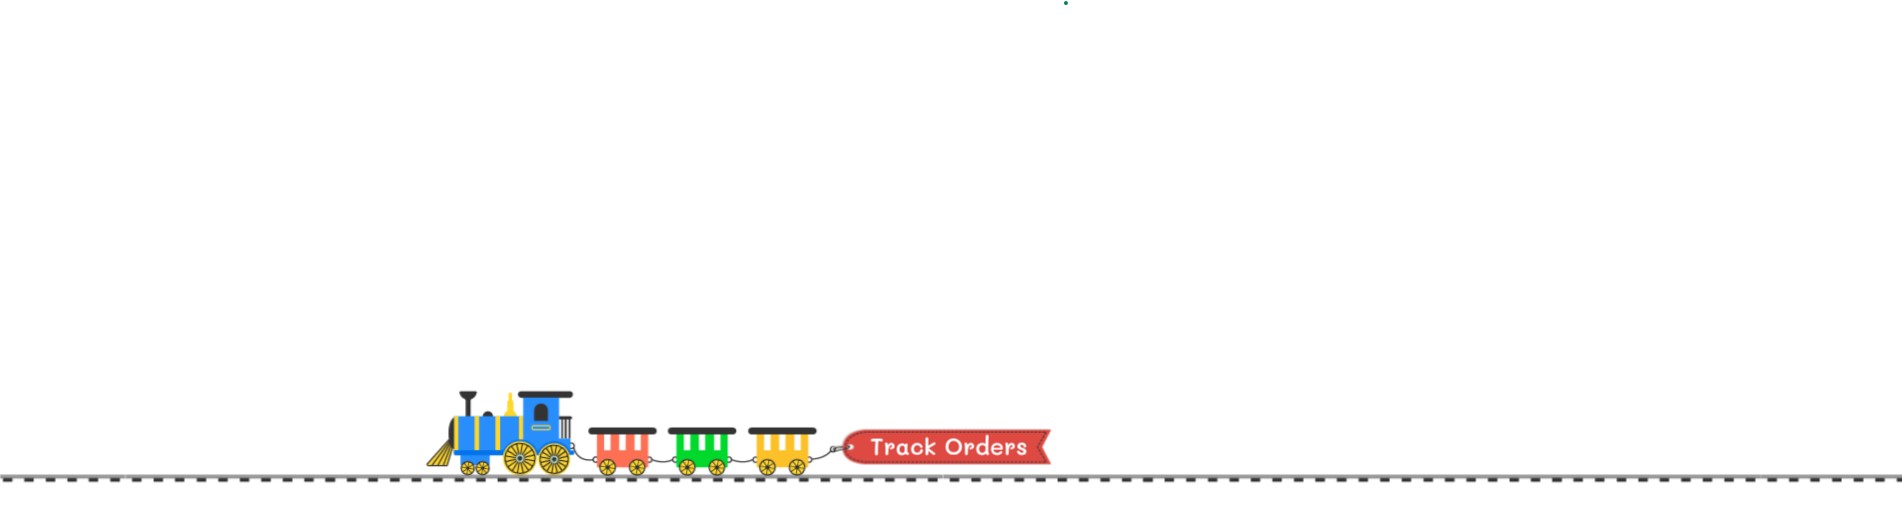
To add this section, please follow the below steps:
- From your Shopify admin, go to Online Store ➝ Themes.
- Find the theme that you want to edit, and then click Customize.
- Click Add section and choose Shipping Spotlight .
- In the Shipping Spotlight section kidverz allows you to add the Lottie JSON URL link which is the best features of kidverz.
- You can also customize the background iamge and section spacinng.

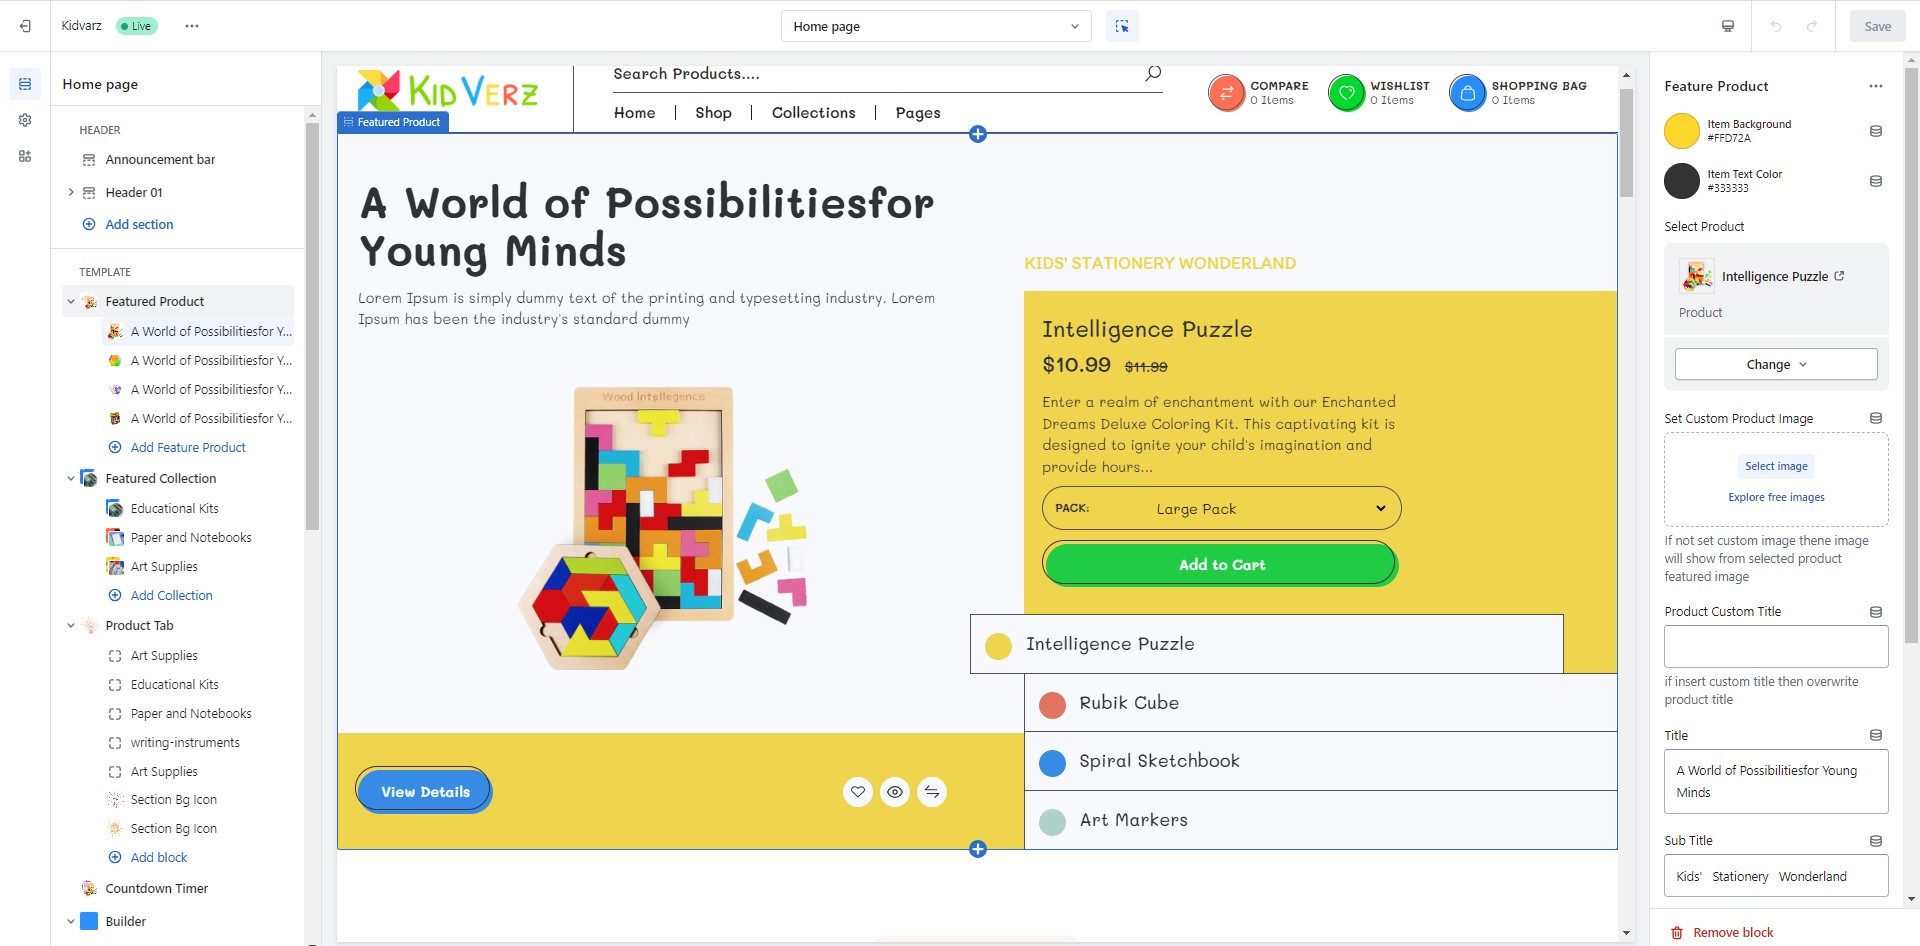
Featured Product
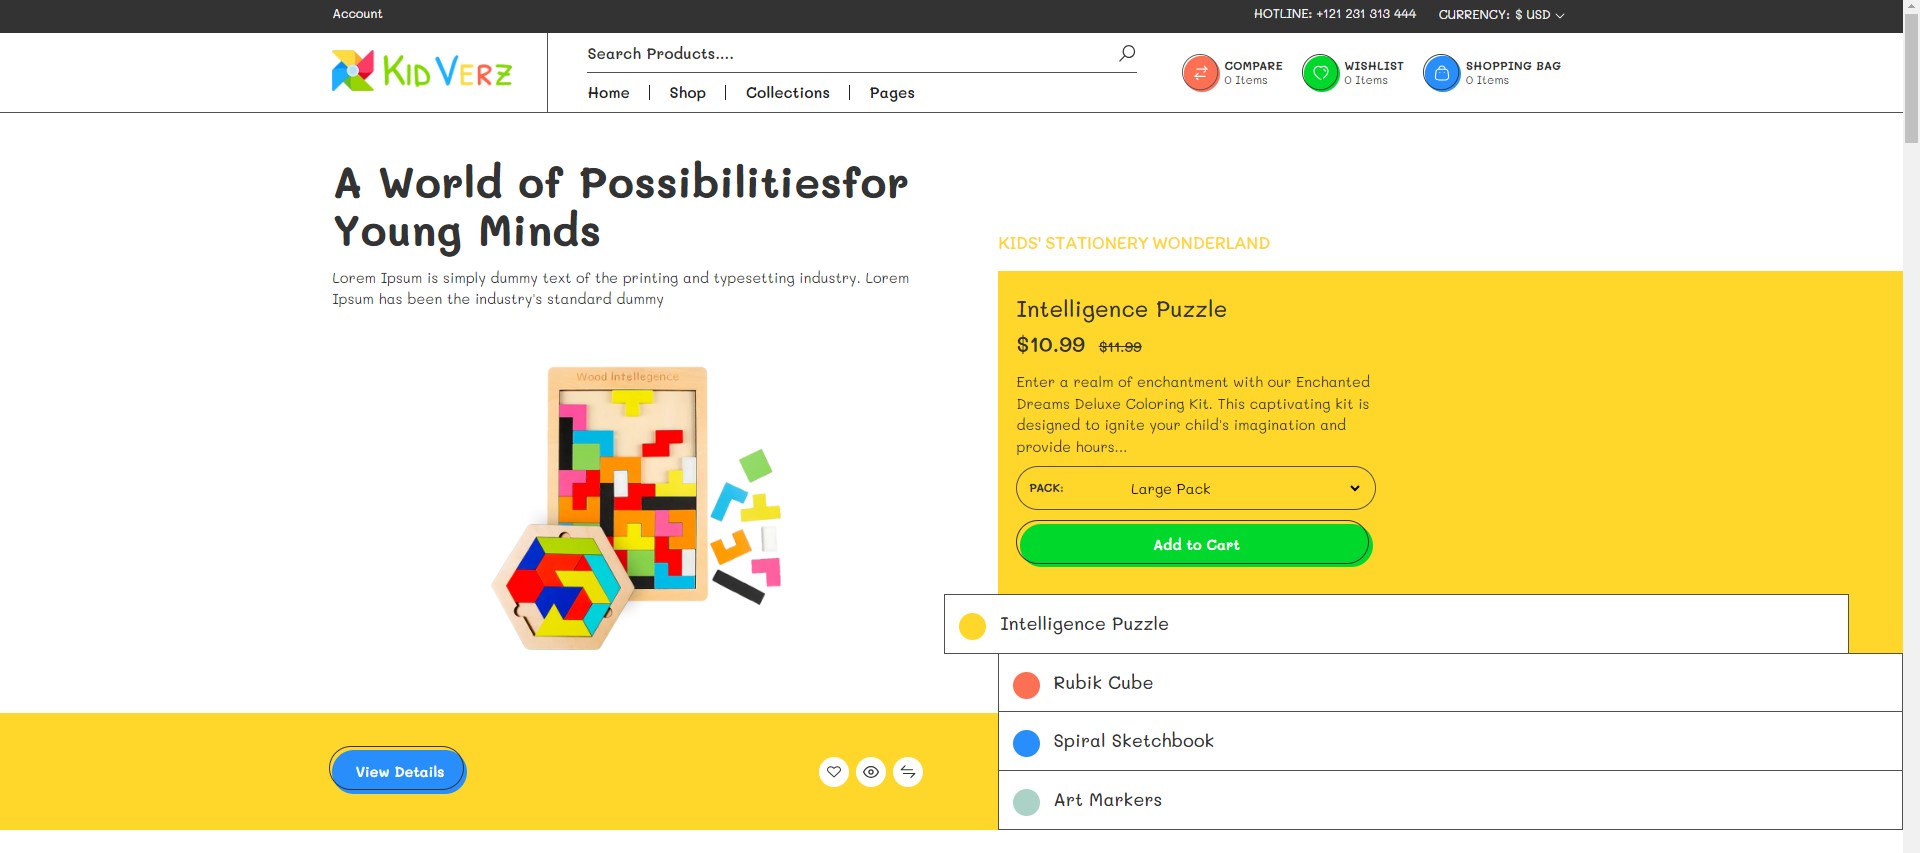
Kidverz allows you to add Featured Product section, please follow the below steps:
- From your Shopify admin, go to Online Store ➝ Themes
- Find the theme that you want to edit, and then click Customize.
- Click Add section and choose Featured Product.
- In the Featured Product section you can customize the section like Background color and title setting
- You can select product from the shopify product listing, change the product image and Custom product title
- Subtitle , HTML content and button setting is also customizable in the Featured Product setion
Bellow image is showing the seeting of Featured Product
Knowledge Base
Fully Documentation of Shopify for your reference: https://help.shopify.com/en
Theme Support
- Answering inquiries or issues in regards to the thing’s issue and its elements.
- Giving updated versions to guarantee the theme works well.
- Fixing bugs and reported issues.
We will make an honest effort to answer your messages straightaway. Be that as it may, we will focus on email with respect to Theme features and issues.
- We will reply your email regarding theme features and issues within 24 hours.
- Regarding emails about template customization, we will reply you within 48 hours (but normally much sooner).
- Based on the native of the issues/ requests/ questions, it might require more time.
DON’T FORGET TO RATE OUR WORK.
Your ideas are highly valued and assist us with making better items.
Many thanks to you.
Social Media
Social Media allows adding social media links to your site.